Acrob: Rozdiel medzi revíziami
Zo stránky SensorWiki
Bez shrnutí editace |
|||
| (97 medziľahlých úprav od rovnakého používateľa nie je zobrazených.) | |||
| Riadok 1: | Riadok 1: | ||
__NOTOC__ | |||
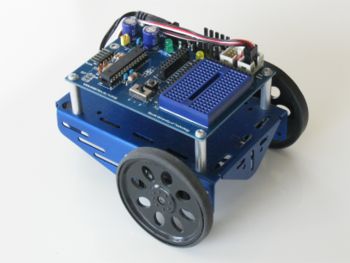
[[Obrázok:AcrobRobot.jpg|thumb|right|350px|Acrob robot.]] | |||
[[Obrázok:logoAcrob.png|200px]] | |||
== | == '''Acrob''' =''' A'''rduino '''C'''ompatible '''Rob'''ot == | ||
__NOEDITSECTION__ | |||
<BR> | |||
Author: ''Richard Balogh'' (<TT>balogh[[Obrázok:Zavinac.gif]]elf.stuba.sk</TT>)<BR> | |||
Acrob is a small mobile robot platform used for education developed at the [http://www.stuba.sk/new/generate_page.php?page_id=132 Slovak University of Technology in Bratislava]. It is a fruitful combination of the great [http://www.parallax.com Parallax] [http://www.parallax.com/go/BoeBot Boe-Bot] robot | |||
with the new electronic board compatible with the popular [http://arduino.cc Arduino] platform. As a result, we have the robot with many | |||
accessories available and programmable in C-like language with many libraries and user forums support. The board is an integrated version of the [http://www.parallax.com/StoreSearchResults/tabid/768/List/0/SortField/4/ProductID/819/Default.aspx?txtSearch=arduino Parallax Board of Education Shield (for Arduino)]. | |||
See also: http://learn.parallax.com/ | |||
<br style="clear: both" /> | |||
<div style="float: left; width: 50%"> | |||
==== English ==== | |||
[[ | # '''[[Acrob technical description|Technical documentation]]''' (technical parameters, schematics,...) | ||
# [[Acrob001|Before You start]] (download, install, setup) | |||
# [http://learn.parallax.com/node/194 Build your robot] (hardware mount) | |||
# [[Acrob002|Hello, World!]] (serial output, TODO: variables) | |||
# [[Acrob003|LED Blink]] (digital output, delays) | |||
# [[Acrob004|Pushbutton]] (digital input, conditions, statements) | |||
# [[Acrob005|Piezospeaker]] (digital output, tone, reset) | |||
# [[Acrob006|Basic movements]] (analog output, PWM, servo, robot kinematics) | |||
# [[Acrob007|Distance sensor]] (analog input, distance sensor) | |||
# [[Acrob008|Line sensor I.]] (analogue) | |||
# [[Acrob009|Line sensor II.]] (digital) | |||
# [[Acrob010|Line following robot with obstacle avoidance]] | |||
# [[Acrob015|Ultrasonic sensor]] (time measurement) (see also [[Acrob115|HCSR04]]) | |||
# [[Acrob020|Whiskers]] (digital obstacle detection) | |||
# [[Acrob030|Compass]] (digital compass sensor) | |||
# [[Acrob040|Color sensor]] (digital color sensor) | |||
# [[Acrob050|Accelerometer]] (dual axis accelerometer) | |||
# [[Acrob060|Line Follower Sensor]] | |||
# | |||
# [https://learn.sparkfun.com/tutorials/analog-vs-digital Basics] (analog vs. digital, discrete vs. continuous) | |||
</div><div style="float: left; width: 50%"> | |||
==== Slovak (obsolete) ==== | |||
# [[Acrob01|Hello, World.]] (prvý program) | |||
# [[Acrob02|LED Blink.]] (digitálne výstupy, oneskorenie) | |||
# [[Acro02b|Pushbutton.]] (digitálne vstupy, podmienky) | |||
# [[Acro02c|Piezospeaker.]] (zvuky, reset) | |||
# [[Acrob03|Basic movements.]] (základný pohyb robota) | |||
# [[Acrob04|Distance sensor.]] (analógový vstup, snímač vzdialenosti) | |||
# [[Acrob05|Line sensor I.]] (snímač čiary, analógový) | |||
# [[Acrob06|Line sensor II.]] (snímač čiary, digitálny) | |||
# [[Acrob07|Line following robot with obstacle avoidance.]] | |||
# [http://ap.urpi.fei.stuba.sk/sensorwiki/index.php/LCD_displej LCD displej] (pripojenie, komunikácia) | |||
# [http://www.virtronics.com.au/Simulator-for-Arduino.html Arduino Simulator] | |||
<BR> | |||
<FONT Color="red"> | |||
==== Robotika Cvičenia ==== | |||
</FONT> | |||
[[ | * [[Zadanie z robotiky|Zadania z robotiky 2012]] | ||
* [[Zadanie z robotiky 2011|Zadania z robotiky 2011]] | |||
* [https://spreadsheets.google.com/spreadsheet/viewform?formkey=dHZyVlctVUdGTVZCZUZGUkg5U1V1Y2c6MQ Dotazník] - prosím, ohodnoťte cvičenia (vopred vďaka) | |||
* [https://spreadsheets.google.com/ccc?key=0AhS3f3dCsrEvdDdFbGg5Vl9WN3FwV0tjSDZyUVVGWXc&hl=en&authkey=CMXXvrQO Tabuľka s bodmi z cvičení] (kde nič nie je, chýba referát) | |||
* [http://www.robotika.sk/misc/Straty_a_Nalezy_Robotika2011.png Straty a nálezy] (pero, prsten, zosit, usb kluc: balogh@elf.stuba.sk ) | |||
<BR> | |||
<BR> | |||
</div><BR> | |||
<BR><BR><BR> | |||
== Read more == | |||
* Richard Balogh: ''[http://ap.urpi.fei.stuba.sk/balogh/pdf/10ATPplusAcrob.pdf Acrob - an Educational Robotic Platform]'', AT&P Journal Plus magazine, November, 2010. Vol. 10(2), pp. 6-9. <nowiki>[</nowiki>[http://ap.urpi.fei.stuba.sk/balogh/balogh2010h.html Abstract]<nowiki>] [</nowiki>[http://ap.urpi.fei.stuba.sk/balogh/balogh2010h.html BibTeX]<nowiki>] [</nowiki>[http://ap.urpi.fei.stuba.sk/balogh/pdf/10ATPplusAcrob.pdf PDF]<nowiki>]</nowiki> | |||
* Richard Balogh: ''[http://ap.urpi.fei.stuba.sk/balogh/pdf/11RiEAcrob.pdf Laboratory exercises with Acrob robot]'', In: Proceedings of 2nd International Conference on Robotics in Education (RiE 2011)., pp. 41-46. Vienna, Austria. <nowiki>[</nowiki>[http://ap.urpi.fei.stuba.sk/balogh/balogh2011c.html Abstract]<nowiki>] [</nowiki>[http://ap.urpi.fei.stuba.sk/balogh/balogh2011c.html BibTeX]<nowiki>] [</nowiki>[http://ap.urpi.fei.stuba.sk/balogh/pdf/11RiEAcrob.pdf PDF]<nowiki>]</nowiki> | |||
* Richard Balogh: ''[http://ap.urpi.fei.stuba.sk/balogh/pdf/11OssGeda.pdf Using an Open Software for Electronics and Robotics]'', In: Proceedings of the conference on Open Software in Research and Education (OSS 2011), pp. 39 - 47. Žilina, Slovakia. <nowiki>[</nowiki>[http://ap.urpi.fei.stuba.sk/balogh/balogh2011a.html Abstract]<nowiki>] [</nowiki>[http://ap.urpi.fei.stuba.sk/balogh/balogh2011a.html BibTeX]<nowiki>] [</nowiki>[http://ap.urpi.fei.stuba.sk/balogh/pdf/11OssGeda.pdf PDF]<nowiki>]</nowiki> | |||
* Andy Lindsay: ''[http://learn.parallax.com/ Robotics with the Board of Education Shield for Arduino]''. | |||
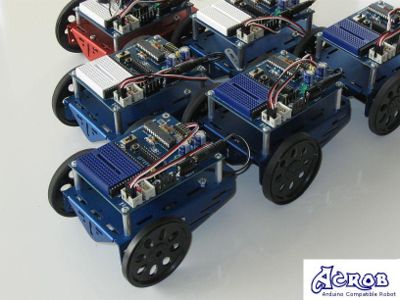
[[Obrázok:AcrobRobots.jpg|thumb|center|400px|Acrob robots.]] | |||
== References == | |||
The Acrob board is (or was) used here: | |||
* Roobotic club Sachisti: https://kruzok.net/index.php/Acrob and their experiences... | |||
* Course ''Robotics'' at the [http://www.stuba.sk/new/generate_page.php?page_id=132 Slovak University of Technology in Bratislava], Slovakia | |||
* Summer school of robotics at the [http://www.technikum-wien.at/en/home/ Fachhochschule Technikum Wien], Austria | |||
* Local Mechatronic Contest organized by the [http://www.best-bratislava.sk/ BEST - Board of European Students of Technology] | |||
* Robotchallenge robotic contest in Linefollower and Puck Collect categories | |||
* Robot with Acrob board won the international RoboCup Jr. 2011 contest in the category RescueJr. B | |||
{| align="center" style="width:80%" | |||
| style="width:100px" | [[Obrázok:logoOpenHW.png|80px]] | |||
| | |||
'''Acrob''' board is open hardware. <BR>Schematic diagram and final pcb were designed using the [http://www.geda-project.org/ gEDA suite] of programs. <BR><BR> | |||
More info on the [[Acrob technical description#Sources|technical documentation page]]... | |||
| [[Obrázok:logo_gEDA.png|200px|right]] | |||
|} | |||
Aktuálna revízia z 13:32, 11. august 2021

Acrob = Arduino Compatible Robot
Author: Richard Balogh (balogh![]() elf.stuba.sk)
elf.stuba.sk)
Acrob is a small mobile robot platform used for education developed at the Slovak University of Technology in Bratislava. It is a fruitful combination of the great Parallax Boe-Bot robot
with the new electronic board compatible with the popular Arduino platform. As a result, we have the robot with many
accessories available and programmable in C-like language with many libraries and user forums support. The board is an integrated version of the Parallax Board of Education Shield (for Arduino).
See also: http://learn.parallax.com/
English
- Technical documentation (technical parameters, schematics,...)
- Before You start (download, install, setup)
- Build your robot (hardware mount)
- Hello, World! (serial output, TODO: variables)
- LED Blink (digital output, delays)
- Pushbutton (digital input, conditions, statements)
- Piezospeaker (digital output, tone, reset)
- Basic movements (analog output, PWM, servo, robot kinematics)
- Distance sensor (analog input, distance sensor)
- Line sensor I. (analogue)
- Line sensor II. (digital)
- Line following robot with obstacle avoidance
- Ultrasonic sensor (time measurement) (see also HCSR04)
- Whiskers (digital obstacle detection)
- Compass (digital compass sensor)
- Color sensor (digital color sensor)
- Accelerometer (dual axis accelerometer)
- Line Follower Sensor
- Basics (analog vs. digital, discrete vs. continuous)
Slovak (obsolete)
- Hello, World. (prvý program)
- LED Blink. (digitálne výstupy, oneskorenie)
- Pushbutton. (digitálne vstupy, podmienky)
- Piezospeaker. (zvuky, reset)
- Basic movements. (základný pohyb robota)
- Distance sensor. (analógový vstup, snímač vzdialenosti)
- Line sensor I. (snímač čiary, analógový)
- Line sensor II. (snímač čiary, digitálny)
- Line following robot with obstacle avoidance.
- LCD displej (pripojenie, komunikácia)
- Arduino Simulator
Robotika Cvičenia
- Zadania z robotiky 2012
- Zadania z robotiky 2011
- Dotazník - prosím, ohodnoťte cvičenia (vopred vďaka)
- Tabuľka s bodmi z cvičení (kde nič nie je, chýba referát)
- Straty a nálezy (pero, prsten, zosit, usb kluc: balogh@elf.stuba.sk )
Read more
- Richard Balogh: Acrob - an Educational Robotic Platform, AT&P Journal Plus magazine, November, 2010. Vol. 10(2), pp. 6-9. [Abstract] [BibTeX] [PDF]
- Richard Balogh: Laboratory exercises with Acrob robot, In: Proceedings of 2nd International Conference on Robotics in Education (RiE 2011)., pp. 41-46. Vienna, Austria. [Abstract] [BibTeX] [PDF]
- Richard Balogh: Using an Open Software for Electronics and Robotics, In: Proceedings of the conference on Open Software in Research and Education (OSS 2011), pp. 39 - 47. Žilina, Slovakia. [Abstract] [BibTeX] [PDF]
- Andy Lindsay: Robotics with the Board of Education Shield for Arduino.

References
The Acrob board is (or was) used here:
- Roobotic club Sachisti: https://kruzok.net/index.php/Acrob and their experiences...
- Course Robotics at the Slovak University of Technology in Bratislava, Slovakia
- Summer school of robotics at the Fachhochschule Technikum Wien, Austria
- Local Mechatronic Contest organized by the BEST - Board of European Students of Technology
- Robotchallenge robotic contest in Linefollower and Puck Collect categories
- Robot with Acrob board won the international RoboCup Jr. 2011 contest in the category RescueJr. B

|
Acrob board is open hardware. |
 |
