Acrob001: Rozdiel medzi revíziami
Z SensorWiki
(Nová stránka: == 1. Úloha == Spustite vývojové prostredie kliknutím na ikonu Obrázok:ArduinoIcon.png. Najprv spravte základné nastavenia - t.j. typ riadiacej jednotky s ktorou budeme ...) |
|||
| Riadok 1: | Riadok 1: | ||
| − | == | + | == Setup == |
| − | + | The Arduino integrated development environment (IDE) is run using the icon [[Obrázok:ArduinoIcon.png]] on Your desktop. | |
| − | |||
| − | + | First You have to perform the basic settings: the type of Your board and serial port to which is it connected. | |
| − | |||
| − | |||
| − | + | Go to the menu and select Tools -> Board -> Arduino Diecimila, Duemilanove or Nano w/ Atmega168. | |
| − | + | This is the type of the board we will use. | |
| − | + | [[Obrázok:ArduinoBoardSetting01.png|center]] | |
| − | |||
| − | |||
| − | |||
| − | |||
| − | + | Then, again from the main menu select Tools -> Ports -> COMx where x is a number of Your serial port to which is the board connected. | |
| − | + | This port is used for communication, sending and receiving messages and also for program download using special firmware ''bootloader''. | |
| − | + | We use the USB/Serial converter, so it is necessary to know, which number is given by the operating system Windows | |
| − | |||
| − | |||
| − | + | [[Obrázok:ArduinoPortSetting01.png|center]] | |
| − | |||
| − | |||
| − | |||
| − | |||
| − | |||
| − | |||
| − | |||
| − | |||
| − | |||
| − | [[Obrázok: | ||
| − | |||
| − | |||
| − | |||
| − | |||
| − | |||
| + | You are ready for Your first programm! | ||
| − | [[Acrob| | + | [[Acrob|Home]] | [[Acrob002|Next >]] |
Verzia zo dňa a času 07:15, 12. jún 2010
Setup
The Arduino integrated development environment (IDE) is run using the icon ![]() on Your desktop.
on Your desktop.
First You have to perform the basic settings: the type of Your board and serial port to which is it connected.
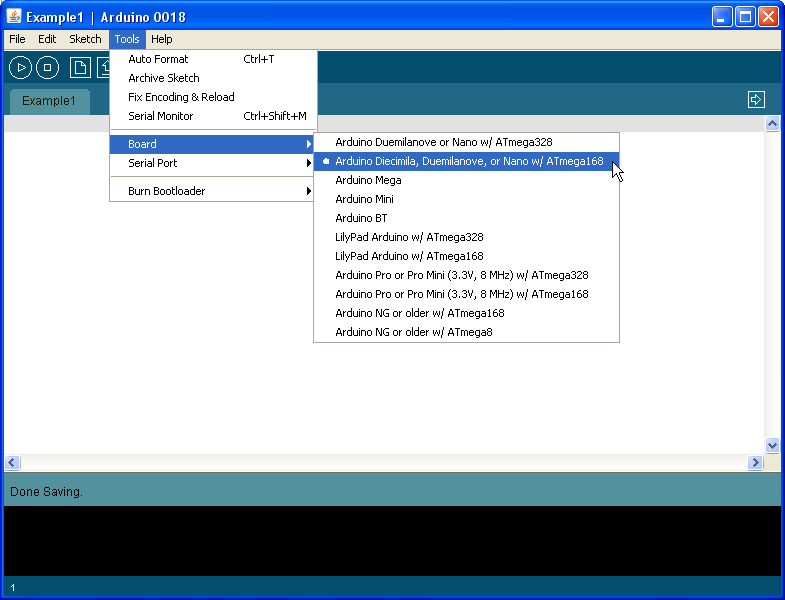
Go to the menu and select Tools -> Board -> Arduino Diecimila, Duemilanove or Nano w/ Atmega168.
This is the type of the board we will use.
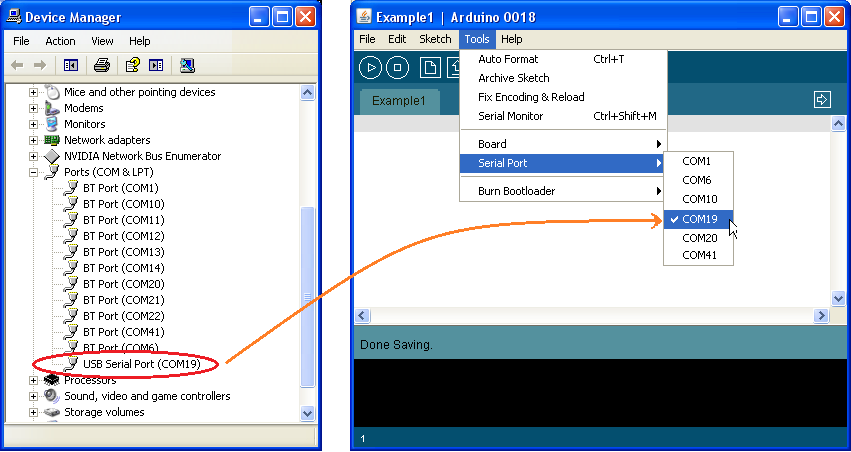
Then, again from the main menu select Tools -> Ports -> COMx where x is a number of Your serial port to which is the board connected. This port is used for communication, sending and receiving messages and also for program download using special firmware bootloader. We use the USB/Serial converter, so it is necessary to know, which number is given by the operating system Windows
You are ready for Your first programm!

