Acrob002: Rozdiel medzi revíziami
Zo stránky SensorWiki
Nová stránka: Here is a source code for Your first program. <source lang="c"> void setup() { Serial.begin(9600); } void loop() { Serial.println("Hello, World!"); } </source> It should look li... |
Bez shrnutí editace |
||
| Riadok 29: | Riadok 29: | ||
Then the program performs an infinity <TT>loop()</TT>. There is defined the whole operation of Your program. | Then the program performs an infinity <TT>loop()</TT>. There is defined the whole operation of Your program. | ||
=== | === IDE description === | ||
If You just want to verify Your program, You can just compile it [[Obrázok:ArduinoButtonCompile.png|29px]] without downloading | If You just want to verify Your program, You can just compile it [[Obrázok:ArduinoButtonCompile.png|29px]] without downloading | ||
| Riadok 37: | Riadok 37: | ||
[[Acrob001|< Previous]] | [[Acrob|Home]] | [[Acrob003| | [[Acrob001|< Previous]] | [[Acrob|Home]] | [[Acrob003|Next >]] | ||
Verzia z 06:52, 12. jún 2010
Here is a source code for Your first program.
void setup()
{
 Serial.begin(9600);
}

void loop()
{
 Serial.println("Hello, World!");
}
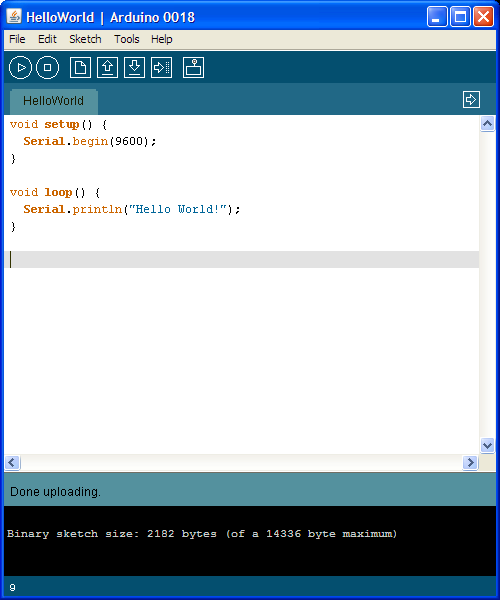
It should look like on the following screen

To run the program on Your board it is necessary to compile and download the program using the ![]() button.
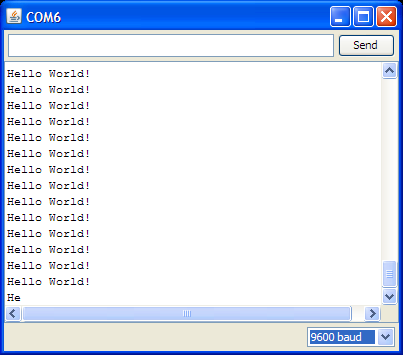
If the operation was successfull, the downloaded program runs automatically. To see how it works, it is necessary to open an additional window with the terminal
button.
If the operation was successfull, the downloaded program runs automatically. To see how it works, it is necessary to open an additional window with the terminal ![]() . It should look like this:
. It should look like this:

How it works
Notice that program contains two blocks. Section setup() runs just once, during the startup. Usually contains settings, definitions and hardware initialization and configuration commands.
Then the program performs an infinity loop(). There is defined the whole operation of Your program.
IDE description
If You just want to verify Your program, You can just compile it ![]() without downloading
to Your board.
without downloading
to Your board.
Don't forget to save Your work often using the ![]() button.
button.
< Previous | Home | Next >