MEMS cvičenie 3: Rozdiel medzi revíziami
Zo stránky SensorWiki
Bez shrnutí editace |
|||
| Riadok 61: | Riadok 61: | ||
Nasledovný príklad je pre Arduino. | Nasledovný príklad je pre Arduino. | ||
Pozn.: Ak budete vypisovať najprv štvorciferné číslo a potom trojciferné, nezabudnite to štvorciferné najprv vymazať, inak vám tam posledná cifra bude "visieť". Vymazať sa dá napríklad takto: | |||
// 12345678 | |||
lcd.print(" "); | |||
* [https://www.arduino.cc/en/Reference/LiquidCrystal LCD Library] | * [https://www.arduino.cc/en/Reference/LiquidCrystal LCD Library] | ||
Verzia z 10:49, 27. február 2018
Hackathon Praha
Pripojenie LED a LCD displeja a lokálne zobrazenie meranej veličiny
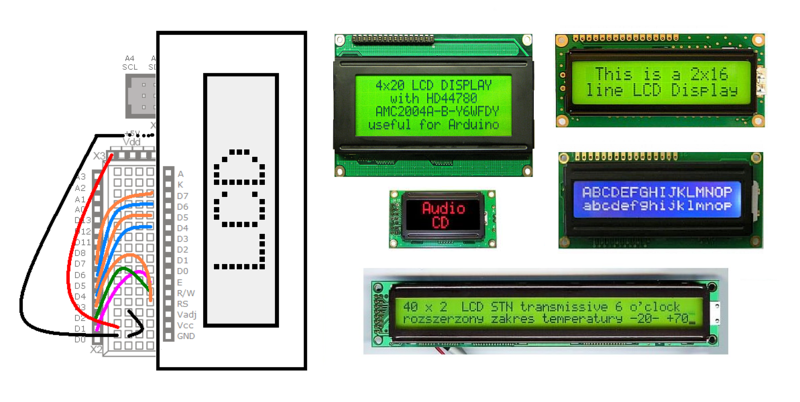
Programovateľný LCD displej
- LCD zobrazovač. Klávesnica.
Obšírnejšie informácie o displejoch (prednáška z predmetu MMP)
LCD Modul
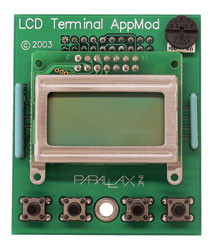
Vlastnosti:
- 2x8 LCD Displej bez podsvetlenia
- 4 Tlačítka
- Trimer na zmenu kontrastu
Technické parametre:
- Napájanie: 5 V @ 15 mA
- Pripojenie: 4-Bit parallel interface (Hitachi HD44780 compatible)
- Rozmery: 60 x 50 x 20 mm
- Pracovná teplota: 0 až +70 °C
Úlohy
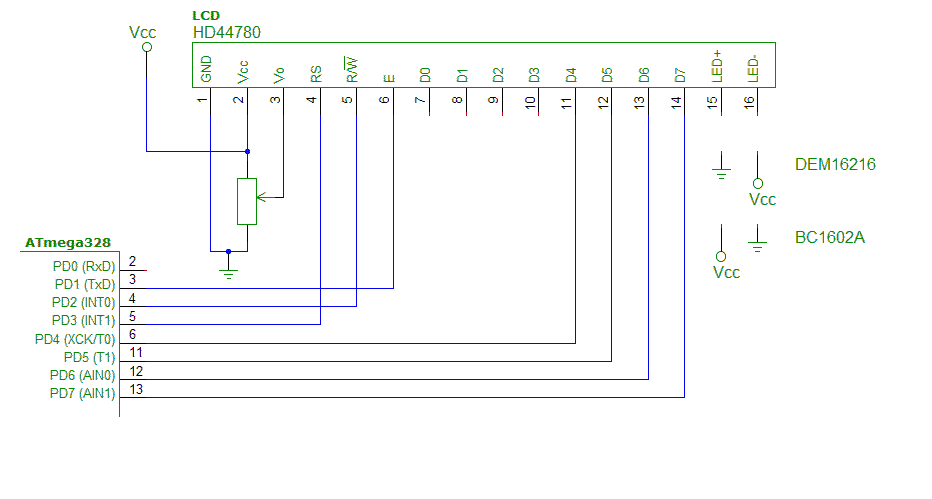
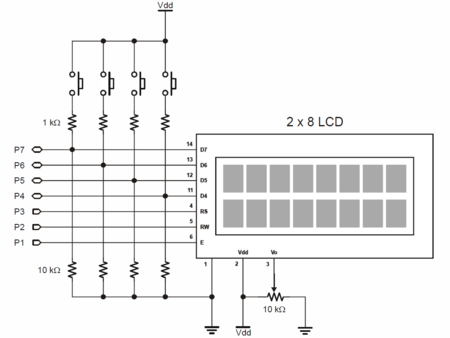
Najprv sa snažte pochopiť, ako je vytvorený vzorový program, ako sa konfiguruje pripojenie LCD k portom, skontrolujte konfiguráciu. Potom modifikujte program z predošlého cvičenia tak, aby sa meraná hodnota polohy potenciometra zobrazila na displeji. Zobrazte aj inžinierske jednotky.
Literatúra
- Katalógové listy
- Radič Hitachi HD44780
- Displej 2x16 DEM 16216 SYH-LY
- Displej 2x16 DEM 20231 SYH-PY
- 2x16 Parallel LCD datasheet
- Podrobné manuály sú aj u výrobcu Hantronix.
- Peter Ouwehand: How to control a HD44780-based Character-LCD
- Ian Harries: HD44780-Based LCD Modules'
- Tomáš Dresler: Inteligentní displeje a jejich připojení k PC. [hw.cz]
- Nuts & Volts: Demystifying Character Based LCDs
- Stamp Works - pp. 73 and more [1]
Arduino
Nasledovný príklad je pre Arduino.
Pozn.: Ak budete vypisovať najprv štvorciferné číslo a potom trojciferné, nezabudnite to štvorciferné najprv vymazať, inak vám tam posledná cifra bude "visieť". Vymazať sa dá napríklad takto:
  //        12345678
 lcd.print("        ");
/*
  LiquidCrystal Library - Hello World

 Demonstrates the use a 8x2 LCD display.

   The circuit:
 * LCD RS pin to digital pin 3
 * LCD R/W pin to digital pin 2
 * LCD Enable pin to digital pin 1
 * LCD D4 pin to digital pin 4
 * LCD D5 pin to digital pin 5
 * LCD D6 pin to digital pin 6
 * LCD D7 pin to digital pin 7
 */

#include <LiquidCrystal.h>           // include the library

// initialize the library with the numbers of the interface pins
//  LiquidCrystal(RS, RW, EN, D4, D5, D6, D7)
LiquidCrystal lcd( 3,  2,  1,  4,  5,  6,  7);

void setup() {
  // set up the LCD's number of columns and rows:
  lcd.begin(8, 2);
  // Print a message to the LCD.
  lcd.print("Ahoj!");
}

void loop() {
  // set the cursor to column 0, line 1
  // (note: line 1 is the second row, since counting begins with 0):
  lcd.setCursor(0, 1);
  // print the number of seconds since reset:
  lcd.print(millis()/1000);
  // print the status of buttons:
  lcd.setCursor(6, 0);
  lcd.print(ReadButtons(),HEX);

}


/* ------------------------------------------------------- */
/*  Read and debounce the LCD AppMod buttons               */
/*                                                         */
/*  Returns 0 if nothing  is pressed                       */
/*  Returns 1 if button A is pressed                       */
/*  Returns 2 if button B is pressed                       */
/*  Returns 4 if button C is pressed                       */
/*  Returns 8 if button D is pressed                       */
/*  Returns combination if more is pressed (e.g. 6 for B+C)*/
/*                                                         */
/* ------------------------------------------------------- */

unsigned char ReadButtons()
{
  DDRD  = 0b00001110;                // make LCD bus inputs
  unsigned char state = 0xFF;           // assume nothing pressed

  for(int scan = 1; scan<=10; scan++)
  {
   state = state & ((PIND&0xF0)>>4); // make sure button held
   delay(5);                     // debounce 10 x 5 ms
  }

  DDRD  = 0b11111110;				 // return bus to outputs

  return(state);
}
Misc:
Prečo je takto napísaná a ako vlastne funguje lepšie zistíte, keď si preštudujete schému zapojenia:
Sedemsegmentový 4-miestny LED displej
- 4-miestny 7-segmentový displej
- Product page http://www.gme.sk/hd-m324rd-p512-924
- Datasheet http://www.gme.sk/img/cache/doc/512/924/hd-m324rd-datasheet-1.pdf
- Animácia k 7seg displeju: http://www.uize.com/examples/seven-segment-display.html
Programovanie
Z tejto časti nemusíte mať obavy, programovanie je jednoduché a budeme využívať existujúce programy s knižnicami, ktoré si len zľahka modifikujete pre svoje potreby.
- Programovací jazyk aj prostredie: Arduino
- Knižnica SevSeg: https://github.com/sparkfun/SevSeg
Ukážkové programy:
#include <SevSeg.h>

SevSeg MyDisp; //Instantiate a seven segment controller object

void setup()
{
  byte numDigits = 4;
  byte digitPins[] = {2, 3, 4, 5};                    // Digits:   1,2,3,4
  byte segmentPins[] = {6, 7, 8, 11, 12, 13, 14, 15}; // Segments: A,B,C,D,E,F,G,Period

  MyDisp.begin(COMMON_ANODE, numDigits, digitPins, segmentPins);
  MyDisp.setBrightness(80);
}

void loop()
{
  MyDisp.setNumber(1234,9);  // Second argument is decimal place

  MyDisp.refreshDisplay();   // Must run repeatedly
}
#include "SevSeg.h"
SevSeg myDisplay;

#define FOUR_DIGITS 4
#define A1 2
#define A2 3
#define A3 4
#define A4 5
#define SegA 6
#define SegB 7
#define SegC 8

int value;
int oldvalue;
char tempString[5];

//-------------------------------------------------------------------------------------------

void setup()
{
  value = 0;
  oldvalue = 0;

  myDisplay.Begin(COMMON_ANODE, FOUR_DIGITS, A1, A2, A3, A4, SegA, SegB, SegC, 11, 12, 13, 14, 15);
  myDisplay.SetBrightness(100); //Set the display to 100% brightness level
}
//-------------------------------------------------------------------------------------------
void loop()
{
  value = analogRead(5);                          // measurement
  value = (15*oldvalue + value)/16;               // simple filter
   sprintf(tempString, "%4d",  (long)value, DEC); // create output string
   myDisplay.DisplayString(tempString, 0);        // display value on disp
   oldvalue = value;

}
//-------------------------------------------------------------------------------------------
Rozličné neusporiadané linky:
- Animácia k 7seg displeju: http://www.uize.com/examples/seven-segment-display.html
- Nas displej:
- Schema zapojenia Arduino https://www.arduino.cc/en/uploads/Main/Arduino-Pro-schematic.pdf
Grafické priebehy na PC --Serial Plotter =

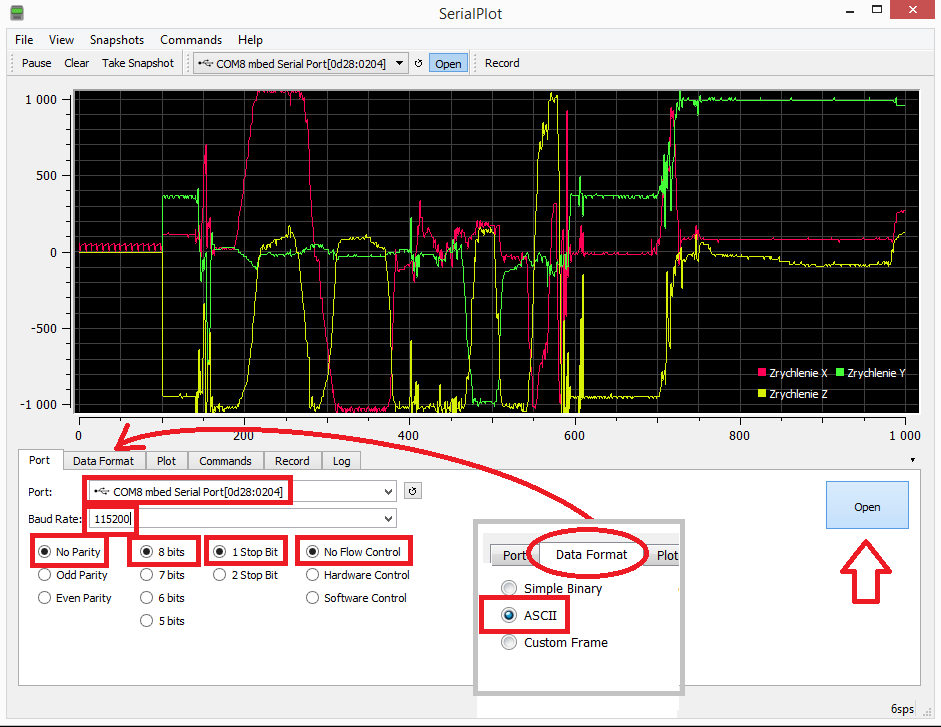
Serial Plotter je trocha sofistikovanejší program ako Terminal, jeho úlohou je zakresliť graficky všetky prijaté informácie. Najjednoduchšie je posielať mu čísla, pričom ich môže byť aj viac, oddelených čiarkami. Každá jedna n-tica hodnôt musí končíť znakom pre nový riadok. V knižnici Serial použite bloky Serial Write Number pre čísla, Serial Write String pre čiarky a Serial Write Line pre ukončenie riadka. Neposielajte hodnoty príliš často, aby sa nepreplnil vstupný buffer.
- Graphics in Arduino IDE: http://www.idogendel.com/en/archives/489
- https://rheingoldheavy.com/new-arduino-serial-plotter/
Trocha zlozitejsie:
- http://arduino.stackexchange.com/questions/1180/serial-data-plotting-programs
- https://github.com/nprasan/ardugraph
