Acrob007: Rozdiel medzi revíziami
Zo stránky SensorWiki
Nová stránka: Budete potrebovať: * [http://sharp-world.com/products/device/lineup/data/pdf/datasheet/gp2y0a_d_e.pdf Katalógový list senzora Sharp GP 2Y0A21] * [http://sharp-world.com/products/... |
Bez shrnutí editace |
||
| (4 medziľahlé úpravy od rovnakého používateľa nie sú zobrazené.) | |||
| Riadok 1: | Riadok 1: | ||
[[Acrob006|< Previous]] | [[Acrob|Home]] | [[Acrob008|Next >]] | |||
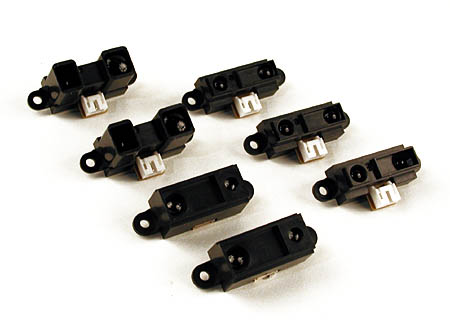
[[Obrázok:SharpSensorFamily.jpg | [[Obrázok:SharpSensorFamily.jpg]] [[Obrázok:SharpSensorCharacteristics.png]] | ||
This distance sensor uses the triangulation principle with a PSD sensor inside. There are various types, each with different operation range. Look into the datasheet of YOUR sensor used on Your robot! | |||
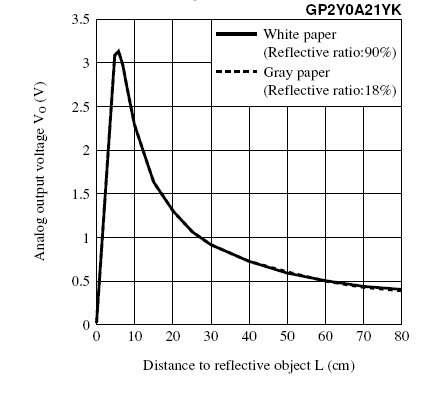
Note also the non-linear sensor characteristics! | |||
Sensor uses three wires to connect. Two of them are for power supply, third one is an analogue output ranging according the datasheet. Output voltage is measured using the internal A/D converter inside the microcontroller. Its resolution is 10-bits (values 0-1023). Simple measurement displayed on the terminal window is done with this program: | |||
<source lang="c"> | <source lang="c"> | ||
| Riadok 35: | Riadok 30: | ||
</source> | </source> | ||
Do You want to know more? | |||
* [http://www.acroname.com/robotics/info/articles/sharp/sharp.html Sharp IR Rangers Information] | * [http://www.acroname.com/robotics/info/articles/sharp/sharp.html Sharp IR Rangers Information] | ||
* [http://www.sales.hamamatsu.com/assets/pdf/catsandguides/psd_technical_information.pdf PSD sensors. Principle of operation (Hamamatsu)] | * [http://www.sales.hamamatsu.com/assets/pdf/catsandguides/psd_technical_information.pdf PSD sensors. Principle of operation (Hamamatsu)] | ||
You will need the appropriate datasheet for Your sensor (note the type on the side of the sensor): | |||
* [http://sharp-world.com/products/device/lineup/data/pdf/datasheet/gp2y0a_d_e.pdf Sharp GP 2Y0A21] | |||
* [http://sharp-world.com/products/device/lineup/data/pdf/datasheet/gp2y0a02_e.pdf Sharp GP 2Y0A02] | |||
* [http://sharp-world.com/products/device/lineup/data/pdf/datasheet/gp2d120_e.pdf Sharp GP 2D120X] | |||
[[ | [[Acrob006|< Previous]] | [[Acrob|Home]] | [[Acrob008|Next >]] | ||
Aktuálna revízia z 08:37, 3. jún 2011
< Previous | Home | Next >
This distance sensor uses the triangulation principle with a PSD sensor inside. There are various types, each with different operation range. Look into the datasheet of YOUR sensor used on Your robot!
Note also the non-linear sensor characteristics!
Sensor uses three wires to connect. Two of them are for power supply, third one is an analogue output ranging according the datasheet. Output voltage is measured using the internal A/D converter inside the microcontroller. Its resolution is 10-bits (values 0-1023). Simple measurement displayed on the terminal window is done with this program:
#define SerialSpeed 9600   //typical values are 9600 or 115200
#define SampFrequency 10   //sampling frequency in Hz (cycles per second)
#define AnalogPIN 5        //define your pin here

int mDelay;

void setup()
{
 Serial.begin(SerialSpeed);
 mDelay = 1000/SampFrequency; //calculate delay for proper sampling rate
}

void loop()
{
 delay(mDelay); //delay in milliseconds
 Serial.println( analogRead(AnalogPIN) ); //reads the analog port and prints value over serial
}
Do You want to know more?
You will need the appropriate datasheet for Your sensor (note the type on the side of the sensor):
< Previous | Home | Next >

