Acrob009: Rozdiel medzi revíziami
Zo stránky SensorWiki
Nová stránka: Použijeme ten istý senzor ako v predošlej úlohe, len si ukážeme jeho využitie v digitálnom režime. Úlohu rozhodovacieho prvku za nás prevezme vstupný komparátor mikropro... |
Bez shrnutí editace |
||
| Riadok 1: | Riadok 1: | ||
[[Acrob008|< Previous]] | [[Acrob|Home]] | [[Acrob010|Next >]] | |||
Use the same sensor as in [[Acrob008|previous]] task. The only difference is that we use it in digital mode. | |||
Input comparator decides whether the measured value is below (0) or above (1) the fixed comparative level. | |||
Try following programm: | |||
<source lang="c"> | <source lang="c"> | ||
| Riadok 35: | Riadok 37: | ||
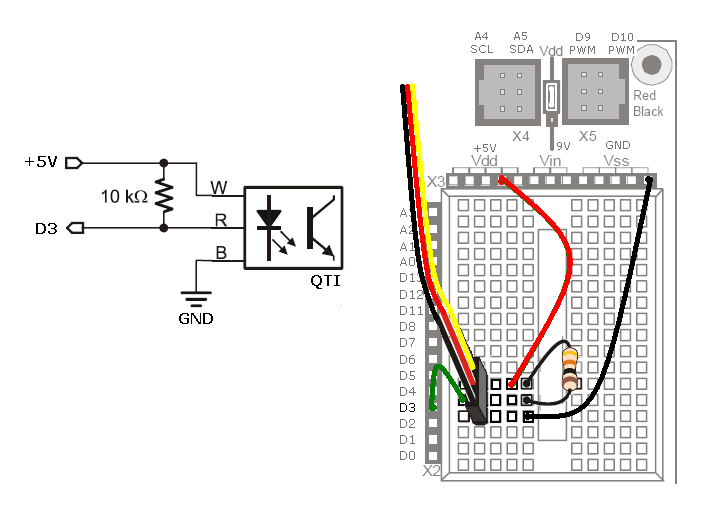
[[Obrázok:QTILineSensorDigitalConnection.png|center]] | [[Obrázok:QTILineSensorDigitalConnection.png|center]] | ||
[[ | Presented solution is much quickier and easier, unfortunately we lost the possibility of the sensor callibration. | ||
[[Acrob008|< Previous]] | [[Acrob|Home]] | [[Acrob010|Next >]] | |||
Aktuálna revízia z 08:57, 13. jún 2010
< Previous | Home | Next >
Use the same sensor as in previous task. The only difference is that we use it in digital mode. Input comparator decides whether the measured value is below (0) or above (1) the fixed comparative level.
Try following programm:
#define LED_Yellow  13   // select the pin for the LED
#define SENSOR  3

long val = 0;           // variable to store the value coming from the sensor

void setup()
{
  pinMode(LED_Yellow, OUTPUT);    // declare this pin as an OUTPUT
  pinMode(SENSOR, INPUT);         // declare this pin as an INPUT

  Serial.begin(9600);

  Serial.println("Test started   \n");
  digitalWrite(LED_Yellow, HIGH);  // make it visible
  delay(1000);
}


void loop()
{
    val = digitalRead(SENSOR);     // read the value from the sensor
    Serial.print("Sensor = ");
    Serial.println(val, BIN);
    delay(200);
}   /* End of Loop */

Presented solution is much quickier and easier, unfortunately we lost the possibility of the sensor callibration.
< Previous | Home | Next >