Acrob002: Rozdiel medzi revíziami
Zo stránky SensorWiki
Bez shrnutí editace |
|||
| (5 medziľahlých úprav od rovnakého používateľa nie je zobrazených.) | |||
| Riadok 1: | Riadok 1: | ||
== Hello, World! == | [[Acrob001|< Previous]] | [[Acrob|Home]] | [[Acrob003|Next >]] | ||
== '''Hello, World!''' == | |||
[[Obrázok:ArduinoIDE01.png|right]] | |||
Here is a source code for Your first program. | Here is a source code for Your first program. | ||
| Riadok 15: | Riadok 20: | ||
</source> | </source> | ||
It should look like on the | It should look like on the screen right. | ||
To run the program on Your board it is necessary to compile and download the program using the [[Obrázok:ArduinoButtonUpload.png|29px]] button. | To run the program on Your board it is necessary to compile and download the program using the [[Obrázok:ArduinoButtonUpload.png|29px]] button. | ||
If the operation was successfull, the downloaded program runs automatically. To see how it works, it is necessary to open an additional window with the terminal [[Obrázok:ArduinoButtonTerminal.png|29px]]. It | If the operation was successfull, the downloaded program runs automatically. To see how it works, it is necessary to open an additional window with the terminal [[Obrázok:ArduinoButtonTerminal.png|29px]]. | ||
It will look like this: | |||
[[Obrázok:ArduinoIDE02.png|center]] | [[Obrázok:ArduinoIDE02.png|center]] | ||
| Riadok 37: | Riadok 43: | ||
* '''But I want to have just ONE message!''' | * '''But I want to have just ONE message!''' | ||
You can | Well, why not. You can <BR> | ||
a) place the print command into the <TT>setup()</TT> section and leave the <TT>loop()</TT> empty. <BR> | |||
b) stop the loop using e.g following construction: | |||
<source lang="c"> | <source lang="c"> | ||
void loop() | void loop() | ||
{ | { | ||
Serial.println("Hello, World!"); | Serial.println("Hello, World!"); | ||
for(;;) /* stop here */ | for(;;); /* stop here */ | ||
} | } | ||
</source> | </source> | ||
=== | === More commands === | ||
If You just want to verify Your program, You can just compile it [[Obrázok:ArduinoButtonCompile.png|29px]] without downloading | If You just want to verify Your program, You can just compile it [[Obrázok:ArduinoButtonCompile.png|29px]] without downloading | ||
| Riadok 55: | Riadok 61: | ||
Don't forget to save Your work often using the [[Obrázok:ArduinoButtonSave.png|29px]] button. | Don't forget to save Your work often using the [[Obrázok:ArduinoButtonSave.png|29px]] button. | ||
When You need a particular help with any Arduino language commands, use the menu item Help -> Reference. This is Your | |||
language handbook and wocabulary. | |||
'''Nobody is perfect!''' | |||
Try to intentionally make some mistakes in Your source code to see what happens and how the compiler lets You know what is the | |||
problem. The most often errors are | |||
* forgotten command terminator ';' | |||
* unmatched parentheses '{' and '}' and strings '" "' | |||
* misspelled commands (e.g. vood instead of void) | |||
* unknown comands (e.g. Serial.clearscreen() ) | |||
=== Your turn === | |||
* Change the text of the message, add more messages, try to format them using special chars like '***' or '---' | |||
* What happens if You use the Serial.print() command instead of the Serial.println()? | |||
* TODO: Variables - declaration, using, types, display values... | |||
[[Acrob001|< Previous]] | [[Acrob|Home]] | [[Acrob003|Next >]] | [[Acrob001|< Previous]] | [[Acrob|Home]] | [[Acrob003|Next >]] | ||
Aktuálna revízia z 14:10, 12. jún 2010
< Previous | Home | Next >
Hello, World!

Here is a source code for Your first program.
void setup()
{
 Serial.begin(9600);
}

void loop()
{
 Serial.println("Hello, World!");
}
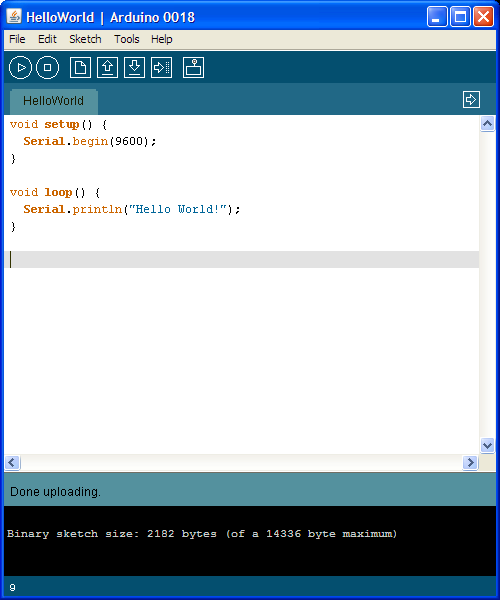
It should look like on the screen right.
To run the program on Your board it is necessary to compile and download the program using the ![]() button.
If the operation was successfull, the downloaded program runs automatically. To see how it works, it is necessary to open an additional window with the terminal
button.
If the operation was successfull, the downloaded program runs automatically. To see how it works, it is necessary to open an additional window with the terminal ![]() .
.
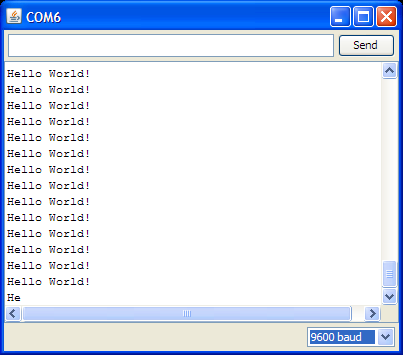
It will look like this:

How it works
Notice that program contains two blocks. Section setup() runs just once, during the startup. Usually contains settings, definitions and hardware initialization and configuration commands.
Then the program performs an infinity loop(). There is defined the whole operation of Your program.
- Why there is not just single Hello, World! message?
This is because the print command is located in the loop() section.
- But I want to have just ONE message!
Well, why not. You can
a) place the print command into the setup() section and leave the loop() empty.
b) stop the loop using e.g following construction:
void loop()
{
 Serial.println("Hello, World!");
 for(;;);  /* stop here */
}
More commands
If You just want to verify Your program, You can just compile it ![]() without downloading
to Your board.
without downloading
to Your board.
Don't forget to save Your work often using the ![]() button.
button.
When You need a particular help with any Arduino language commands, use the menu item Help -> Reference. This is Your
language handbook and wocabulary.
Nobody is perfect!
Try to intentionally make some mistakes in Your source code to see what happens and how the compiler lets You know what is the problem. The most often errors are
- forgotten command terminator ';'
- unmatched parentheses '{' and '}' and strings '" "'
- misspelled commands (e.g. vood instead of void)
- unknown comands (e.g. Serial.clearscreen() )
Your turn
- Change the text of the message, add more messages, try to format them using special chars like '***' or '---'
- What happens if You use the Serial.print() command instead of the Serial.println()?
- TODO: Variables - declaration, using, types, display values...
< Previous | Home | Next >