MiniMEXLE Hodiny na orientačný beh
Zo stránky SensorWiki
| Autori: | Bc.Dávid Leško, Bc.Vladimír Biath | |
| Študijný odbor: | Aplikovaná mechatronika | 2. Ing. (2013) |
Zadanie
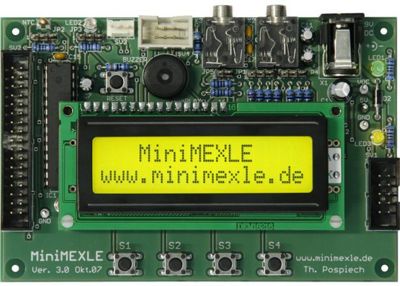
LCD displej na doske MiniMEXLE treba pripojiť k mikroprocesoru a naprogramovať tak, aby po zapnutí odpočítaval minúty nasledujúce po štarte, pričom posledných 5 sekúnd pred každou celou minútou odpípa. Posledné pípnutie bude dlhšie a bude sprevádzané inkrementovaním čísla na displeji. Pred časom 00 bude displej zobrazovať pripravenosť symbolmi --.
Literatúra:
- Dokumentácia k doske MiniMexle
- http://virtuallab.kar.fei.stuba.sk/robowiki/images/d/da/MiniMexle_manual.pdf
- http://www.robotika.sk/holls/2008/doc/Gruhler2008_IntroductionMEXLE.pdf
- http://ap.urpi.fei.stuba.sk/sensorwiki/index.php/S%C3%BAbor:MiniMexleBlockDiagram.png
- http://ap.urpi.fei.stuba.sk/sensorwiki/index.php/S%C3%BAbor:Schemazapojenia.jpg
- http://www.display-elektronik.de/DEM16216SYH-LY.PDF
Analýza - hardware
MiniMexle:
- Microcontroller ATmega48/88 (pre naše riešenie sme použili Microcontroller ATmega328P programované cez USB rozhranie)
- Display DEM16216, 2x16 LCD-Display,
- 4 push buttons
- Analógové rozhranie : 2 A/D a 2 D/A kanály
Hardware MiniMexle:
Na obrázku nižšie sú označené jednotlivé prvky dosky MiniMexle:
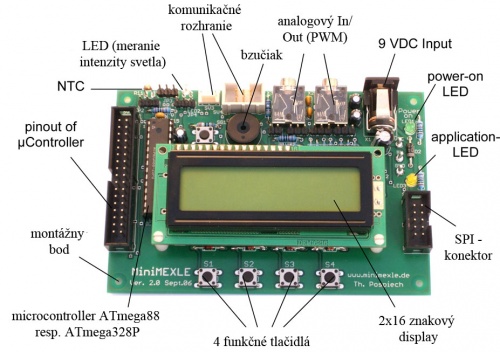
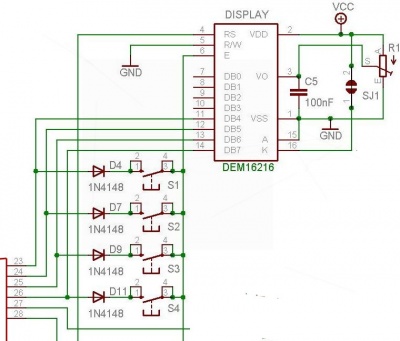
- odkaz na schemu | zapojenia
Display:
Na zobrazovanie odpočítavania času sme použili display s označením DEM16216, ktorý pozostáva z 2 x 16 znakového displeja.
- 16 pin konektor pre pripojenie k doske MiniMexle

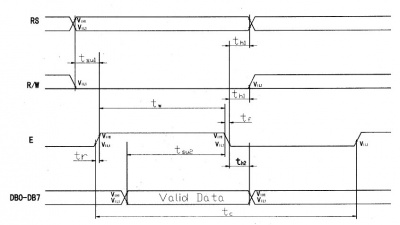
Write mode Display16216:
Read mode Display16216:
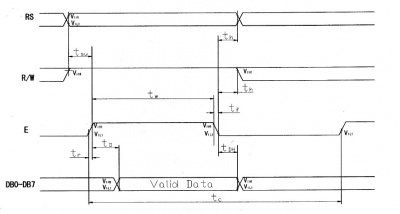
- bližšie informácie k displeju viď literatúra
Popis riešenia
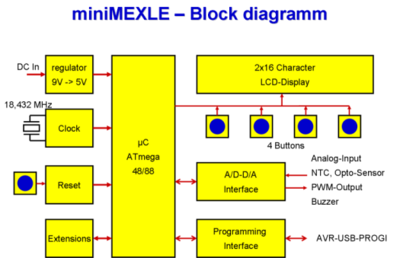
Bloková schéma
- blokova schema dosky MiniMexle
Užívateľské rozhranie:
- x16 LCD displej s podsvietením
(Spojený 4 bity)
(RS: Data / Control)
(E = 1: Enable Display)
(R premenná: Kontrast)
- 4 tlačidlá pripojená na rovnaké piny ako LCD displej
(E = 0: Read buttons)
(Port μC obojsmerný)
Algoritmus a program
Algoritmus je písaný v jazyku C, a vo vývojovom prostredí AVR Studio 4. Celé riešenie sa skladá z jedného hlavného súboru a jedného hlavičkového súboru. V hlavičkovom súbore som vytvoril funkcie pre prácu s displejom, bolo to náročnejšie, z dôvodu, že vývojová doska využíva 4-bit mód displeja a jeho kontrolné a dátové piny sú na dvoch portoch. Bližší popis funkcií si je možné prečítať v samotnom súbore.
Hlavný program využíva 16-bit Timer v NORMAL mode. Je využité prerušenie, ktoré nastáva po pretečení TIMERa (presne v 1s), kde sa inkrementuje pomocná premenná. Bližšie informácie o štruktúre kódu je možné vidieť nižšie.
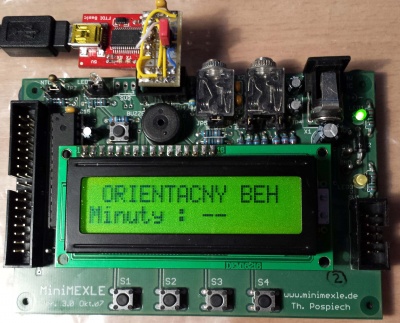
Samotný program je ovládaný tlačidlom S1 a S2, pričom S1 je START a S2 je RESET. V prípade stlačenia S1 sa začne odpočítavanie, pričom sa na displeji zobrazuje 00. Posledných 5s odpočítavania je sprevádzaných pípaním, pričom posledné pípnutie je dlhšie. Na displeji sa zobrazujú len dosiahnuté minúty ako je uvedené v zadaní. V prípade, že sa stlačí tlačidlo S2, tak sa na displeji zobrazí -- a zastaví sa TIMER, vynulujú sa pomocné premenné.
Zdrojový kód hlavného programu :
/****************************************************************
File name - Zadanie_final.c
Compiler - WinAVR / AVR GCC
Author - David Lesko
*****************************************************************/

#include<avr/io.h>
#include<util/delay.h>
#include"lcd.h"
#include<avr/interrupt.h>

#define SET_BIT(PORT,BIT) ((PORT)|=(1<<BIT))	// Function for setting specific bit
#define CLR_BIT(PORT,BIT) ((PORT)&=~(1<<BIT))	// Function	for clearing specific bit
#define ENABLE	7								// Enable macro

#define PC_PORT		PORTC	// Port C macro
#define PC_PIN1		0		// Pin C macro
#define PC_PIN2		1

#define bit(m)			((1<<m))	// Bit macro
#define bit_get(p,m)	((p) & bit(m))	// Bit selection macro
#define PIN(x)			(*(&x - 2))	// Pin macro

bool	sw1 = 0;		// Switch variable
bool	sw2 = 0;
int	s=0,secondss=0;

static volatile seconds,minutes;

void readButtons(void);		// Read buttons function
void inkrement(void);		// Incrementation of a second
void sekundy(void);			// Seconds function
void minuty(void);			// Minutes function
void short_beep(void);		// Short beep function
void long_beep(void);		// Long beep function

void short_beep(void)
{
	int	i=0;
	for(i=0;i<=200;i++)		// Short beep frequency generation
	{
		PORTD |= 0x20;
		_delay_us(200);
		PORTD &= 0xDF;
		_delay_us(200);
	}
	_delay_ms(1000);
}

void long_beep(void)
{
	int	i=0;
	for(i=0;i<=600;i++)		// Long beep frequency generation
	{
		PORTD |= 0x20;
		_delay_us(200);
		PORTD &= 0xDF;
		_delay_us(200);
	}
	_delay_ms(1000);
}

ISR(TIMER1_COMPA_vect)
{
	inkrement();			// Interrupt vector is calling increment function
}

void inkrement(void)
{
	if(seconds!=60)
	{
		seconds++;		// If seconds are not 1 minute then incrementation will occur
	}
	else
	{
		minutes++;		// Incrementation of minutes variable
		seconds = 0;	// Reset of seconds variable
	}
	TCNT1=0;		// Reset TIMER1
}

void sekundy(void)
{
	switch(seconds)		// Specific seconds function
		{				// 55 to 58 is short beep, 59 long beep
			case 0:
			lcd_gotoxy(1,14);
			lcd_putstr("  ");
			break;
			case 56:
			short_beep();
			break;
			case 57:
			short_beep();
			break;
			case 58:
			short_beep();
			break;
			case 59:
			short_beep();
			break;
			case 60:
			long_beep();
			break;
		}
}

void minuty(void)
{
	switch(minutes)		// Displaying minutes to display, up to 19 minutes is defined
		{
			case 0:
			lcd_gotoxy(1,9);
			lcd_putstr("00");
			break;
			case 1:
			lcd_gotoxy(1,9);
			lcd_putstr("01");
			break;
			case 2:
			lcd_gotoxy(1,9);
			lcd_putstr("02");
			break;
			case 3:
			lcd_gotoxy(1,9);
			lcd_putstr("03");
			break;
			case 4:
			lcd_gotoxy(1,9);
			lcd_putstr("04");
			break;
			case 5:
			lcd_gotoxy(1,9);
			lcd_putstr("05");
			break;
			case 6:
			lcd_gotoxy(1,9);
			lcd_putstr("06");
			break;
			case 7:
			lcd_gotoxy(1,9);
			lcd_putstr("07");
			break;
			case 8:
			lcd_gotoxy(1,9);
			lcd_putstr("08");
			break;
			case 9:
			lcd_gotoxy(1,9);
			lcd_putstr("09");
			break;
			case 10:
			lcd_gotoxy(1,9);
			lcd_putstr("10");
			break;
			case 11:
			lcd_gotoxy(1,9);
			lcd_putstr("11");
			break;
			case 12:
			lcd_gotoxy(1,9);
			lcd_putstr("12");
			break;
			case 13:
			lcd_gotoxy(1,9);
			lcd_putstr("13");
			break;
			case 14:
			lcd_gotoxy(1,9);
			lcd_putstr("14");
			break;
			case 15:
			lcd_gotoxy(1,9);
			lcd_putstr("15");
			break;
			case 16:
			lcd_gotoxy(1,9);
			lcd_putstr("16");
			break;
			case 17:
			lcd_gotoxy(1,9);
			lcd_putstr("17");
			break;
			case 18:
			lcd_gotoxy(1,9);
			lcd_putstr("18");
			break;
			case 19:
			lcd_gotoxy(1,9);
			lcd_putstr("19");
			break;
		}
}

void readButtons(void)
{
	CLR_BIT(PORTD,ENABLE);	// Clearing definition of PORTD
	DDRC = DDRC & 0xf0;		// Definition of input on PORTC
	PORTC = 0x0f;

	_delay_us(10);

	sw1 = !bit_get(PIN(PC_PORT),PC_PIN1);	// Getting boolean state of button 1
	_delay_ms(10);							// Switch bounce elimination

	sw2 = !bit_get(PIN(PC_PORT),PC_PIN2);	// Getting boolean state of button 2
	_delay_ms(10);

	DDRC = DDRC|0x0f;		// Returning the DDRC to previous state of outputs
}

int	main()
{
	int	tl=0;

	lcd_init();				// Initialisation of display
	LCD_initialise();

	lcd_gotoxy(1,9);		// Sending ready string to display
	lcd_putstr("--");

	DDRD |= (1<<DDD5);		// Initialisation of Buzzer

	TCCR1A = 0;						// Normal Mode Timer1
	TCCR1B = (1<<CS12)|(1<<CS10);	// Prescaler 1024
	TCNT1 = 0;						// Start count from 0
	OCR1A = 15625;					// 1 second

	TIFR1 = (1<<OCF1A);		// Clear Pending Interrupt
	TIMSK1 = 0;				// Disable Compare A Interrupt

	sei();		// Enable global interrupts

	while(1) // Loop forever
	{
		lcd_gotoxy(0,0);		// Timer errors in DRAM compensation
	    lcd_putstr(" O");
		readButtons();			// Reading button state

		if(sw1 && tl==0){	// Button Start pressed
			tl=1;			// Double button tick elimination
			TCNT1 = 0;		// Timer count reset
			TIMSK1 = (1<<OCIE1A);	// Enable Compare A Interrupt
		}
		else if(sw2 && tl==1)	// Button Reset pressed
		{
			lcd_gotoxy(1,9);	// Sending ready string to display
			lcd_putstr("--");
			tl=0;			// Double button tick elimination
			TCNT1 = 0;		// Reset Timer
			TIMSK1 = 0;		// Disable Compare A Interrupt
			seconds = 0;	// Reset seconds
			minutes = 0;	// Reset minutes
			sekundy();
		}
		else if(tl==1)		// If Start was pressed
		{
		sekundy();			// Calling seconds function
		minuty();			// Calling minutes function
		}
	}
}
Zdrojový kód: lcd_mexle.h a Zadanie_final.c
Overenie
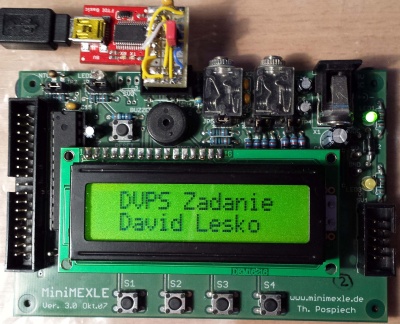
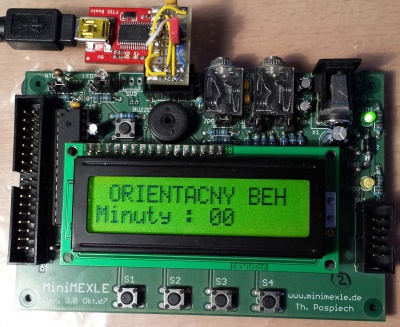
Popis činnosti je uvedení v časti Algoritmus a program. Pre ilustráciu sú nižšie uvedené obrázky s rôznymi stavmi displeja.
Demonštračné video :