LCD displej s radičom HD44780: Rozdiel medzi revíziami
Z SensorWiki
(→Opis displeja) |
(→Opis displeja) |
||
| Riadok 3: | Riadok 3: | ||
| − | [[Súbor:HD44780pinout.png| | + | [[Súbor:HD44780pinout.png|x500px|left]] |
Verzia zo dňa a času 23:39, 29. január 2021
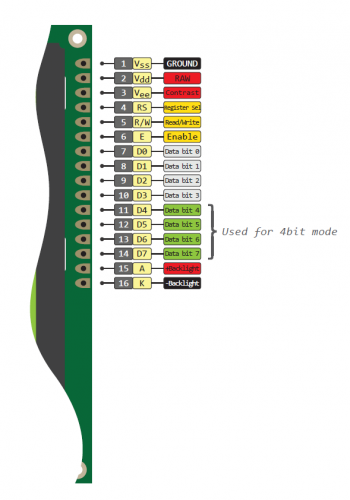
Opis displeja
| 1 | GND | Ground, zem |
|---|---|---|
| 2 | Vcc | Napájanie, typ. +5V |
| 3 | Vo | Nastavenie kontrastu, 0 < Vo < Vcc |
| 4 | RS | Register Select, výber registra - Command RS=0 alebo Data RS=1 |
| 5 | R/W | Read/Write 0: Write, 1: Read (zriedkavo používaný) |
| 6 | E | Enable - aktivačný signál, aktívna je dobežná hrana |
| 7 | D0 | Data bit D0 |
| 8 | D1 | Data bit D1 |
| 9 | D2 | Data bit D2 |
| 10 | D3 | Data bit D3 |
| 11 | D4 | Data bit D4 (používa sa v 4-bitovom zapojení) |
| 12 | D5 | Data bit D5 (používa sa v 4-bitovom zapojení) |
| 13 | D6 | Data bit D6 (používa sa v 4-bitovom zapojení) |
| 14 | D7 | Data bit D7 (poižíva sa v 4-bitovom zapojení) |
| 15 | A+ | Podsvietenie - anóda |
| 16 | K- |
Podsvietenie - katóda |
Instruction set
The HD44780 instruction set is shown below:[1]
| Instruction | Code | Description | Execution time (max) (when fcp = 270 kHz) | |||||||||
|---|---|---|---|---|---|---|---|---|---|---|---|---|
| RS | R/W | B7 | B6 | B5 | B4 | B3 | B2 | B1 | B0 | |||
| Clear display | 0 | 0 | 0 | 0 | 0 | 0 | 0 | 0 | 0 | 1 | Clears display and returns cursor to the home position (address 0). | 1.52 ms |
| Cursor home | 0 | 0 | 0 | 0 | 0 | 0 | 0 | 0 | 1 | * | Returns cursor to home position. Also returns display being shifted to the original position. DDRAM content remains unchanged. | 1.52 ms |
| Entry mode set | 0 | 0 | 0 | 0 | 0 | 0 | 0 | 1 | I/D | S | Sets cursor move direction (I/D); specifies to shift the display (S). These operations are performed during data read/write. | 37 μs |
| Display on/off control | 0 | 0 | 0 | 0 | 0 | 0 | 1 | D | C | B | Sets on/off of all display (D), cursor on/off (C), and blink of cursor position character (B). | 37 μs |
| Cursor/display shift | 0 | 0 | 0 | 0 | 0 | 1 | S/C | R/L | * | * | Sets cursor-move or display-shift (S/C), shift direction (R/L). DDRAM content remains unchanged. | 37 μs |
| Function set | 0 | 0 | 0 | 0 | 1 | DL | N | F | * | * | Sets interface data length (DL), number of display line (N), and character font (F). | 37 μs |
| Set CGRAM address | 0 | 0 | 0 | 1 | CGRAM address | Sets the CGRAM address. CGRAM data are sent and received after this setting. | 37 μs | |||||
| Set DDRAM address | 0 | 0 | 1 | DDRAM address | Sets the DDRAM address. DDRAM data are sent and received after this setting. | 37 μs | ||||||
| Read busy flag & address counter |
0 | 1 | BF | CGRAM/DDRAM address | Reads busy flag (BF) indicating internal operation being performed and reads CGRAM or DDRAM address counter contents (depending on previous instruction). | 0 μs | ||||||
| Write CGRAM or DDRAM |
1 | 0 | Write Data | Write data to CGRAM or DDRAM. | 37 μs | |||||||
| Read from CG/DDRAM | 1 | 1 | Read Data | Read data from CGRAM or DDRAM. | 37 μs | |||||||
| Instruction bit names — I/D - 0 = decrement cursor position, 1 = increment cursor position; S - 0 = no display shift, 1 = display shift; D - 0 = display off, 1 = display on; C - 0 = cursor off, 1 = cursor on; B - 0 = cursor blink off, 1 = cursor blink on ; S/C - 0 = move cursor, 1 = shift display; R/L - 0 = shift left, 1 = shift right; DL - 0 = 4-bit interface, 1 = 8-bit interface; N - 0 = 1/8 or 1/11 duty (1 line), 1 = 1/16 duty (2 lines); F - 0 = 5×8 dots, 1 = 5×10 dots; BF - 0 = can accept instruction, 1 = internal operation in progress. | ||||||||||||
DDRAM is Display Data RAM and CGRAM is Character Generator RAM.[2] The DDRAM is 80 bytes (40 per row) addressed with a gap between the two rows. The first row is addresses 0 to 39 decimal or 0 to 27 hex. The second row is addresses 64 decimal to 103 decimal or 40 to 67 hex.
The CGRAM is read/write memory used to encode up to 8 characters in the character generator. It consists of 64 fields at addresses 0 to 3F. Each field is 5 bits mapping to a row of pixels of each character. Each 8 fields in the CGRAM are used for each character. The lower 3 bits of the character codes from 0-7 and 8-15 select the groups of 8 fields in the CGRAM memory.
Reading and writing to the DDRAM is done by setting the RS input high during bus transfers. The DDRAM must also be selected by using the Set DDRAM address command which selects the DDRAM for access and also sets the starting address for DDRAM access.
Likewise reading and writing to the CGRAM is done by setting the RS input high during bus transfers. The CGRAM must also be selected by the Set CGRAM address command which selects the CGRAM for access and also sets the starting address for CGRAM access.
The execution times listed in this table are based on an oscillator frequency of 270 kHz. The data sheet indicates that for a resistor of 91 kΩ at 5V Vcc the oscillator can vary between 190 kHz and 350 kHz resulting in wait times of 52.6 us and 28.6 us instead of 37 us. If a display with the recommended 91 kΩ resistor is powered from 3.3 volts the oscillator will run much slower. If the busy bit is not used and instructions are timed by the external circuitry, this should be taken into account.
Pripojenie
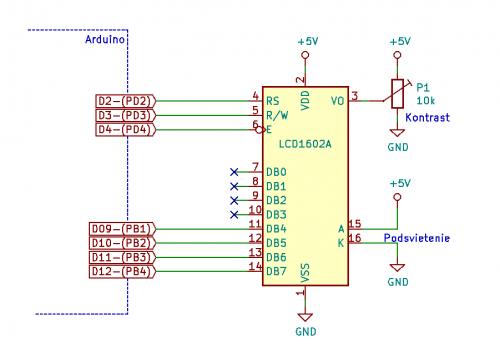
Schéma zapojenia
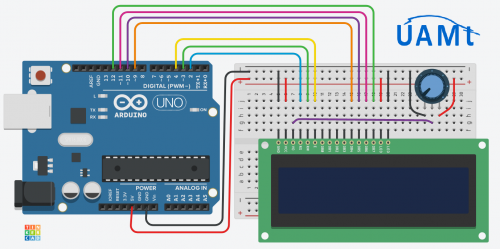
Pokúste sa najprv pripojiť displej len podľa schémy zapojenia. Ak sa vám to nepodarí, alebo si chcete byť naistom, skontrolujte si zapojenie aj podľa zapojovacej schémy.
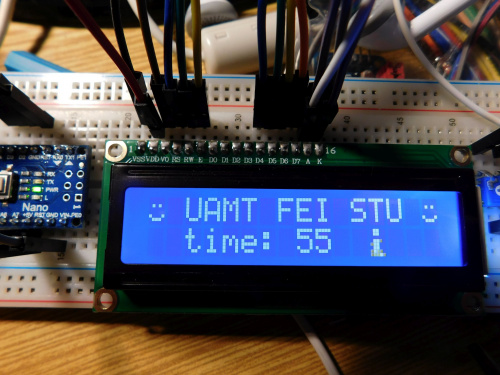
To, či máte displej pripojený správne si môžete vyskúšať týmto demo programom, ktorý preložíte a nahráte z prostredia Arduino.
#include <LiquidCrystal.h>
// connection      RS R/W E D4 D5 D6 D7
LiquidCrystal lcd ( 2,  3,4, 9,10,11,12);

// define some user characters
byte smiley[8] = {
  0b00000,
  0b00000,
  0b01010,
  0b00000,
  0b00000,
  0b10001,
  0b01110,
  0b00000 };

byte step1[8] = {
  0b01100, 0b01100, 0b00000, 0b01110,
  0b11100, 0b01100, 0b11010, 0b10011};

byte step2[8] = {
  0b01100, 0b01100, 0b00000, 0b01100,
  0b01100, 0b01100, 0b1100,  0b01110};

void setup() {
  lcd.begin(16, 2);    // init LCD + set number of columns and rows

  lcd.createChar(1, smiley);    // create a new characters
  lcd.createChar(3, step1);
  lcd.createChar(4, step2);

  lcd.setCursor(0, 0);          // set the cursor to the top left

  lcd.write(byte(1));           // smiley
  lcd.print(" UAMT FEI STU ");  // normal text
  lcd.write((byte)1);           // smiley
}

void loop() {
    lcd.setCursor(2, 1);         // set curspr to line 2 col 3
    lcd.print("time: ");         // print the number of seconds since reset:
    lcd.print(millis() / 1000);
    lcd.setCursor(12, 1);
    lcd.write(3);                // draw the little man
    delay(delayTime);
    lcd.setCursor(12, 1);
    lcd.write(4);
    delay(delayTime);
}
ToDo
Na displeji by sa vám mal zobraziť text, počítadlo a jednoduchá animácia ako na obrázku
Q: Čo s nepoužitými vstupmi?
A1: pripojiť na definovanú úroveň, najlepšie cez pull-up/pull-down rezistor.
A2: Keďže podľa datasheetu[REF 1] má riadiaci obvod Hitachi HD44780 zapojené pull-upy interne, tak nie sú potrebné.
A3: Keďže však nevieme, aký riadiaci čip je v skutočnosti použitý, pre istotu ich môžeme zapojiť.
Vysvetlivky, prečo sú nezapojené vstupy nebezpečné:
Nezapojené (plávajúce) vstupy sú oveľa citlivejšie na ESD (elektrostatický výboj) a taktiež zvyšujú zbytočne spotrebu obvodu. Odporúča sa pripojenie cez tzv. pull-up odpor priamo na zem, prípadne aj bez odporu. Druhá možnosť, pripojenie na kladné napájacie napätie je tiež možná, ale v tomto prípade sa vynechanie pull-up rezistora neodporúča.
Toto je jeden z príkladov mnohých takýchto odporúčaní[REF 2] priamo od firmy NxP:
|
5.3 Line Termination and Pullup/Pulldown Resistors
|
Literatúra
- ↑ Hitachi HD44780U Dot Matrix Liquid Crystal Display Controller/Driver. ADE-207-272(Z), Japan, 1999.
- ↑ Murray Stewart: AN3393: MC9RS08KA Application Hints. NxP/Freescale Semiconductor Application Note, 2007.
Odkazy
- Datasheets
- Basic LCD Datasheet (PDF)
- HD44780 (PDF)
- Wikipedia o HD44780 https://en.wikipedia.org/wiki/Hitachi_HD44780_LCD_controller
- Generátor vlastných znakov
- Arduino Reference Library: LiquidCrystal
- Kniznice lcd.c a lcd.h od P. Fleuryho https://github.com/damadmai/pfleury
- Tinkercad model s LCD displejom a demo programom https://www.tinkercad.com/things/iO56bA1E68T-copy-of-lcd/editel?sharecode=vmfhh-3g1G2NVAtB_BFJZQtqwN3hdpEsSGQGGtChMDc
- ↑ Šablóna:Harvnb
- ↑ {{#if: {{#if:https://www.sparkfun.com/datasheets/LCD/HD44780.pdf | {{#if:HD44780U datasheet|1}}}}||Error: title= and url= must be specified}}{{#if: |{{#if: {{#if:|{{#if:|1}}}}||Error: archiveurl= and archivedate= must be both be specified or both omitted}}}}{{#if:|{{#if:|[[{{{authorlink}}} | {{#if:|{{{last}}}{{#if:|, {{{first}}}}}|{{{author}}}}}]]|{{#if:|{{{last}}}{{#if:|, {{{first}}}}}|{{{author}}}}}}} }}{{#if:|{{#if:|; {{{coauthors}}} }}{{#if:|{{#if:|; [[{{{editor-link}}} | {{{editor}}}]]|; [[{{{editor-link}}} | {{{editor-last}}}, {{{editor-first}}}]]}}|{{#if:|{{#if:|; {{{editor}}}|; {{{editor-last}}}, {{{editor-first}}}}}}}}}{{#if:|; {{{coeditors}}} }}{{#if:|, {{{editor-type}}}|{{#if:|{{#if:|, eds.|, ed.}}}}}}}}{{#if:|{{#if:| ({{{date}}})|{{#if:|{{#if:| ({{{month}}} {{{year}}})| ({{{year}}})}}}}}}|}}{{#if:|. }}{{#if:|{{#if:|{{#if:HD44780U datasheet | [{{{archiveurl}}} HD44780U datasheet] }}}}|{{#if:https://www.sparkfun.com/datasheets/LCD/HD44780.pdf%7C{{#if:HD44780U datasheet | HD44780U datasheet }}}}}}{{#if: | (in {{{language}}})}}{{#if:| ()}}{{#if:|. {{{work}}}}}{{#if:| {{{pages}}}}}{{#if:|. {{{publisher}}}{{#if:||{{#if:||}}}}}}{{#if:||{{#if:| ({{{date}}})|{{#if:|{{#if:| ({{{month}}} {{{year}}})| ({{{year}}})}}}}}}}}{{#if:|. Archived from the original on {{{archivedate}}}}}{{#if:|. Retrieved on {{{accessdate}}} }}{{#if:| Retrieved on {{{accessmonthday}}}, {{{accessyear}}}}}{{#if:| Retrieved on {{{accessdaymonth}}} {{{accessyear}}}}}{{#if:|{{#ifeq:{{{postscript}}}|no||{{{postscript}}} }}|.}}{{#if:| "{{{quote}}}"}}


