Elefreaks ring:bit Car: Rozdiel medzi revíziami
Z SensorWiki
(Vytvorená stránka „Robot ring:bot Car od firmy Elecfreaks. <div style='text-align: center;'> 500px<BR> ''Elecfreaks ring:bit Car v2'' </div> * Produc…“) |
|||
| Riadok 7: | Riadok 7: | ||
</div> | </div> | ||
| − | * Product page https://www. | + | * Product page https://www.elecfreaks.com/ring-bit-car-v2-for-micro-bit.html |
| − | ** | + | * Príslušenstvo |
| + | ** [https://www.elecfreaks.com/tracking-module-for-ring-bit-car-v2.html Tracking module] | ||
| + | ** [https://www.elecfreaks.com/rainbow-led-strip-for-ring-bit-car-v2.html Rainbow LED] | ||
| + | ** [https://www.elecfreaks.com/ring-bit-car-accessories-sonar-bit-tracking-module-and-led-light-bar.html Tracking, Rainbow a Sonar modules] | ||
* Manual https://www.elecfreaks.com/learn-en/microbitKit/ring_bit_v2/index.html | * Manual https://www.elecfreaks.com/learn-en/microbitKit/ring_bit_v2/index.html | ||
* RLX (ceny k 20.1.2022) | * RLX (ceny k 20.1.2022) | ||
| Riadok 20: | Riadok 23: | ||
'''Technické parametre''' | '''Technické parametre''' | ||
| − | * Napájanie 3,5 - 5,0 V DC ( 3x AAA 1,5 V batéria | + | * Napájanie 3,5 - 5,0 V DC ( 3x AAA 1,5 V batéria) |
* Vstupy a senzory | * Vstupy a senzory | ||
** 2x infračervený detektor (na čiary) s roztečou 1,5 cm | ** 2x infračervený detektor (na čiary) s roztečou 1,5 cm | ||
** 1x ultrazvukový senzor SR04, SR04P (5V interface? odmeraj) | ** 1x ultrazvukový senzor SR04, SR04P (5V interface? odmeraj) | ||
| − | |||
| − | |||
** P0, P1, P2 | ** P0, P1, P2 | ||
* Výstupy a aktory | * Výstupy a aktory | ||
| − | ** 2x | + | ** 2x modifikovaný [https://www.elecfreaks.com/ef90d-micro-servo-360-degrees-digital-servo-for-micro-bit.html servomotor EF90D] |
| − | + | ** 2x RGB LED Neopixel zo spodnej strany | |
| − | ** 2x | + | * Rozmery: x x mm |
| − | + | * Hmotnosť: 120 g | |
| − | |||
| − | * Rozmery: | ||
| − | * Hmotnosť: | ||
'''Priradenie vstupov a výstupov''' | '''Priradenie vstupov a výstupov''' | ||
| − | P0 | + | P0 |
| − | P1 | + | P1 |
| − | P2 | + | P2 |
| − | |||
| − | |||
| − | |||
| − | |||
| − | |||
| − | |||
| − | |||
| − | |||
| − | |||
| − | |||
| − | |||
| − | |||
| − | |||
| − | |||
| − | |||
| − | |||
| − | |||
| − | |||
| − | |||
| − | |||
| − | |||
| − | |||
| − | |||
| − | |||
| − | |||
| Riadok 220: | Riadok 193: | ||
=== Line following robot === | === Line following robot === | ||
| + | |||
| + | ring:bit ukazkovy program https://makecode.microbit.org/45086-58044-52516-35101 | ||
Robot musí byť doplnený špeciálnym senzorom, ktorý sa pripojí k expanznej doske, umožňujúcej využiť aj viac ako 3 vstupy P0 - P3. | Robot musí byť doplnený špeciálnym senzorom, ktorý sa pripojí k expanznej doske, umožňujúcej využiť aj viac ako 3 vstupy P0 - P3. | ||
Verzia zo dňa a času 08:50, 20. január 2022
Robot ring:bot Car od firmy Elecfreaks.

Elecfreaks ring:bit Car v2
- Product page https://www.elecfreaks.com/ring-bit-car-v2-for-micro-bit.html
- Príslušenstvo
- Manual https://www.elecfreaks.com/learn-en/microbitKit/ring_bit_v2/index.html
- RLX (ceny k 20.1.2022)
- ring:bit v2 + micro:bit v2 47,88 € s DPH
- ring:bit v2 bez micro:bitu 23,00 € s DPH
- príslušenstvo: ultrazvukový senzor, sledovanie čiary a LED pásik 17,40 € s DPH
- príslušenstvo: len sledovanie čiary 7,08 € s DPH
- náhradný diel: riadiaca doska 6,73 € s DPH
Technické parametre
- Napájanie 3,5 - 5,0 V DC ( 3x AAA 1,5 V batéria)
- Vstupy a senzory
- 2x infračervený detektor (na čiary) s roztečou 1,5 cm
- 1x ultrazvukový senzor SR04, SR04P (5V interface? odmeraj)
- P0, P1, P2
- Výstupy a aktory
- 2x modifikovaný servomotor EF90D
- 2x RGB LED Neopixel zo spodnej strany
- Rozmery: x x mm
- Hmotnosť: 120 g
Priradenie vstupov a výstupov
 P0
 P1
 P2
Obsah
Základné programy
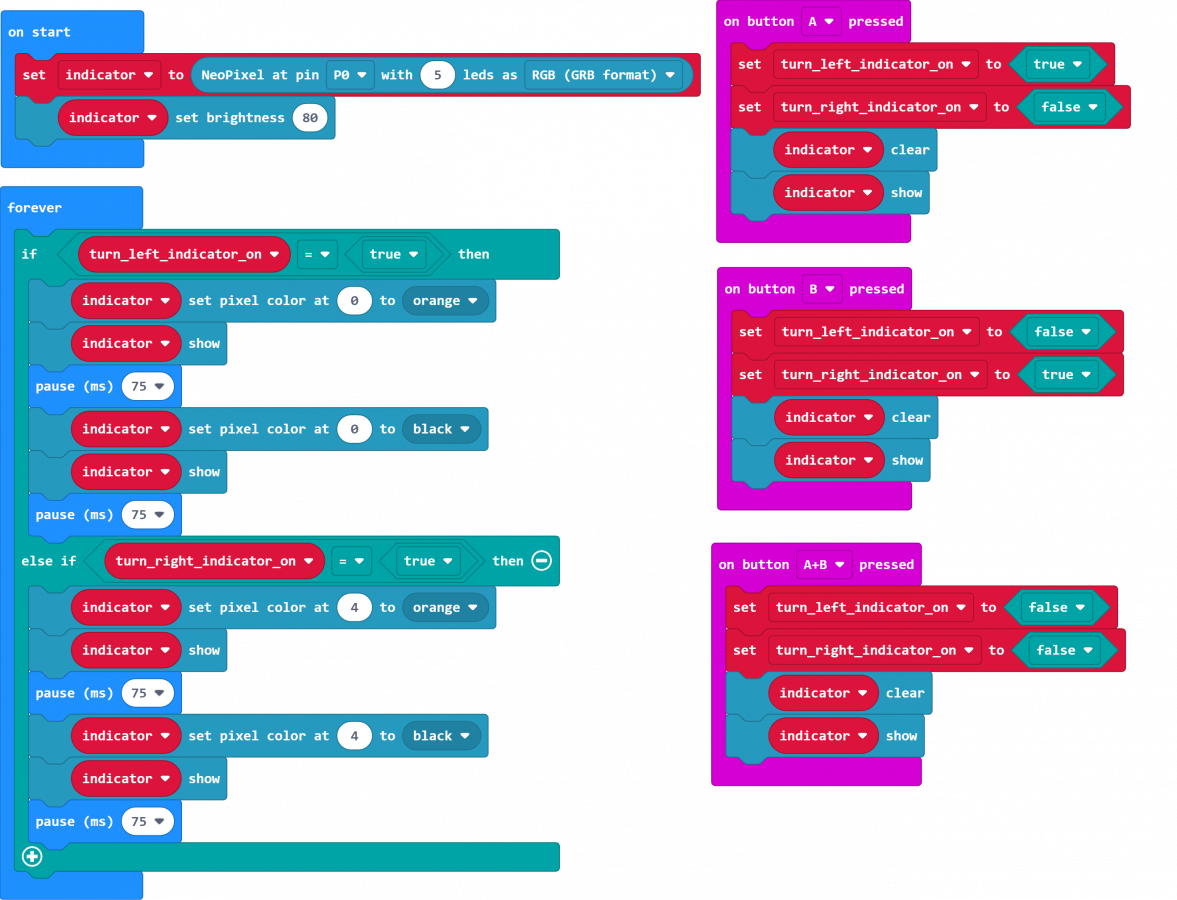
Blinker
Pre prácu so svetielkami na hornej hrane robota je potrebné nahrať knižnicu Neopixel
Jednoduchý program pre blinker, funguje na tlačítka - stlačením ľavého tlačidla 🅰 sa zapne ľavá smerovka, pravým tlačidlom 🅱 sa zapne pravá. Stlačením oboch 🅰+🅱 sa blinker vypne.
Smerovky

input.onButtonPressed(Button.A, function () {
    turn_left_indicator_on = true
    turn_right_indicator_on = false
    indicator.clear()
    indicator.show()
})
input.onButtonPressed(Button.AB, function () {
    turn_left_indicator_on = false
    turn_right_indicator_on = false
    indicator.clear()
    indicator.show()
})
input.onButtonPressed(Button.B, function () {
    turn_left_indicator_on = false
    turn_right_indicator_on = true
    indicator.clear()
    indicator.show()
})
let turn_right_indicator_on = false
let turn_left_indicator_on = false
let indicator: neopixel.Strip = null
indicator = neopixel.create(DigitalPin.P0, 5, NeoPixelMode.RGB)
indicator.setBrightness(80)
basic.forever(function () {
    if (turn_left_indicator_on == true) {
        indicator.setPixelColor(0, neopixel.colors(NeoPixelColors.Orange))
        indicator.show()
        basic.pause(75)
        indicator.setPixelColor(0, neopixel.colors(NeoPixelColors.Black))
        indicator.show()
        basic.pause(75)
    } else if (turn_right_indicator_on == true) {
        indicator.setPixelColor(4, neopixel.colors(NeoPixelColors.Orange))
        indicator.show()
        basic.pause(75)
        indicator.setPixelColor(4, neopixel.colors(NeoPixelColors.Black))
        indicator.show()
        basic.pause(75)
    }
})
def on_button_pressed_a():
    global turn_left_indicator_on, turn_right_indicator_on
    turn_left_indicator_on = True
    turn_right_indicator_on = False
    indicator.clear()
    indicator.show()
input.on_button_pressed(Button.A, on_button_pressed_a)

def on_button_pressed_ab():
    global turn_left_indicator_on, turn_right_indicator_on
    turn_left_indicator_on = False
    turn_right_indicator_on = False
    indicator.clear()
    indicator.show()
input.on_button_pressed(Button.AB, on_button_pressed_ab)

def on_button_pressed_b():
    global turn_left_indicator_on, turn_right_indicator_on
    turn_left_indicator_on = False
    turn_right_indicator_on = True
    indicator.clear()
    indicator.show()
input.on_button_pressed(Button.B, on_button_pressed_b)

turn_right_indicator_on = False
turn_left_indicator_on = False
indicator: neopixel.Strip = None
indicator = neopixel.create(DigitalPin.P0, 5, NeoPixelMode.RGB)
indicator.set_brightness(80)

def on_forever():
    if turn_left_indicator_on == True:
        indicator.set_pixel_color(0, neopixel.colors(NeoPixelColors.ORANGE))
        indicator.show()
        basic.pause(75)
        indicator.set_pixel_color(0, neopixel.colors(NeoPixelColors.BLACK))
        indicator.show()
        basic.pause(75)
    elif turn_right_indicator_on == True:
        indicator.set_pixel_color(4, neopixel.colors(NeoPixelColors.ORANGE))
        indicator.show()
        basic.pause(75)
        indicator.set_pixel_color(4, neopixel.colors(NeoPixelColors.BLACK))
        indicator.show()
        basic.pause(75)
basic.forever(on_forever)
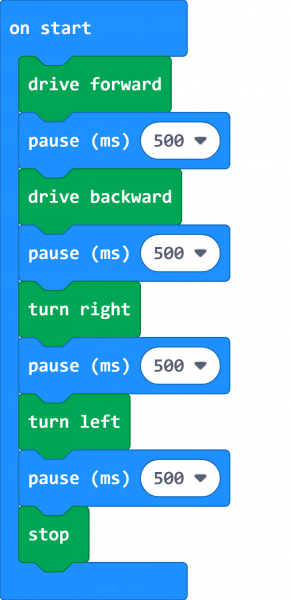
Základné pohyby
Výrobca, firma Kitronik poskytuje pre robota špeciálnu knižnicu. Niekedy sa volá iba Kitronik, ale väčšinou ju nájdete pod názvom Servo:Lite
Tento ukážkový program len pohýbe všetkými smermi a potom skončí.
Základné pohyby

kitronik_servo_lite.forward()
basic.pause(500)
kitronik_servo_lite.backward()
basic.pause(500)
kitronik_servo_lite.right()
basic.pause(500)
kitronik_servo_lite.left()
basic.pause(500)
kitronik_servo_lite.stop()
kitronik_servo_lite.forward()
basic.pause(500)
kitronik_servo_lite.backward()
basic.pause(500)
kitronik_servo_lite.right()
basic.pause(500)
kitronik_servo_lite.left()
basic.pause(500)
kitronik_servo_lite.stop()
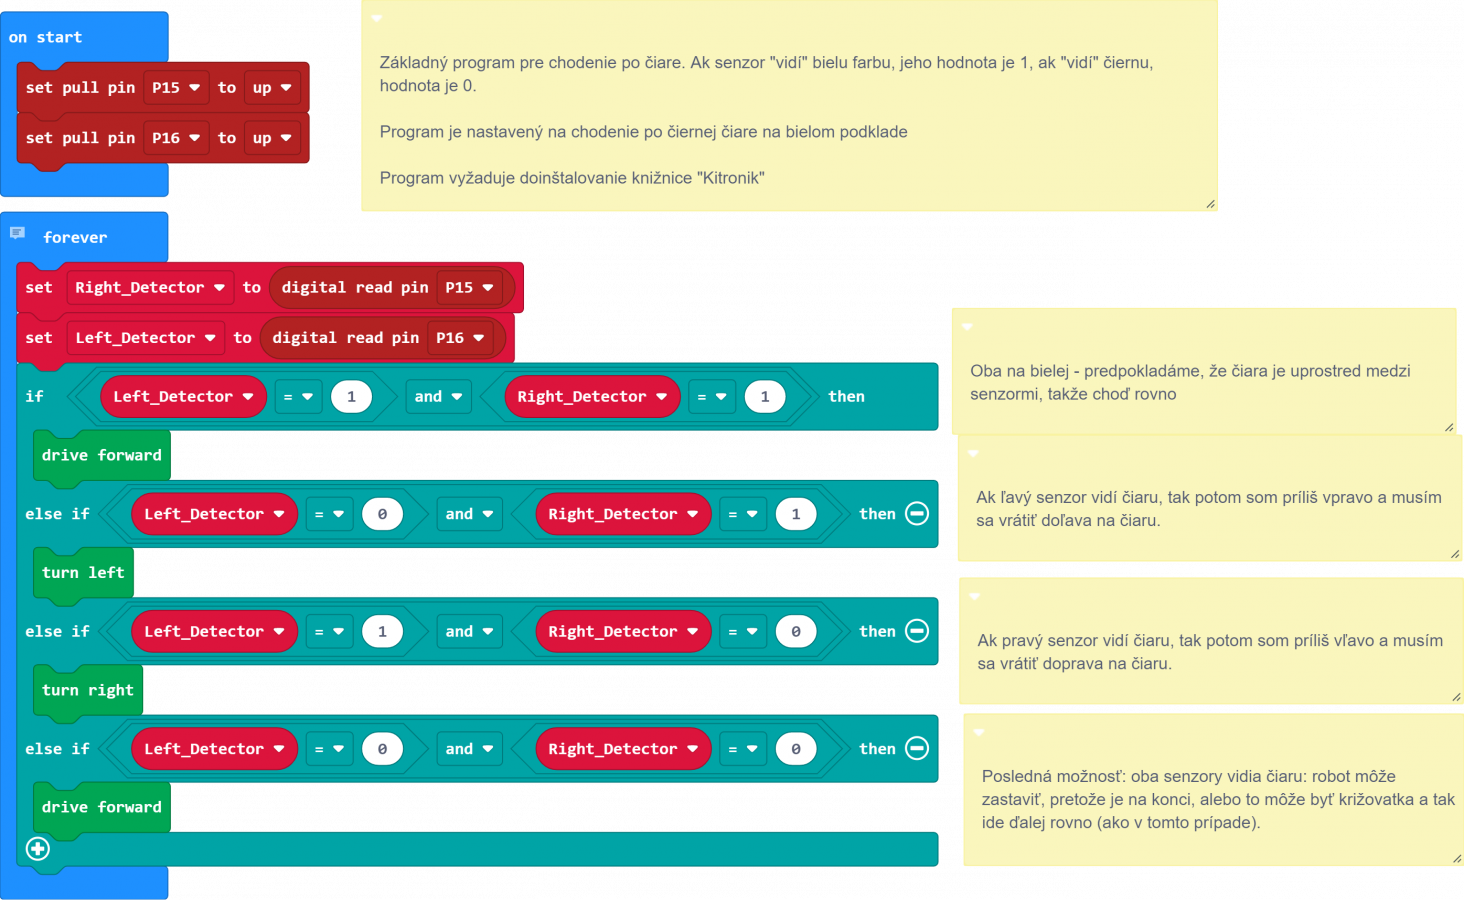
Line following robot
ring:bit ukazkovy program https://makecode.microbit.org/45086-58044-52516-35101
Robot musí byť doplnený špeciálnym senzorom, ktorý sa pripojí k expanznej doske, umožňujúcej využiť aj viac ako 3 vstupy P0 - P3.
Samozrejmosťou je tiež vopred nahrať knižnicu Kitronik
- Product page https://kitronik.co.uk/products/5659-line-following-add-on-for-move-mini-v2
- Product manual https://resources.kitronik.co.uk/pdf/5629-move-line-following-board-microbit-datasheet.pdf
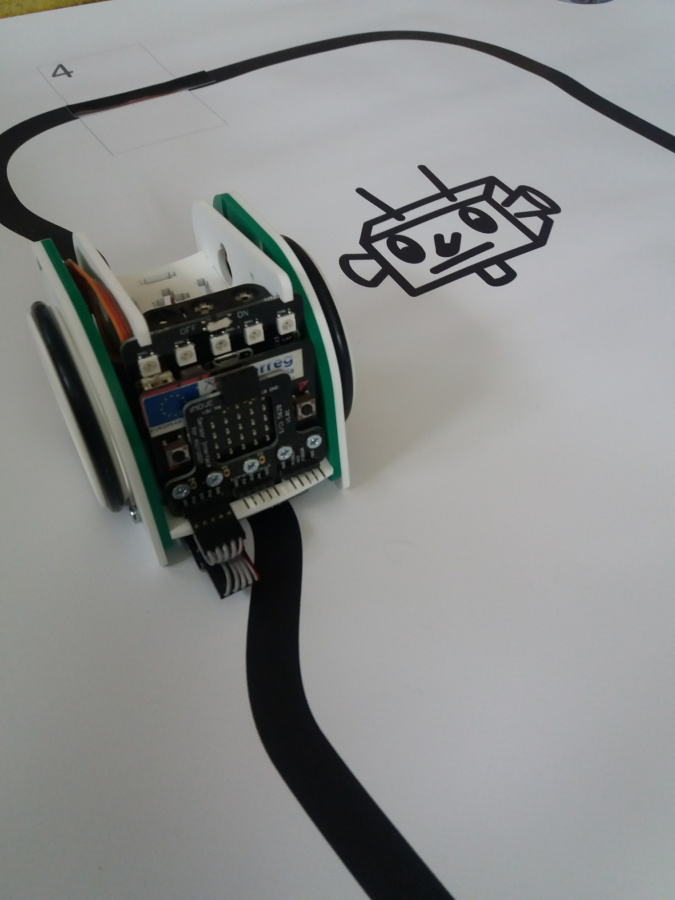
Robot sleduje čiernu čiaru na svetlom podklade.
Robot sleduje čiernu čiaru na svetlom podklade.


let Left_Detector = 0
let Right_Detector = 0
pins.setPull(DigitalPin.P15, PinPullMode.PullUp)
pins.setPull(DigitalPin.P16, PinPullMode.PullUp)

basic.forever(function on_forever() {

    Right_Detector = pins.digitalReadPin(DigitalPin.P15)
    Left_Detector = pins.digitalReadPin(DigitalPin.P16)
    if (Left_Detector == 1 && Right_Detector == 1) {
        kitronik.forward()
    } else if (Left_Detector == 0 && Right_Detector == 1) {
        kitronik.left()
    } else if (Left_Detector == 1 && Right_Detector == 0) {
        kitronik.right()
    } else if (Left_Detector == 0 && Right_Detector == 0) {
        kitronik.forward()
    }

})
Left_Detector = 0
Right_Detector = 0
pins.set_pull(DigitalPin.P15, PinPullMode.PULL_UP)
pins.set_pull(DigitalPin.P16, PinPullMode.PULL_UP)


def on_forever():
    global Right_Detector, Left_Detector
    Right_Detector = pins.digital_read_pin(DigitalPin.P15)
    Left_Detector = pins.digital_read_pin(DigitalPin.P16)
    if Left_Detector == 1 and Right_Detector == 1:
        kitronik.forward()
    elif Left_Detector == 0 and Right_Detector == 1:
        kitronik.left()
    elif Left_Detector == 1 and Right_Detector == 0:
        kitronik.right()
    elif Left_Detector == 0 and Right_Detector == 0:
        kitronik.forward()
basic.forever(on_forever)
Ultrazvukový senzor
Pre prácu s ultrazvukovým senzorom je potrebné nahrať knižnicu Sonar
Jednoduchý program, ktorý ukáže ako robot zastaví pred prekážkou

Robot s namontovaným snímačom.
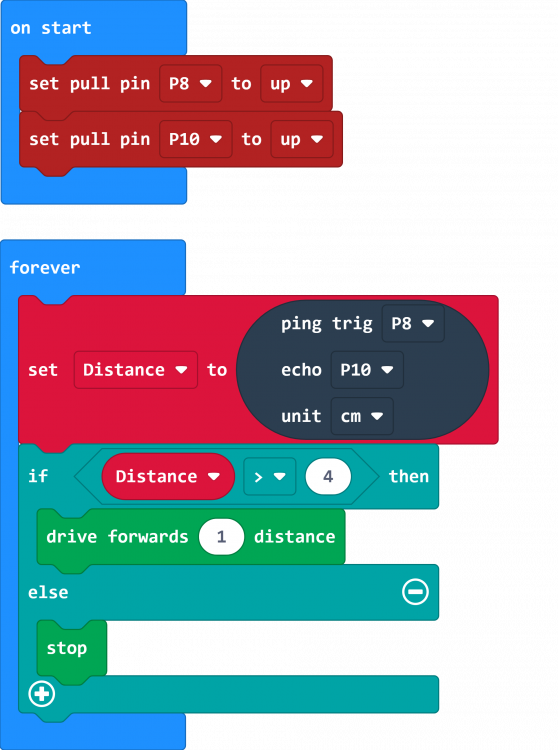
Stoj, prekážka.


let Distance = 0
pins.setPull(DigitalPin.P8, PinPullMode.PullUp)
pins.setPull(DigitalPin.P10, PinPullMode.PullUp)
basic.forever(function () {
    Distance = sonar.ping(
    DigitalPin.P8,
    DigitalPin.P10,
    PingUnit.Centimeters
    )
    if (Distance > 4) {
        kitronik_servo_lite.driveForwards(1)
    } else {
        kitronik_servo_lite.stop()
    }
})
Distance = 0
pins.set_pull(DigitalPin.P8, PinPullMode.PULL_UP)
pins.set_pull(DigitalPin.P10, PinPullMode.PULL_UP)

def on_forever():
    global Distance
    Distance = sonar.ping(DigitalPin.P8, DigitalPin.P10, PingUnit.CENTIMETERS)
    if Distance > 4:
        kitronik_servo_lite.drive_forwards(1)
    else:
        kitronik_servo_lite.stop()
basic.forever(on_forever)
👉 Späť na zoznam príkladov....