JTAGICE XPII
Zo stránky SensorWiki
Programátor na obvody AVR
Mal by spolupracovať priamo s AVR Studiom, na rozdiel od tých ostatných, ktoré väčšinou vedia pracovať len s avrdude.
- Product page https://www.waveshare.com/usb-avr-jtagice-xpii.htm
- Manual page https://www.waveshare.com/wiki/USB_AVRISP_XPII
- Manual page 2: https://www.waveshare.com/w/upload/DVD_AVR8_EN/data/product/USB_AVR_ISP_XPII_PG-1-1.htm
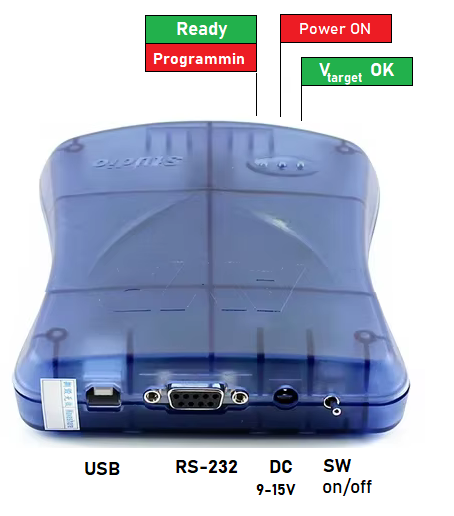
Sem by sa zišiel obrázok s konektormi, svetielkami a opisom čo ktoré znamená.

Podstatná je informácia o napájaní: - Powered from USB bus - Draws power from the USB bus, No need for Additional Power Supply - The target board should be powered from Another Power Supply
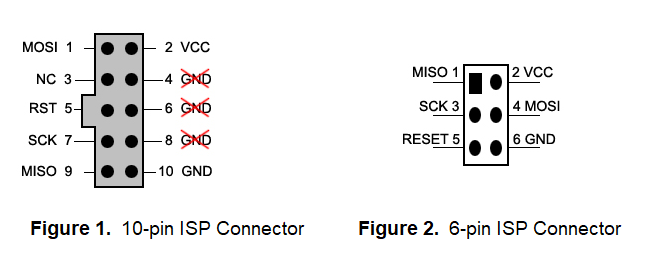
A ešte zapojenie konektorov:

Ale pozor, pre každú veriu AVR studia potrebuje iný firmware, ten čo som si kúpil ja pracuje bez problémov s MicrochipStudiom (cca v8). Firmware sa dá upgradovať priamo s AVR Studia, ale
ak by to nešlo, tu je návod na ručné programovanie (viď. https://www.waveshare.com/wiki/AVR_Programmer_Firmware_Upgrade_Manually)
Firmware upgrade manually
Normally, if you update the AVR Studio, you need to update the firmware of programmer as well, and generally the upgrade of firmware following the software.
But sometimes the firmware cannot upgrade automatically, in this case you can try to upgrade it manually. (this method only work for studio 6 and higher version)
- Open the installation directory of Studio, for example: c:\Program Files(x86)\Atmel\Atmel Studio 6.2\
- Copy the firmware(avrispmkii_fw.zip or tagicemkii_fw.zip) which is located at tools directory to c:\Program Files(x86)\Atmel\Atmel Studio 6.2\atbackend\
- Open cmd, and enter the directory where atfw program locats:
cd c:\Program Files(x86)\Atmel\Atmel Studio 6.2\atbackend\
Execute the command:
atfw -a avrispmkii_fw.zip -t avrispmkii
or
atfw -a jtagicemkii_fw.zip -t jtagicemkii
Note: Please according to your programmer to use the correspoding command and choose correct firmware