MEMS cvičenie 2
Zo stránky SensorWiki
Poznamky 2020: https://www.qsl.net/om3cph/sw/pot.html https://electronics.stackexchange.com/questions/231522/improving-the-linearity-of-a-potentiometer-after-loading http://www.geofex.com/article_folders/potsecrets/potscret.htm
Potenciometrické snímače
- Poskladajte si odporový senzor polohy so stupnicou.
- Zmerajte prevodovú charakteristiku odporového senzora polohy pomocou ohmmetra.
- Senzor pripojte k A/D prevodníku mikropočítača a pomocou programu nižšie zmerajte prevodovú charakteristiku celého meracieho člena.
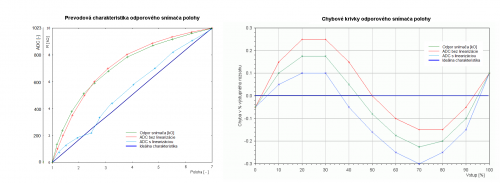
- Prevodovú charakteristiku zlinearizujte a doložte úspešnosť porovnaním metrologických parametrov.
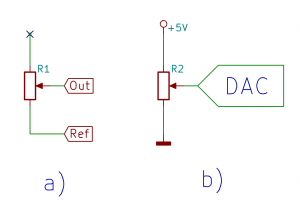
- Príklad na pripojenie analógového senzora: http://senzor.robotika.sk/sensorwiki/index.php/Acrob007
- Riadiaca doska Acrob http://senzor.robotika.sk/sensorwiki/index.php/Acrob
- Technická dokumentácia http://senzor.robotika.sk/sensorwiki/index.php/Acrob_technical_description
- Arduino homepage https://www.arduino.cc/
#define positionSensor 5       // define your pin here

int adcValue;
float outputValue;

void setup()
{
 Serial.begin(9600);           // typical values are 9600 or 115200
}

void loop()
{
 adcValue = analogRead(positionSensor); // read ADC value

 /*  =======  replace this section with your code ===== */

 outputValue = adcValue;

 /*  ================================================== */

 Serial.println( outputValue );  // prints value over serial

 delay(100);                     // delay in milliseconds

}
Pripojenie LCD a LED displeja a lokálne zobrazenie meranej veličiny
V tejto časti cvičenia zobrazíme meranú veličinu na miestnom LCD displeji mikropočítača.
Programovateľný LCD displej
- LCD zobrazovač. Klávesnica.
Obšírnejšie informácie o displejoch (prednáška z predmetu MMP)
LCD Modul
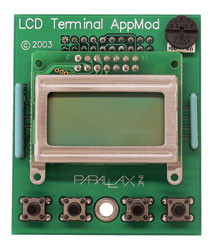
Vlastnosti:
- 2x8 LCD Displej bez podsvetlenia
- 4 Tlačítka
- Trimer na zmenu kontrastu
Technické parametre:
- Napájanie: 5 V @ 15 mA
- Pripojenie: 4-Bit parallel interface (Hitachi HD44780 compatible)
- Rozmery: 60 x 50 x 20 mm
- Pracovná teplota: 0 až +70 °C
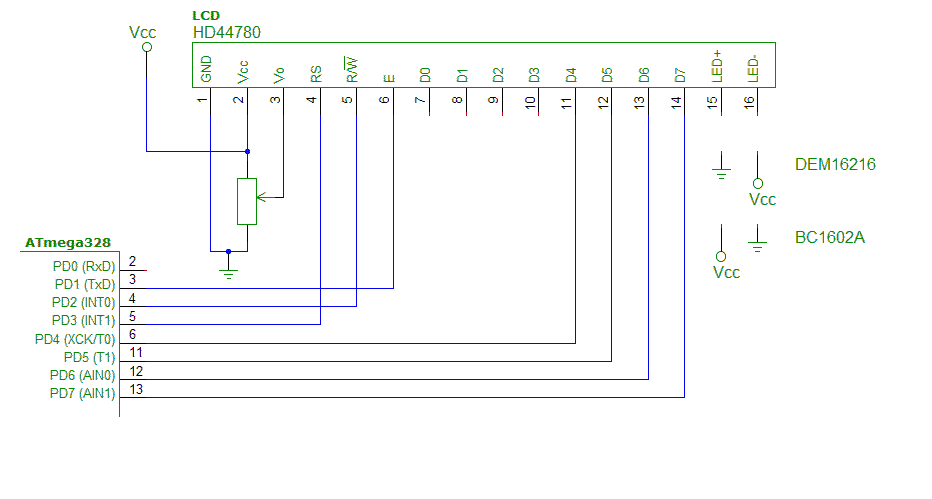
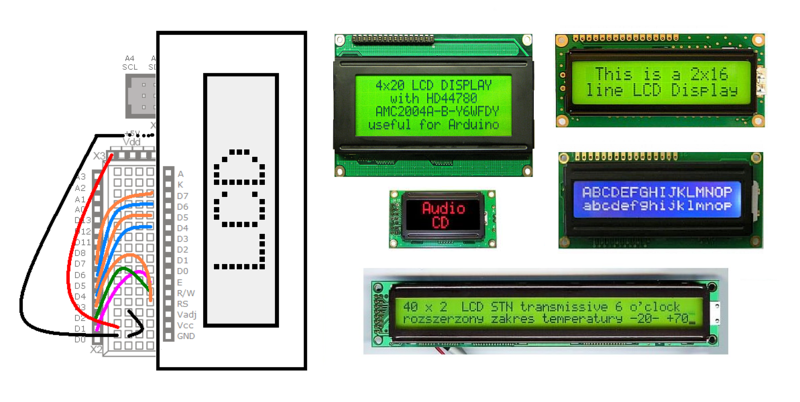
Najprv sa snažte pochopiť, ako je vytvorený vzorový program, ako sa konfiguruje pripojenie LCD k portom, skontrolujte konfiguráciu. Potom modifikujte program z predošlého cvičenia tak, aby
sa meraná hodnota polohy potenciometra zobrazila na displeji. Zobrazte aj inžinierske jednotky.
Literatúra
- Katalógové listy
- Radič Hitachi HD44780
- Displej 2x16 DEM 16216 SYH-LY
- Displej 2x16 DEM 20231 SYH-PY
- 2x16 Parallel LCD datasheet
- Podrobné manuály sú aj u výrobcu Hantronix.
- Peter Ouwehand: How to control a HD44780-based Character-LCD
- Ian Harries: HD44780-Based LCD Modules'
- Tomáš Dresler: Inteligentní displeje a jejich připojení k PC. [hw.cz]
- Nuts & Volts: Demystifying Character Based LCDs
- Stamp Works - pp. 73 and more [1]
Arduino
Nasledovný príklad je pre Arduino.
Pozn.: Ak budete vypisovať najprv štvorciferné číslo a potom trojciferné, nezabudnite to štvorciferné najprv vymazať, inak vám tam posledná cifra bude "visieť". Vymazať sa dá napríklad takto:
  //        12345678
 lcd.print("        ");
/*
  LiquidCrystal Library - Hello World

 Demonstrates the use a 8x2 LCD display.

   The circuit:
 * LCD RS pin to digital pin 3
 * LCD R/W pin to digital pin 2
 * LCD Enable pin to digital pin 1
 * LCD D4 pin to digital pin 4
 * LCD D5 pin to digital pin 5
 * LCD D6 pin to digital pin 6
 * LCD D7 pin to digital pin 7
 */

#include <LiquidCrystal.h>           // include the library

// initialize the library with the numbers of the interface pins
//  LiquidCrystal(RS, RW, EN, D4, D5, D6, D7)
LiquidCrystal lcd( 3,  2,  1,  4,  5,  6,  7);

void setup() {
  // set up the LCD's number of columns and rows:
  lcd.begin(8, 2);
  // Print a message to the LCD.
  lcd.print("Ahoj!");
}

void loop() {
  // set the cursor to column 0, line 1
  // (note: line 1 is the second row, since counting begins with 0):
  lcd.setCursor(0, 1);
  // print the number of seconds since reset:
  lcd.print(millis()/1000);
  // print the status of buttons:
  lcd.setCursor(6, 0);
  lcd.print(ReadButtons(),HEX);

}


/* ------------------------------------------------------- */
/*  Read and debounce the LCD AppMod buttons               */
/*                                                         */
/*  Returns 0 if nothing  is pressed                       */
/*  Returns 1 if button A is pressed                       */
/*  Returns 2 if button B is pressed                       */
/*  Returns 4 if button C is pressed                       */
/*  Returns 8 if button D is pressed                       */
/*  Returns combination if more is pressed (e.g. 6 for B+C)*/
/*                                                         */
/* ------------------------------------------------------- */

unsigned char ReadButtons()
{
  DDRD  = 0b00001110;                // make LCD bus inputs
  unsigned char state = 0xFF;           // assume nothing pressed

  for(int scan = 1; scan<=10; scan++)
  {
   state = state & ((PIND&0xF0)>>4); // make sure button held
   delay(5);                     // debounce 10 x 5 ms
  }

  DDRD  = 0b11111110;				 // return bus to outputs

  return(state);
}
Misc:
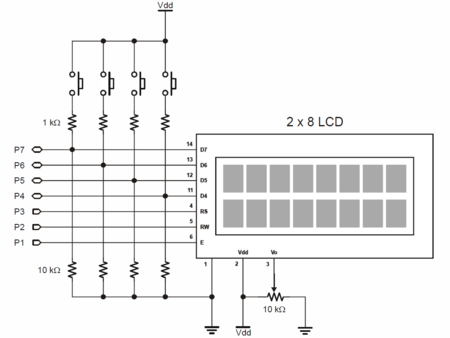
Prečo je takto napísaná a ako vlastne funguje lepšie zistíte, keď si preštudujete schému zapojenia:
Sedemsegmentový 4-miestny LED displej
- 4-miestny 7-segmentový displej
- Product page http://www.gme.sk/hd-m324rd-p512-924
- Datasheet http://www.gme.sk/img/cache/doc/512/924/hd-m324rd-datasheet-1.pdf
- Animácia k 7seg displeju: http://www.uize.com/examples/seven-segment-display.html
Programovanie
Z tejto časti nemusíte mať obavy, programovanie je jednoduché a budeme využívať existujúce programy s knižnicami, ktoré si len zľahka modifikujete pre svoje potreby.
- Programovací jazyk aj prostredie: Arduino
- Knižnica SevSeg: https://github.com/sparkfun/SevSeg
Ukážkové programy:
#include <SevSeg.h>

SevSeg MyDisp; //Instantiate a seven segment controller object

void setup()
{
  byte numDigits = 4;
  byte digitPins[] = {2, 3, 4, 5};                    // Digits:   1,2,3,4
  byte segmentPins[] = {6, 7, 8, 11, 12, 13, 14, 15}; // Segments: A,B,C,D,E,F,G,Period

  MyDisp.begin(COMMON_ANODE, numDigits, digitPins, segmentPins);
  MyDisp.setBrightness(80);
}

void loop()
{
  MyDisp.setNumber(1234,9);  // Second argument is decimal place

  MyDisp.refreshDisplay();   // Must run repeatedly
}
#include "SevSeg.h"
SevSeg myDisplay;

#define FOUR_DIGITS 4
#define A1 2
#define A2 3
#define A3 4
#define A4 5
#define SegA 6
#define SegB 7
#define SegC 8

int value;
int oldvalue;
char tempString[5];

//-------------------------------------------------------------------------------------------

void setup()
{
  value = 0;
  oldvalue = 0;

  myDisplay.Begin(COMMON_ANODE, FOUR_DIGITS, A1, A2, A3, A4, SegA, SegB, SegC, 11, 12, 13, 14, 15);
  myDisplay.SetBrightness(100); //Set the display to 100% brightness level
}
//-------------------------------------------------------------------------------------------
void loop()
{
  value = analogRead(5);                          // measurement
  value = (15*oldvalue + value)/16;               // simple filter
   sprintf(tempString, "%4d",  (long)value, DEC); // create output string
   myDisplay.DisplayString(tempString, 0);        // display value on disp
   oldvalue = value;

}
//-------------------------------------------------------------------------------------------
Rozličné neusporiadané linky:
- Animácia k 7seg displeju: http://www.uize.com/examples/seven-segment-display.html
- Nas displej:
- Schema zapojenia Arduino https://www.arduino.cc/en/uploads/Main/Arduino-Pro-schematic.pdf
Úlohy
Úlohy, ktoré treba odovzdať:
- Graf 1: prevodové charakteristiky
- Chyby podľa EN 60 770
- Nepresnosť
- Meraná chyba
- Nelinearita
- Hysteréza
- Neopakovateľnosť
- Graf 2: chybové krivky (viď obr.)
- Program pre mikroprocesor na linearizáciu
Hodnotenie: 3 body
Deadline: 27. 2. 2018
