Generovanie tónov
Zo stránky SensorWiki
Generovanie tónov prostredníctvom pripojeného miniatúrneho reproduktora je veľmi obľúbené a využíva sa aj ako akustická signalizácia pri prekročení hraničných stavov, alebo ako alarm.
Pri použití miniatúrnych piezoreproduktorov si treba dať pozor na správny typ. V praxi sa veľmi často vyskytujú aj samobudené signazlizačné prvky - sirénky, ku ktorým stačí priviesť správne napájacie napätie a zvuk začnú generovať automaticky, pomocou zabudovaného oscilátora, najčastejšie naladeného na mechanickú rezonančnú frekvenciu meniča, takže obvykle aj účinnosť je výborná a hlasitosť ľahko presiahne desiatky dB.
My sa však v ďalšom budeme zaoberať len pasívnym meničom, čo je vlastne miniatúrny reproduktor, ktorý musíme vybudiť vhodnou frekvenciou, aby sme z neho dostali nejaký zvuk. Na prvý pohľad je to nevýhoda, ale takto môžeme generovať oveľa širšiu škálu zvukov. Nepočítajte však s nejakou hi-fi kvalitou, piezomeniče sú určené najmä na signalizáciu a nie na prehrávanie Carminy Burana.
Najjednoduchší program
Frekvečný signál môžeme na výstupoch procesora generovať dvoma spôsobmi
- priamo ovládať daný výstup (v takom prípade však procesor nerobí nič iné), alebo
- využiť vstavané periférie, v tomto prípade počítadlo v režime generátora frekvencie.
Ďalej sa budeme zaoberať len druhým spôsobom. To nám obmedzí možné výstupy - môžu to byť len tie, na ktoré sú pripojené interné počítadlá, t.j. 3,5,6,9,10 alebo 11. Na doske Arduino UNO majú tieto výstupy pri čísle aj vlnovku.
Poznámka: výstupný frekvenčný signál bude mať síce správnu frekvenciu, ale tvar bude obdĺžnikový. Jednoduchými prostriedkami nedokážeme na výstupe generovať spojitý harmonický signál (sínusovku).
/* *************************************************
*
*  Arduino code for Passive buzzer / Piezo Speaker
*
* ************************************************** */

const int buzzer = 6;      // connect buzzer to Arduino pin 6

void setup(){
  pinMode(buzzer, OUTPUT); // set the buzzer pin as an output
}

void loop(){
  tone(buzzer, 440);       // send 440 Hz wave to the output
  delay(1000);             // and do it for 1 sec
  noTone(buzzer);          // stop frequency output
  delay(1000);             // again for 1 sec
  tone(buzzer, 880, 500);  // third parameter is length in ms
  delay(1000);             // in reality 1000 - 500
}
To site spravit v AVRG-GCC nas este len caka.
Obmedzenia pre Arduuino[1]:
- Ak použijete funkciu tone(), tak nemôžete zároveň použiť analogWrite() na pinoch 3 alebo 11, pretože obe používajú ten istý časovač.
- Funkcia tone() nevie generovať tón s frekvenciou menšou ako 31 Hz.
- Funkcia tone() sa nedá použiť súčasne na dvoch rôznych výstupoch.
Poznámky k programu pre AVR-GCC
Podla https://balau82.wordpress.com/2014/10/15/using-a-buzzer-with-arduino-in-pure-c/
V horeuvedenom príklade využívame Timer0 a jeho výstup OC0A, ktorý je mapovaný na pin 6 portu D procesora ATmega328P, (na Arduino doske označený ako D6).
Počítadlo a časovač Timer0 má niekoľko režimov činnsotí, my sme využili režim Clear Timer on Compare Match (CTC). V tomto režime sa dá výstup pinu OC0A ovládať frekvenciou, ktorú vieme
nastaviť pomerne presne aj s potrebnou striedou 50% (pripomínam, že výstup je obdĺžnikový, nie harmonický). Vzťah pre nastavenie frekvencie je podľa datasheetu:
Kde je frekvencia generovaného signálu, je frekvencia oscilátora (pre Arduino UNO je to 16 MHz), je preddelič a OCRnx je príslušný Output Compare Register, v našom prípade OCR0A, ktorý prislúcha k pinu OC0A.
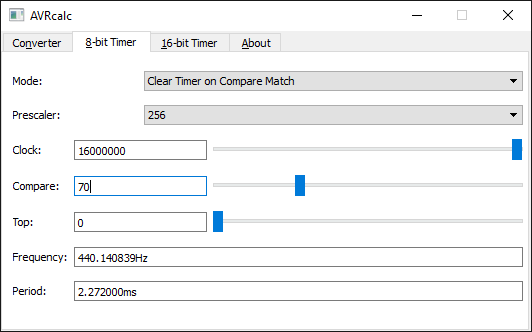
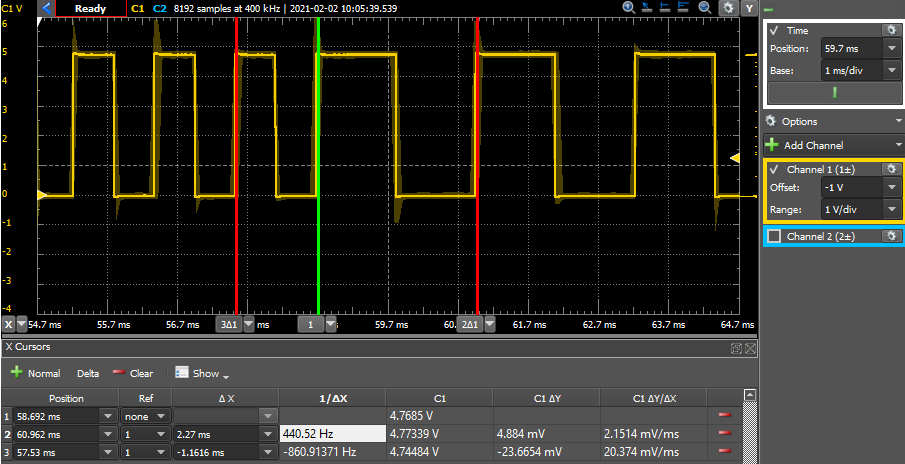
Ako príklad uvedieme výpočet hodnôt pre komorné A, teda tón s frekvenciou 440Hz. Preddelič môžeme nastaviť len na hodnoty z množiny {1; 8; 64; 256; 1024}, tak vyberieme napríklad N = 256 a k tomu dopočítame hodnotu pre register OCR0A = 70. Pre iné hodnoty nám nevyjde hodnota, ktorá by sa vošla do 8-bitového registra.
Pre výpočet sa dá použiť aj niektorá z utilitiek na internete, napríklad
- AVR Calc by Brandon Roberts https://sourceforge.net/projects/avrcalc/
Pozri -> Oneskorenia s AVR
Komplexnejšie melódie
Ak sa nám bude chcieť, tak sem dáme aj zložitejšie programíky...
Napríklad tento odtialto https://learn.sparkfun.com/tutorials/sik-experiment-guide-for-arduino---v32/experiment-11-using-a-piezo-buzzer
/*
SparkFun Inventor's Kit
Example sketch 11

BUZZER

  Use the buzzer to play a song!

  The buzzer in your Inventor's Kit is an electromechanical
  component you can use to make noise. Inside the buzzer is a
  coil of wire and a small magnet. When current flows through
  the coil, it becomes magnetized and pulls towards the magnet,
  creating a tiny "click". When you do this thousands of times
  per second, you create tones.

  The Arduino has a built-in command called tone() which clicks
  the buzzer at a certain frequency. This sketch knows the
  frequencies of the common notes, allowing you to create songs.
  We're never going to let you down!

Hardware connections:

  The buzzer has two pins. One is positive and one is negative.
  The postitive pin is marked by a "+" symbol on both the top
  and bottom of the buzzer.

  Connect the positive pin to Arduino digital pin 9.
  (Note that this must be a PWM pin.)
  Connect the negative pin to GND.

  Tip: if the buzzer doesn't fit into the breadboard easily,
  try rotating it slightly to fit into diagonal holes.

This sketch was written by SparkFun Electronics,
with lots of help from the Arduino community.
(This sketch was originally developed by D. Cuartielles for K3)
This code is completely free for any use.
Visit http://learn.sparkfun.com/products/2 for SIK information.
Visit http://www.arduino.cc to learn about the Arduino.

Version 2.0 6/2012 MDG
*/

/*
This sketch uses the buzzer to play songs.
The Arduino's tone() command will play notes of a given frequency.
We'll provide a function that takes in note characters (a-g),
and returns the corresponding frequency from this table:

  note  frequency
  c     262 Hz
  d     294 Hz
  e     330 Hz
  f     349 Hz
  g     392 Hz
  a     440 Hz
  b     494 Hz
  C     523 Hz

For more information, see http://arduino.cc/en/Tutorial/Tone
*/

const int buzzerPin = 6;

// We'll set up an array with the notes we want to play
// change these values to make different songs!

// Length must equal the total number of notes and spaces

const int songLength = 18;

// Notes is an array of text characters corresponding to the notes
// in your song. A space represents a rest (no tone)

char notes[] = "cdfda ag cdfdg gf "; // a space represents a rest

// Beats is an array of values for each note and rest.
// A "1" represents a quarter-note, 2 a half-note, etc.
// Don't forget that the rests (spaces) need a length as well.

int beats[] = {1,1,1,1,1,1,4,4,2,1,1,1,1,1,1,4,4,2};

// The tempo is how fast to play the song.
// To make the song play faster, decrease this value.

int tempo = 113;


void setup()
{
  pinMode(buzzerPin, OUTPUT);
}


void loop()
{
  int i, duration;

  for (i = 0; i < songLength; i++) // step through the song arrays
  {
    duration = beats[i] * tempo;  // length of note/rest in ms

    if (notes[i] == ' ')          // is this a rest?
    {
      delay(duration);            // then pause for a moment
    }
    else                          // otherwise, play the note
    {
      tone(buzzerPin, frequency(notes[i]), duration);
      delay(duration);            // wait for tone to finish
    }
    delay(tempo/10);              // brief pause between notes
  }

  // We only want to play the song once, so we'll pause forever:
  while(true){}
  // If you'd like your song to play over and over,
  // remove the above statement
}


int frequency(char note)
{
  // This function takes a note character (a-g), and returns the
  // corresponding frequency in Hz for the tone() function.

  int i;
  const int numNotes = 8;  // number of notes we're storing

  // The following arrays hold the note characters and their
  // corresponding frequencies. The last "C" note is uppercase
  // to separate it from the first lowercase "c". If you want to
  // add more notes, you'll need to use unique characters.

  // For the "char" (character) type, we put single characters
  // in single quotes.

  char names[] = { 'c', 'd', 'e', 'f', 'g', 'a', 'b', 'C' };
  int frequencies[] = {262, 294, 330, 349, 392, 440, 494, 523};

  // Now we'll search through the letters in the array, and if
  // we find it, we'll return the frequency for that note.

  for (i = 0; i < numNotes; i++)  // Step through the notes
  {
    if (names[i] == note)         // Is this the one?
    {
      return(frequencies[i]);     // Yes! Return the frequency
    }
  }
  return(0);  // We looked through everything and didn't find it,
              // but we still need to return a value, so return 0.
}
A tu je k dispozícii príklad aj s niekoľkými už predpripravenými melódiami:
- https://dragaosemchama.com/en/2019/02/songs-for-arduino/
- https://github.com/robsoncouto/arduino-songs
A tu je to aj s hudobnou teóriou:
- ↑ Referenčná príručka Arduino, dostupná na adrese https://www.arduino.cc/reference/en/language/functions/advanced-io/tone/


