Inteligentný ultrazvukový skener: Rozdiel medzi revíziami
Zo stránky SensorWiki
| Riadok 90: | Riadok 90: | ||
/* A nezabudnite zdroják hojne komentovať */ | /* A nezabudnite zdroják hojne komentovať */ | ||
int | Connections: | ||
MMA7455 Arduino | |||
GND GND | |||
VDD 5V | |||
I2C DATA* SDA | |||
I2C CLK* | |||
*/ | |||
#include <Wire.h> //Include the Wire library | |||
#include <MMA_7455.h> //Include the MMA_7455 library | |||
MMA_7455 accel = MMA_7455(); // Make MMA7455 object | |||
char xVal, yVal, zVal; // Return value variables | |||
int reading = 0; | |||
float distance, time_s; | |||
#define SRF_ADDRESS_SDA 0x7F // READ DIGITAL ADDRESS ONLY VALUE OF SRF 012 | HEX 0x7F | |||
#define MMA_7455_ADDRESS 0x1D //I2C Adsress for the sensor | |||
#define MMA_7455_MODE_CONTROLL 0x16 //Call the sensors Mode Control | |||
#define X_OUT 0x06 //Register for reading the X-Axis | |||
#define Y_OUT 0x07 //Register for reading the Y-Axis | |||
#define Z_OUT 0x08 //Register for reading the Z-Axis | |||
/* | |||
* Setup Arduino and connected devices. | |||
*/ | |||
void setup() { | |||
Serial.begin(9600); // Use the Serial Monitor window at 9600 baud | |||
// Set the g force sensitivity: 2=2g, 4=4g, 8-8g | |||
accel.initSensitivity(2); | |||
// Update the numbers with your own values from the MMA7455_CalibrateOffset sketch. | |||
accel.calibrateOffset(0, 0, 0); | |||
} | |||
/* | |||
* Acan avaliable address of connected device to arduino. | |||
*/ | |||
void scan_addresses(){ | |||
byte error, address; | |||
int nDevices; | |||
Serial.println("Scanning..."); | |||
nDevices = 0; | |||
for(address = 1; address < 127; address++ ) | |||
{ | |||
// The i2c_scanner uses the return value of | |||
// the Write.endTransmisstion to see if | |||
// a device did acknowledge to the address. | |||
Wire.beginTransmission(address); | |||
error = Wire.endTransmission(); | |||
if (error == 0) | |||
{ | |||
Serial.print("I2C device found at address 0x"); | |||
if (address<16) | |||
Serial.print("0"); | |||
Serial.print(address,HEX); | |||
Serial.println(" !"); | |||
nDevices++; | |||
} | |||
else if (error==4) | |||
{ | |||
Serial.print("Unknown error at address 0x"); | |||
if (address<16) | |||
Serial.print("0"); | |||
Serial.println(address,HEX); | |||
} | |||
} | |||
if (nDevices == 0) | |||
Serial.println("No I2C devices found\n"); | |||
else | |||
Serial.println("done\n"); | |||
delay(5000); // wait 5 seconds for next scan | |||
} | |||
/* | |||
* Read Values from Ultrasound RFS | |||
* @remarks: Begin transmission on spcific address. | |||
*/ | |||
void srf_read_echos(){ | |||
//Serial.println("Raeding echos..."); | |||
// step 1: instruct sensor to read echoes | |||
Wire.beginTransmission(SRF_ADDRESS_SDA); // transmit to device #29 (0x1D) | |||
Wire.write(0x00); // sets register pointer to the command register (0x00) | |||
distance=Wire.write(0x51); // command sensor to measure in "centimeters" (0x51) | |||
time_s=Wire.write(0x52); // command sensor to measure in "ping microseconds" (0x51) | |||
Wire.endTransmission(); // stop transmitting | |||
// step 2: wait for readings to happen | |||
delay(70); // datasheet suggests at least 65 milliseconds | |||
// step 3: instruct sensor to return a particular echo reading | |||
Wire.beginTransmission(SRF_ADDRESS_SDA); // transmit to device #29 | |||
Wire.write(0x02); // sets register pointer to echo #1 register (0x02) | |||
Wire.endTransmission(); // stop transmitting | |||
// step 4: request reading from sensor | |||
Wire.requestFrom(SRF_ADDRESS_SDA, 2); // request 2 bytes from slave device #29 | |||
// step 5: receive reading from sensor | |||
if (2 <= Wire.available()) | |||
{ // if two bytes were received | |||
reading = Wire.read(); // receive high byte (overwrites previous reading) | |||
//Serial.println(reading); // print the reading | |||
reading = reading << 8; // shift high byte to be high 8 bits | |||
reading |= Wire.read(); // receive low byte as lower 8 bits | |||
//Serial.print(" "); | |||
//Serial.print(reading); // print the reading | |||
} | |||
//Wire.endTransmission(); | |||
//delay(1000); // wait a bit since people have to read the output :) | |||
} | |||
/* | |||
* Read Values from Acclerometer | |||
* @remarks: call included library for accelerometer. Open transmissiinon for reading3 | |||
*/ | |||
void read_acc_vals(){ | |||
// Get the X, Y, anx Z axis values from the device | |||
xVal = accel.readAxis('x'); // Read X Axis | |||
yVal = accel.readAxis('y'); // Read Y Axis | |||
zVal = accel.readAxis('z'); // Read Z Axis | |||
// Display the in the Serial Monitor window. | |||
Serial.print(" "); | |||
Serial.print(xVal, DEC); | |||
Serial.print(" "); | |||
Serial.print(yVal, DEC); | |||
Serial.print(" "); | |||
Serial.print(zVal, DEC); | |||
Serial.print(" "); | |||
Serial.print(reading); | |||
Serial.print("\n"); | |||
} | |||
/* | |||
* run program in loop | |||
*/ | |||
void loop() { | |||
read_acc_vals(); | |||
delay(1000); | |||
srf_read_echos(); | |||
} | } | ||
</source> | </source> | ||
| Riadok 102: | Riadok 251: | ||
[[Médiá:MojProgram.c|program.c]] | [[Médiá:MojProgram.c|program.c]] | ||
=== Overenie === | === Overenie === | ||
Verzia z 16:33, 22. máj 2018
| Autori: | Maroš Kolibaš, Balázs Sebo a Ján Sapura | |
| Študijný odbor: | Aplikovaná mechatronika a elektromobilita | 1. Ing. (2018) |
Zadanie
- Zrealizujte projekt na snímanie polohy a zobrazenie objektu v 3D grafe pomocou vhodne zvolených senzorov cez I2C komunikáciu pomocou arduino.
Literatúra:
- Zoznam použitej literatúry, vrátane katalógových údajov (datasheet), internetových odkazov a pod.
Analýza
Použité komponenty:
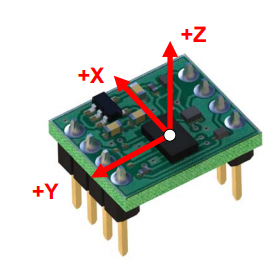
- 3D modul akcelerometra MMA7455
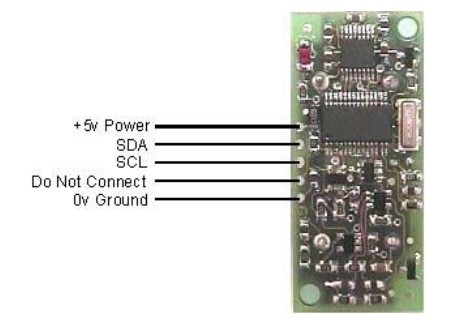
- Ultrazvuk na meranie vzdialensti SRF08
- Arduino
- I2C ZBERNICA
MMA7455:
je 3D akcelerometer, ktorý je nízkonapäťový mikro snímač s digitálnym výstupom pomocou ktorého vieme snímať akceleráciu v 3 osiach. Ponúka niekoľko výhodných integrovaných funkcií, analógový digitálny prevodník (ADC), digitálný dolnopriepustný filter a určovanie citlivosti v rozsahu ±2g, ±4g, or ±8g. Tento modul je vhodný takmer pre ktorýkoľvek mikroradič vďaka vnútro systémovému napäťovému regulátoru a I / O meničov úrovni napätia. Pracuje v širokom rozsahu napájacieho napätia od 2,5 VDC do 5,5 VDC a komunikuje prostredníctvom sériového periférneho rozhrania (SPI) alebo integrovaného obvodu (I2C) zbernice.
Kľúčové vlastnosti:
- Požiadavky na napájanie: 2,5 - 5,5 VDC; 26 μA v pohotovostnom režime, 0,5 - 3 mA aktívny
- Komunikácia: SPI alebo I2C
- Rozmery: 12,7 x 15,2 x 11,7 mm
- Prevádzková teplota: -40 až +85 ° C
Obr. 1. 3D modul akcelerometra MMA7455
SRF08:
Komunikácia s ultrazvukovým diaľkovým ovládačom SRF08 je cez zbernicu I2C. Toto je k dispozícii na populárnych riadiacich jednotkách, ako napríklad OOPic. Predvolená odoslaná adresa SRF08 je 0xE0. Používateľ môže zmeniť na ktorúkoľvek z 16 adries E0, E2, E4, E6, E8, EA, EK, EE, F0, F2, F4, F6, F8, FA, FC alebo FE. Môže sa použiť 16 sonarov. Okrem vyššie uvedených adries budú všetky sonary na zbernici I2C odpovedať na adresu 0. Linky SCL a SDA by mali mať každý pull-up rezistor na + 5v niekde na I2C zbernici.. Oni sú SRF08 je vždy slave - nikdy master zbernica.
Kľúčové vlastnosti:
- Napätie: 5v
- Frekvencia: 40KHz
- Maximálny rozsah: 6 m
- Minimálny rozsah: 3 cm
- Pripojenie: zbernica I2C
- Rozmery: 43 mm x 20 mm x 17 mm
Obr. 2. SRF08 Ultra sonic range finder
I2C ZBERNICA:
Zariadenia na zbernici I2C sú buď typu majster alebo slave. Master je vždy zariadenie, ktoré riadi SCL. Slave zariadenia sú zariadenia, ktoré reagujú na master. Slave nie je schopný iniciovať prenos cez zbernicu I2C, to môže urobiť iba master. Na zbernici I2C môžu byť pripojených zvyčajne viac zariadení, avšak zvyčajne existuje len jeden master. V našom systéme bude hlavným kontrolórom náš počítač (arduino) a slave zariadenia budú naše moduly ako SRF08 alebo MMA7455. Slave zariadenia nikdy nezačnú prevod. Master aj slave dokážu prenášať dáta cez I2C zbernicu, ale tento prenos je vždy riadený hlavným operátorom.
Popis riešenia
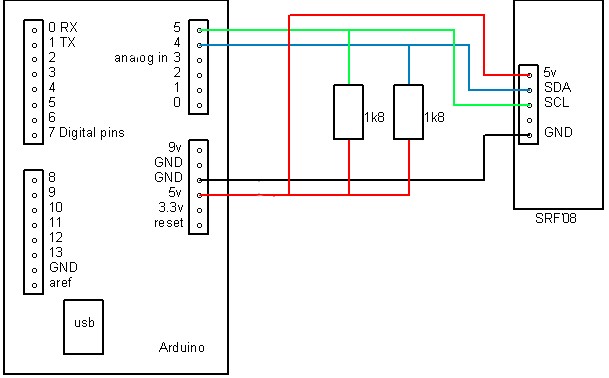
Nižšie je uvedená schéme zapojenia pre konkrétne náš snímač SRF08 alebo tiež možné nastavenie pre snímač SRF02 pre Arduino. Jedinými dodatočnými obvodmi sú dva pull-up odpory 1,8 kOhm, ako môžete vidieť nižšie.
Zapojenie arduina s ultrazvukom:
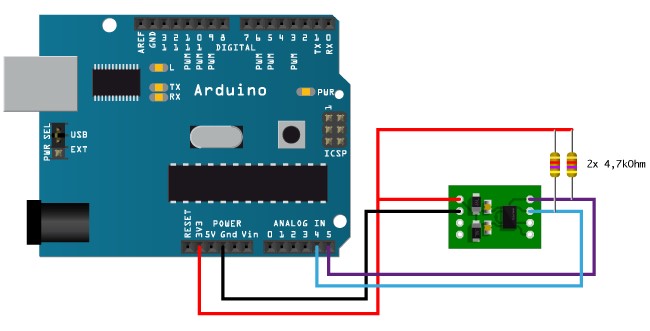
Zapojenie arduina s akcelerometrom MMA7455:
Algoritmus a program
Uveďte stručný popis algoritmu, v akom jazyku a verzii vývojového prostredia ste ho vytvorili. Je vhodné nakresliť aspoň hrubú štruktúru programu napríklad vo forme vývojového diagramu. Rozsiahly program pre lepšiu prehľadnosť rozdeľte do viacerých súborov.
Vyberte podstatné časti zdrojového kódu, použite na to prostredie source:
/* A nezabudnite zdroják hojne komentovať  */

 Connections:
  MMA7455      Arduino
  GND          GND
  VDD          5V
  I2C DATA*    SDA
  I2C CLK*
*/

#include <Wire.h>                       //Include the Wire library
#include <MMA_7455.h>                   //Include the MMA_7455 library

MMA_7455 accel = MMA_7455();            // Make MMA7455 object

char xVal, yVal, zVal;                  // Return value variables
int reading = 0;
float distance, time_s;

#define SRF_ADDRESS_SDA 0x7F            // READ DIGITAL ADDRESS ONLY VALUE OF SRF 012      | HEX 0x7F
#define MMA_7455_ADDRESS 0x1D           //I2C Adsress for the sensor
#define MMA_7455_MODE_CONTROLL 0x16     //Call the sensors Mode Control

#define X_OUT 0x06 //Register for reading the X-Axis
#define Y_OUT 0x07 //Register for reading the Y-Axis
#define Z_OUT 0x08 //Register for reading the Z-Axis

/*
 * Setup Arduino and connected devices.
 */
void setup() {
  Serial.begin(9600);           // Use the Serial Monitor window at 9600 baud

  // Set the g force sensitivity: 2=2g, 4=4g, 8-8g
  accel.initSensitivity(2);

  // Update the numbers with your own values from the MMA7455_CalibrateOffset sketch.
  accel.calibrateOffset(0, 0, 0);
}

/*
 * Acan avaliable address of connected device to arduino.
 */
void scan_addresses(){
  byte error, address;
  int nDevices;

  Serial.println("Scanning...");

  nDevices = 0;
  for(address = 1; address < 127; address++ )
  {
    // The i2c_scanner uses the return value of
    // the Write.endTransmisstion to see if
    // a device did acknowledge to the address.
    Wire.beginTransmission(address);
    error = Wire.endTransmission();

    if (error == 0)
    {
      Serial.print("I2C device found at address 0x");
      if (address<16)
        Serial.print("0");
      Serial.print(address,HEX);
      Serial.println("  !");

      nDevices++;
    }
    else if (error==4)
    {
      Serial.print("Unknown error at address 0x");
      if (address<16)
        Serial.print("0");
      Serial.println(address,HEX);
    }
  }
  if (nDevices == 0)
    Serial.println("No I2C devices found\n");
  else
    Serial.println("done\n");

  delay(5000);           // wait 5 seconds for next scan
}

/*
 * Read Values from Ultrasound RFS
 * @remarks: Begin transmission on spcific address.
 */
void srf_read_echos(){
  //Serial.println("Raeding echos...");
     // step 1: instruct sensor to read echoes
  Wire.beginTransmission(SRF_ADDRESS_SDA); // transmit to device #29 (0x1D)

  Wire.write(0x00);      // sets register pointer to the command register (0x00)
  distance=Wire.write(0x51);      // command sensor to measure in "centimeters" (0x51)
  time_s=Wire.write(0x52);      // command sensor to measure in "ping microseconds" (0x51)

  Wire.endTransmission();      // stop transmitting

  // step 2: wait for readings to happen
  delay(70);                   // datasheet suggests at least 65 milliseconds

  // step 3: instruct sensor to return a particular echo reading
  Wire.beginTransmission(SRF_ADDRESS_SDA); // transmit to device #29
  Wire.write(0x02);      // sets register pointer to echo #1 register (0x02)
  Wire.endTransmission();      // stop transmitting

  // step 4: request reading from sensor
  Wire.requestFrom(SRF_ADDRESS_SDA, 2);    // request 2 bytes from slave device #29

  // step 5: receive reading from sensor
  if (2 <= Wire.available())
  { // if two bytes were received
    reading = Wire.read();  // receive high byte (overwrites previous reading)
    //Serial.println(reading);   // print the reading
    reading = reading << 8;    // shift high byte to be high 8 bits
    reading |= Wire.read(); // receive low byte as lower 8 bits
    //Serial.print(" ");
    //Serial.print(reading);   // print the reading
  }

  //Wire.endTransmission();
  //delay(1000);                  // wait a bit since people have to read the output :)
}

/*
 * Read Values from Acclerometer
 * @remarks: call included library for accelerometer. Open transmissiinon for reading3
 */
void read_acc_vals(){
    // Get the X, Y, anx Z axis values from the device
  xVal = accel.readAxis('x');   // Read X Axis
  yVal = accel.readAxis('y');   // Read Y Axis
  zVal = accel.readAxis('z');   // Read Z Axis

// Display the in the Serial Monitor window.
  Serial.print(" ");
  Serial.print(xVal, DEC);
  Serial.print(" ");
  Serial.print(yVal, DEC);
  Serial.print(" ");
  Serial.print(zVal, DEC);
  Serial.print(" ");
  Serial.print(reading);
  Serial.print("\n");
}

/*
 * run program in loop
 */
void loop() {
  read_acc_vals();
  delay(1000);
  srf_read_echos();
}
Nezabudnite však nahrať aj kompletné zdrojové kódy vášho programu!
Zdrojový kód: serial.h a main.c
Overenie
Nezabudnite napísať čosi ako užívateľský návod. Z neho by malo byť jasné čo program robí, ako sa prejavuje a aké má užívateľské rozhranie (čo treba stlačiť, čo sa kde zobrazuje). Ak ste namerali nejaké signály, sem s nimi. Ak je výsledkom nejaký údaj na displeji, odfotografujte ho.
Kľúčové slová 'Category', ktoré sú na konci stránky nemeňte.


