DF Robot Maqueen Lite: Rozdiel medzi revíziami
Zo stránky SensorWiki
Bez shrnutí editace |
Bez shrnutí editace |
||
| Riadok 52: | Riadok 52: | ||
Pxx Line Key tlacitko?? | Pxx Line Key tlacitko?? | ||
Nie je celkom jasne, akoje to s tlacitkom, ale vo fore k produktu sa da najst takato informacia: | |||
For Maqueen version 4.0 or above, there is a line-key pushbutton. That's for calibrating the grayscale sensor. | |||
If you find that the grayscale sensors are insensitive to the black line or not very accurate, you can recalibrate it by: | |||
1. Turn on the power switch of the Maqueen and place on any black surface or if you have a grayscale map. | |||
2. Press the line-key button for about 1 second and you will see the two RGB lights in the front will flash. | |||
3. You can release the key and the calibration is done. | |||
== Základné programy == | == Základné programy == | ||
Verzia z 11:36, 19. január 2022
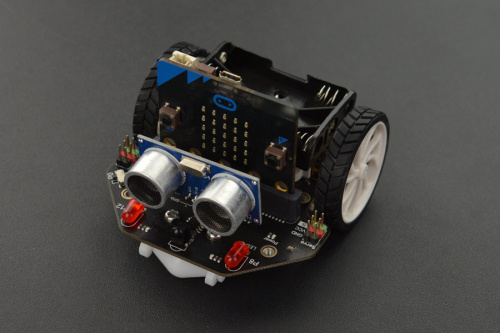
Jedna z viacerých verzií robota Maqueen od firmy DF Robot.
- Product page https://www.dfrobot.com/product-1783.html
- Maqueen Plus V2 -- Variant so 4xAA alebo 18650 bateriami a 5x line senzormi
- Manual https://wiki.dfrobot.com/micro_Maqueen_for_micro_bit_SKU_ROB0148-EN
- Stranka s videami https://www.dfrobot.com/blog-1336.html
Technické parametre
- Napájanie 3,5 - 5,0 V DC ( 3x AAA 1,5 V batéria alebo 3,6 ~ 3,7 V LiPo)
- Vstupy a senzory
- 2x infračervený detektor (na čiary) s roztečou 1,5 cm
- 1x ultrazvukový senzor SR04, SR04P (5V interface? odmeraj)
- 1x infračervený prijímač (NEC decoder)
- 1x i2c Interface (3.3V)
- P0, P1, P2
- Výstupy a aktory
- 2x jednosmerný motor s kovovou prevodovkou 1:150, max. 133 rpm
- 1x bzučiak
- 2x červená LED (blinker)
- 4x RGB LED Neopixel zo spodnej strany
- 2x Servo Interface (S1 S2)x 2
- Rozmery: 81 x 85 x 44 mm
- Hmotnosť: 75,55 g
Priradenie vstupov a výstupov
 P0 miniatúrny reproduktor (dá sa vypnúť/zapnúť prepínačom na doske), univerzálny I/O vzadu, univerzálny SVG konektor vpravo
 P1 ultrazvukový senzor Trig, univerzálny I/O vzadu, univerzálny SVG konektor vpravo
 P2 ultrazvukový senzor Echo, univerzálny I/O vzadu, univerzálny SVG konektor vpravo
 P8 ľavá červená LED
P12 pravá červená LED
P13 ľavý infračervený snímač čiary
P14 pravý infračervený snímač čiary
P15 neopixel 4ks RGB LED
P16 infračervený prijímač diaľkového ovládania

P19 I2C zbernica SCL (aj motor control IC je i2c)
P20 I2C zbernica SDA

Pxx Servo S1 - konektor SVG vľavo
Pxx Servo S2 - konektor SVG vľavo

Pxx Line Key tlacitko??
Nie je celkom jasne, akoje to s tlacitkom, ale vo fore k produktu sa da najst takato informacia:
For Maqueen version 4.0 or above, there is a line-key pushbutton. That's for calibrating the grayscale sensor.
If you find that the grayscale sensors are insensitive to the black line or not very accurate, you can recalibrate it by:

1. Turn on the power switch of the Maqueen and place on any black surface or if you have a grayscale map.
2. Press the line-key button for about 1 second and you will see the two RGB lights in the front will flash.
3. You can release the key and the calibration is done.
Základné programy
Blinker
Pre prácu so svetielkami na hornej hrane robota je potrebné nahrať knižnicu Neopixel
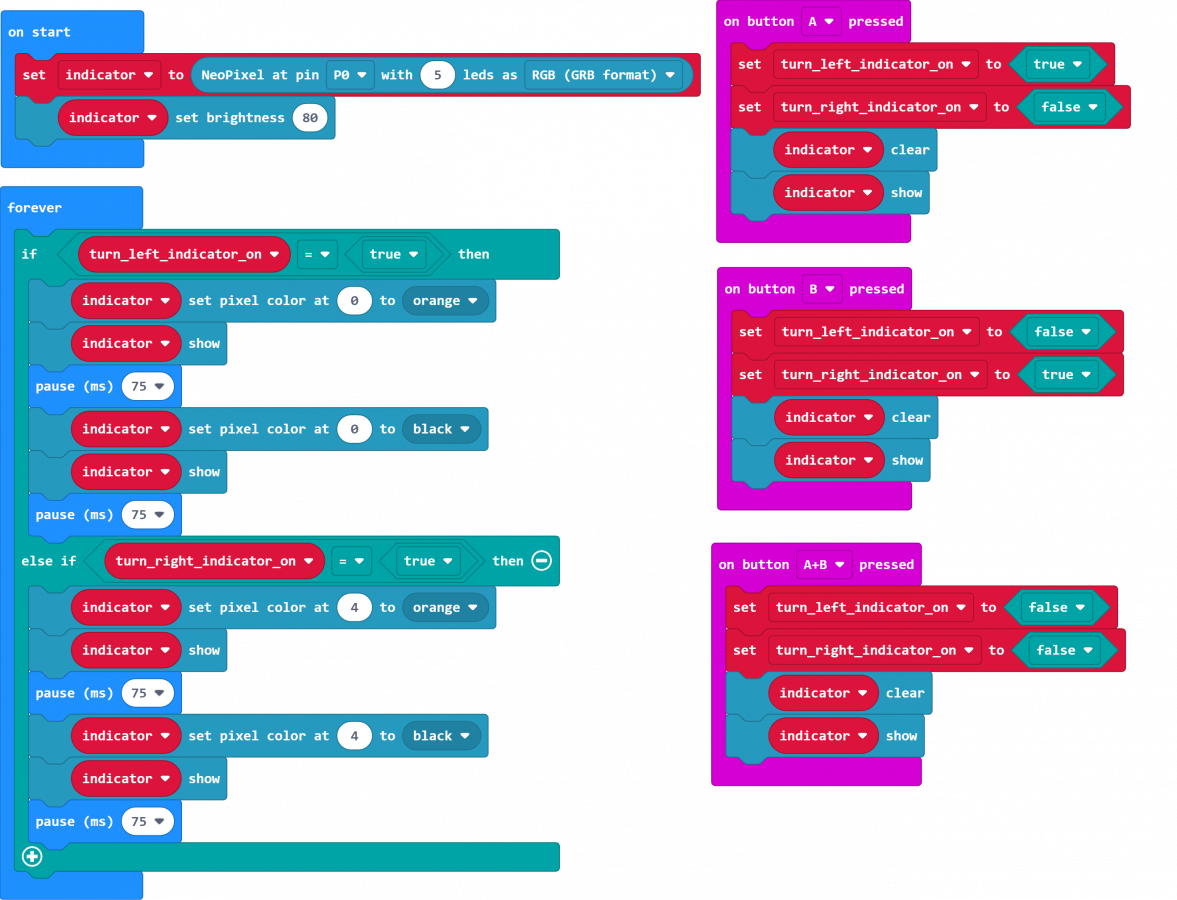
Jednoduchý program pre blinker, funguje na tlačítka - stlačením ľavého tlačidla 🅰 sa zapne ľavá smerovka, pravým tlačidlom 🅱 sa zapne pravá. Stlačením oboch 🅰+🅱 sa blinker vypne.
-
Smerovky
input.onButtonPressed(Button.A, function () {
    turn_left_indicator_on = true
    turn_right_indicator_on = false
    indicator.clear()
    indicator.show()
})
input.onButtonPressed(Button.AB, function () {
    turn_left_indicator_on = false
    turn_right_indicator_on = false
    indicator.clear()
    indicator.show()
})
input.onButtonPressed(Button.B, function () {
    turn_left_indicator_on = false
    turn_right_indicator_on = true
    indicator.clear()
    indicator.show()
})
let turn_right_indicator_on = false
let turn_left_indicator_on = false
let indicator: neopixel.Strip = null
indicator = neopixel.create(DigitalPin.P0, 5, NeoPixelMode.RGB)
indicator.setBrightness(80)
basic.forever(function () {
    if (turn_left_indicator_on == true) {
        indicator.setPixelColor(0, neopixel.colors(NeoPixelColors.Orange))
        indicator.show()
        basic.pause(75)
        indicator.setPixelColor(0, neopixel.colors(NeoPixelColors.Black))
        indicator.show()
        basic.pause(75)
    } else if (turn_right_indicator_on == true) {
        indicator.setPixelColor(4, neopixel.colors(NeoPixelColors.Orange))
        indicator.show()
        basic.pause(75)
        indicator.setPixelColor(4, neopixel.colors(NeoPixelColors.Black))
        indicator.show()
        basic.pause(75)
    }
})
def on_button_pressed_a():
    global turn_left_indicator_on, turn_right_indicator_on
    turn_left_indicator_on = True
    turn_right_indicator_on = False
    indicator.clear()
    indicator.show()
input.on_button_pressed(Button.A, on_button_pressed_a)

def on_button_pressed_ab():
    global turn_left_indicator_on, turn_right_indicator_on
    turn_left_indicator_on = False
    turn_right_indicator_on = False
    indicator.clear()
    indicator.show()
input.on_button_pressed(Button.AB, on_button_pressed_ab)

def on_button_pressed_b():
    global turn_left_indicator_on, turn_right_indicator_on
    turn_left_indicator_on = False
    turn_right_indicator_on = True
    indicator.clear()
    indicator.show()
input.on_button_pressed(Button.B, on_button_pressed_b)

turn_right_indicator_on = False
turn_left_indicator_on = False
indicator: neopixel.Strip = None
indicator = neopixel.create(DigitalPin.P0, 5, NeoPixelMode.RGB)
indicator.set_brightness(80)

def on_forever():
    if turn_left_indicator_on == True:
        indicator.set_pixel_color(0, neopixel.colors(NeoPixelColors.ORANGE))
        indicator.show()
        basic.pause(75)
        indicator.set_pixel_color(0, neopixel.colors(NeoPixelColors.BLACK))
        indicator.show()
        basic.pause(75)
    elif turn_right_indicator_on == True:
        indicator.set_pixel_color(4, neopixel.colors(NeoPixelColors.ORANGE))
        indicator.show()
        basic.pause(75)
        indicator.set_pixel_color(4, neopixel.colors(NeoPixelColors.BLACK))
        indicator.show()
        basic.pause(75)
basic.forever(on_forever)
Základné pohyby
Výrobca, firma Kitronik poskytuje pre robota špeciálnu knižnicu. Niekedy sa volá iba Kitronik, ale väčšinou ju nájdete pod názvom Servo:Lite
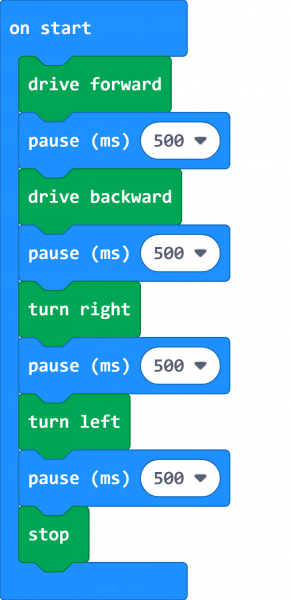
Tento ukážkový program len pohýbe všetkými smermi a potom skončí.
-
Základné pohyby
kitronik_servo_lite.forward()
basic.pause(500)
kitronik_servo_lite.backward()
basic.pause(500)
kitronik_servo_lite.right()
basic.pause(500)
kitronik_servo_lite.left()
basic.pause(500)
kitronik_servo_lite.stop()
kitronik_servo_lite.forward()
basic.pause(500)
kitronik_servo_lite.backward()
basic.pause(500)
kitronik_servo_lite.right()
basic.pause(500)
kitronik_servo_lite.left()
basic.pause(500)
kitronik_servo_lite.stop()
Line following robot
Robot musí byť doplnený špeciálnym senzorom, ktorý sa pripojí k expanznej doske, umožňujúcej využiť aj viac ako 3 vstupy P0 - P3.
Samozrejmosťou je tiež vopred nahrať knižnicu Kitronik
- Product page https://kitronik.co.uk/products/5659-line-following-add-on-for-move-mini-v2
- Product manual https://resources.kitronik.co.uk/pdf/5629-move-line-following-board-microbit-datasheet.pdf
-
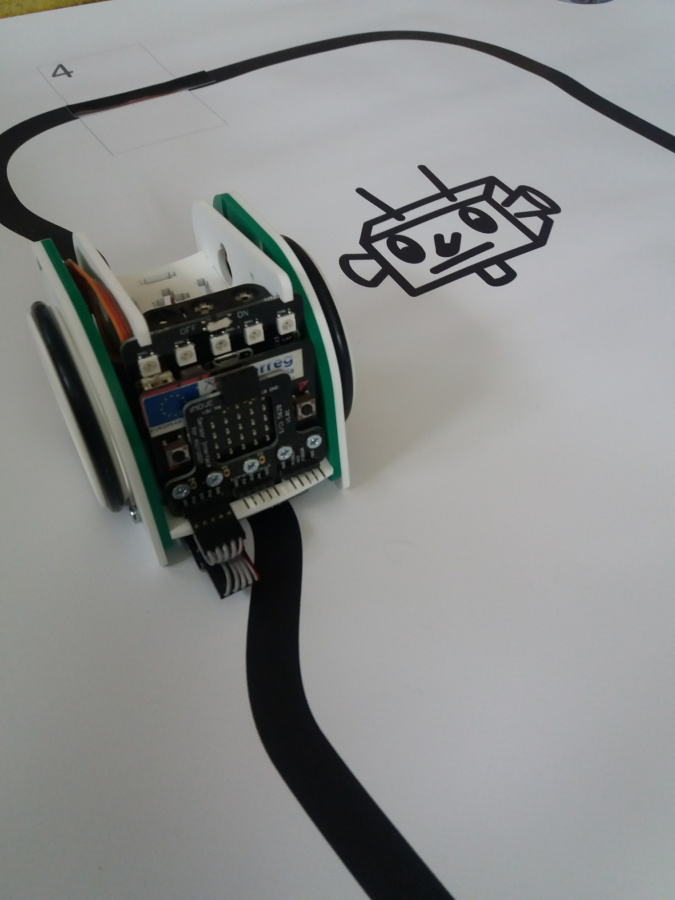
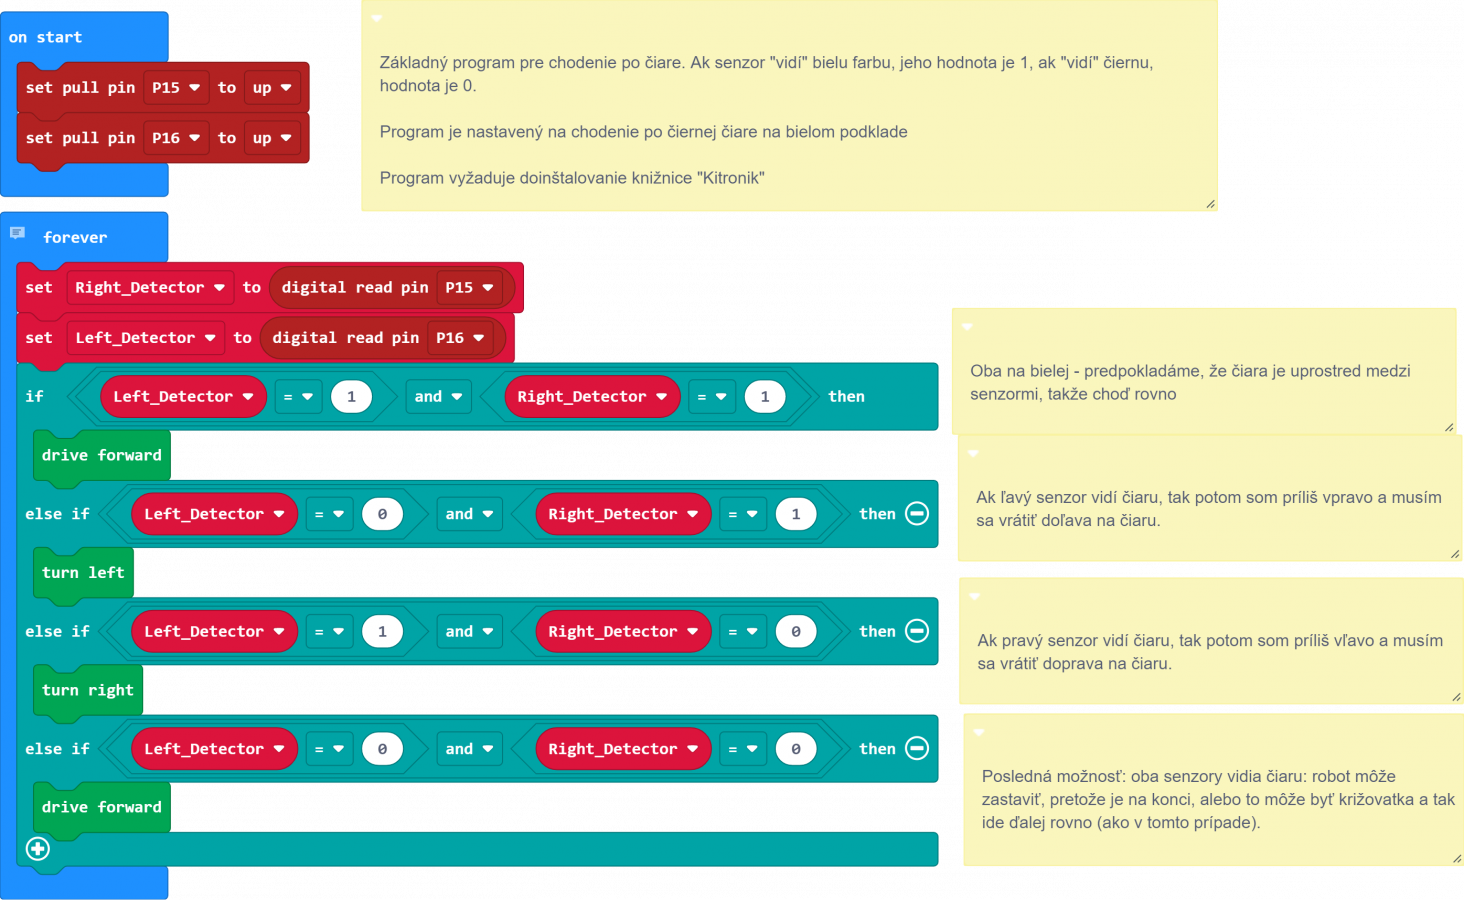
Robot sleduje čiernu čiaru na svetlom podklade.
-
Robot sleduje čiernu čiaru na svetlom podklade.
let Left_Detector = 0
let Right_Detector = 0
pins.setPull(DigitalPin.P15, PinPullMode.PullUp)
pins.setPull(DigitalPin.P16, PinPullMode.PullUp)

basic.forever(function on_forever() {

    Right_Detector = pins.digitalReadPin(DigitalPin.P15)
    Left_Detector = pins.digitalReadPin(DigitalPin.P16)
    if (Left_Detector == 1 && Right_Detector == 1) {
        kitronik.forward()
    } else if (Left_Detector == 0 && Right_Detector == 1) {
        kitronik.left()
    } else if (Left_Detector == 1 && Right_Detector == 0) {
        kitronik.right()
    } else if (Left_Detector == 0 && Right_Detector == 0) {
        kitronik.forward()
    }

})
Left_Detector = 0
Right_Detector = 0
pins.set_pull(DigitalPin.P15, PinPullMode.PULL_UP)
pins.set_pull(DigitalPin.P16, PinPullMode.PULL_UP)


def on_forever():
    global Right_Detector, Left_Detector
    Right_Detector = pins.digital_read_pin(DigitalPin.P15)
    Left_Detector = pins.digital_read_pin(DigitalPin.P16)
    if Left_Detector == 1 and Right_Detector == 1:
        kitronik.forward()
    elif Left_Detector == 0 and Right_Detector == 1:
        kitronik.left()
    elif Left_Detector == 1 and Right_Detector == 0:
        kitronik.right()
    elif Left_Detector == 0 and Right_Detector == 0:
        kitronik.forward()
basic.forever(on_forever)
Ultrazvukový senzor
Pre prácu s ultrazvukovým senzorom je potrebné nahrať knižnicu Sonar
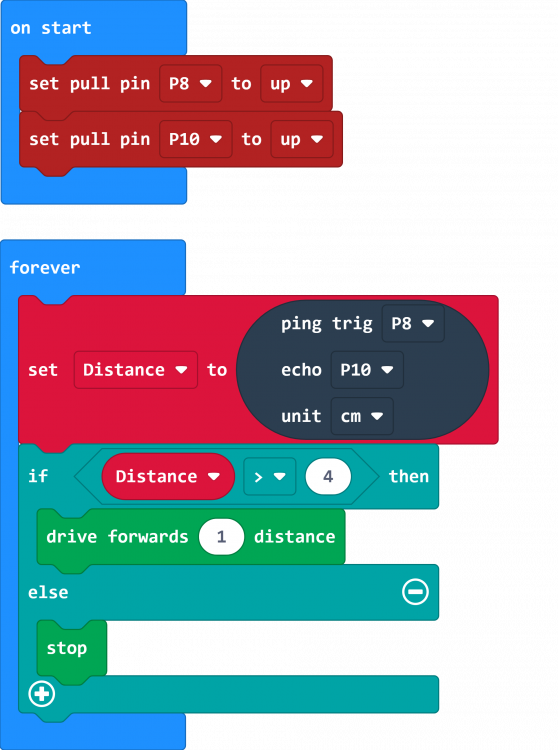
Jednoduchý program, ktorý ukáže ako robot zastaví pred prekážkou
-
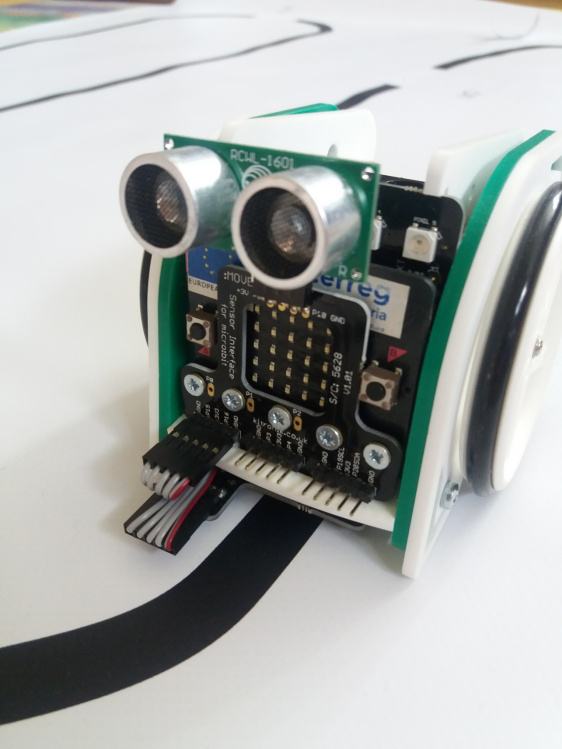
Robot s namontovaným snímačom.
-
Stoj, prekážka.
let Distance = 0
pins.setPull(DigitalPin.P8, PinPullMode.PullUp)
pins.setPull(DigitalPin.P10, PinPullMode.PullUp)
basic.forever(function () {
    Distance = sonar.ping(
    DigitalPin.P8,
    DigitalPin.P10,
    PingUnit.Centimeters
    )
    if (Distance > 4) {
        kitronik_servo_lite.driveForwards(1)
    } else {
        kitronik_servo_lite.stop()
    }
})
Distance = 0
pins.set_pull(DigitalPin.P8, PinPullMode.PULL_UP)
pins.set_pull(DigitalPin.P10, PinPullMode.PULL_UP)

def on_forever():
    global Distance
    Distance = sonar.ping(DigitalPin.P8, DigitalPin.P10, PingUnit.CENTIMETERS)
    if Distance > 4:
        kitronik_servo_lite.drive_forwards(1)
    else:
        kitronik_servo_lite.stop()
basic.forever(on_forever)
👉 Späť na zoznam príkladov....
