LCD displej: Rozdiel medzi revíziami
Zo stránky SensorWiki
| Riadok 57: | Riadok 57: | ||
unsigned char znak; | unsigned char znak; | ||
lcdInit4(); | lcdInit4(); // inicializacia v 4-bitovom rezime | ||
lcdControlWrite(1<<LCD_CLR); | lcdControlWrite(1<<LCD_CLR); // display clear | ||
lcdControlWrite(0x40); // pozicia 0,0 | |||
for(znak='A';znak<'I';znak++) | for(znak='A';znak<'I';znak++) | ||
lcdDataWrite(znak); | lcdDataWrite(znak); // vypis znaky ABCDEFGH | ||
lcdControlWrite(0x40+0x80); | lcdControlWrite(0x40+0x80); // pozicia 1,0 | ||
for(znak='0';znak<'8';znak++) | for(znak='0';znak<'8';znak++) | ||
lcdDataWrite(znak); | lcdDataWrite(znak); // vypis znaky 12345678 | ||
for(;;); | for(;;); | ||
Verzia z 12:26, 12. október 2012
Programovateľný LCD displej
LCD Modul
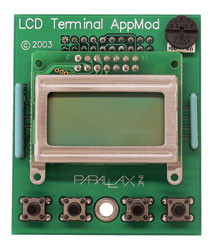
Vlastnosti:
- 2x8 LCD Displej bez podsvetlenia
- 4 Tlačítka
- Trimer na zmenu kontrastu
Technické parametre:
- Napájanie: 5 V @ 15 mA
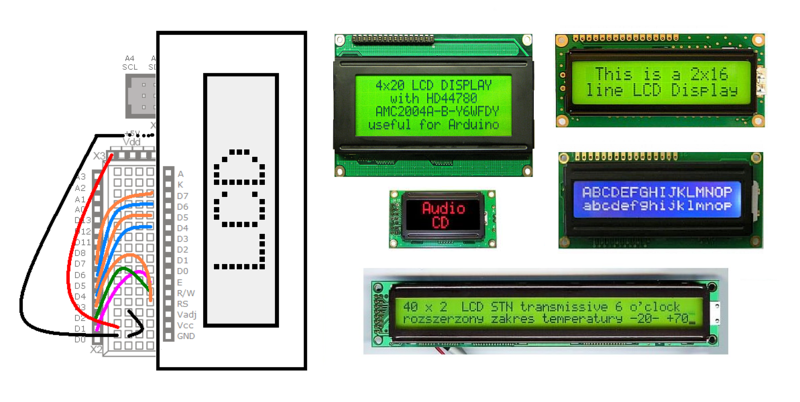
- Pripojenie: 4-Bit parallel interface (Hitachi HD44780 compatible)
- Rozmery: 60 x 50 x 20 mm
- Pracovná teplota: 0 až +70 °C
Úlohy
Najprv sa snažte pochopiť, ako je vytvorený vzorový program, ako sa konfiguruje pripojenie LCD k portom, skontrolujte konfiguráciu. Potom s pomocou manuálu k displeju zobrazte na displeji nejaký text a zrealizujte nasledovné funkcie:
- posun kurzora doprava / dolava
- posun obsahu displeja doprava / dolava
- napíšte funkciu void lcdGotoXY(riadok, stlpec)
- clear displeja (a obnovenie povodneho obsahu displeja)
- zadefinujte si vlastné znaky a zobrazte ich spolu s iným textom. Povinne aspoň jeden znak s diakritikou a znak stupeň, zobrazte teplotu.
Software
K dispozícii máte:
- Demo - skompilovanú ukážku možností práce s displejom.
- Knižnicu (lcd.c, lcd.h) s fungujúcou inicializáciou displeja a príkazmi na ovládanie.
- Pripravené sú funkcie:
.
     void lcdInit4(void);                     	   // inicializácia displeja 4-bitovo
     void lcdDataWrite(unsigned char w_data) ;     // zapíše znak na aktuálnu pozíciu
     void lcdControlWrite(unsigned char c_data);   // zapíše príkaz do displeja
- Demonštračný program využívajúci tieto funkcie
.
    #include "lcd.h"

    int main(void)
    {
     unsigned char znak;

     lcdInit4();                             // inicializacia v 4-bitovom rezime
     lcdControlWrite(1<<LCD_CLR);            // display clear
     lcdControlWrite(0x40);                  // pozicia 0,0

     for(znak='A';znak<'I';znak++)
        lcdDataWrite(znak);                 // vypis znaky ABCDEFGH

     lcdControlWrite(0x40+0x80);            // pozicia 1,0
     for(znak='0';znak<'8';znak++)
        lcdDataWrite(znak);                 // vypis znaky 12345678

     for(;;);
     return 0;
    }
Ponz.: Ak pri vám kompilátor vypíše nasledovný Warning
c:/winavr-20080610/lib/gcc/../../avr/include/util/delay.h:85:3: warning: #warning "F_CPU not defined for <util/delay.h>"
znamená to, že nemáte nastavenú frekvenciu oscilátora a teda nie je možné preložiť knižnicu na generovanie oneskorenia. V menu Project -> Configuration Options nastavte Frequency na hodnotu 16000000 Hz.
Literatúra
- Katalógové listy
- Radič Hitachi HD44780
- Displej 2x16 DEM 16216 SYH-LY
- Displej 2x16 DEM 20231 SYH-PY
- 2x16 Parallel LCD datasheet
- Podrobné manuály sú aj u výrobcu Hantronix.
- Peter Ouwehand: How to control a HD44780-based Character-LCD
- Ian Harries: HD44780-Based LCD Modules'
- Tomáš Dresler: Inteligentní displeje a jejich připojení k PC. [hw.cz]
- Nuts & Volts: Demystifying Character Based LCDs
- Stamp Works - pp. 73 and more [1]
Arduino
Nasledovný príklad je pre Arduino.
/*
  LiquidCrystal Library - Hello World

 Demonstrates the use a 8x2 LCD display.

   The circuit:
 * LCD RS pin to digital pin 3
 * LCD R/W pin to digital pin 2
 * LCD Enable pin to digital pin 1
 * LCD D4 pin to digital pin 4
 * LCD D5 pin to digital pin 5
 * LCD D6 pin to digital pin 6
 * LCD D7 pin to digital pin 7
 */

#include <LiquidCrystal.h>           // include the library

// initialize the library with the numbers of the interface pins
//  LiquidCrystal(RS, RW, EN, D4, D5, D6, D7)
LiquidCrystal lcd( 3,  2,  1,  4,  5,  6,  7);

void setup() {
  // set up the LCD's number of columns and rows:
  lcd.begin(8, 2);
  // Print a message to the LCD.
  lcd.print("Ahoj!");
}

void loop() {
  // set the cursor to column 0, line 1
  // (note: line 1 is the second row, since counting begins with 0):
  lcd.setCursor(0, 1);
  // print the number of seconds since reset:
  lcd.print(millis()/1000);
  // print the status of buttons:
  lcd.setCursor(6, 0);
  lcd.print(ReadButtons(),HEX);

}


/* ------------------------------------------------------- */
/*  Read and debounce the LCD AppMod buttons               */
/*                                                         */
/*  Returns 0 if nothing  is pressed                       */
/*  Returns 1 if button A is pressed                       */
/*  Returns 2 if button B is pressed                       */
/*  Returns 4 if button C is pressed                       */
/*  Returns 8 if button D is pressed                       */
/*  Returns combination if more is pressed (e.g. 6 for B+C)*/
/*                                                         */
/* ------------------------------------------------------- */

unsigned char ReadButtons()
{
  DDRD  = 0b00001110;                // make LCD bus inputs
  unsigned char state = 0xFF;           // assume nothing pressed

  for(int scan = 1; scan<=10; scan++)
  {
   state = state & ((PIND&0xF0)>>4); // make sure button held
   delay(5);                     // debounce 10 x 5 ms
  }

  DDRD  = 0b11111110;				 // return bus to outputs

  return(state);
}
Misc:
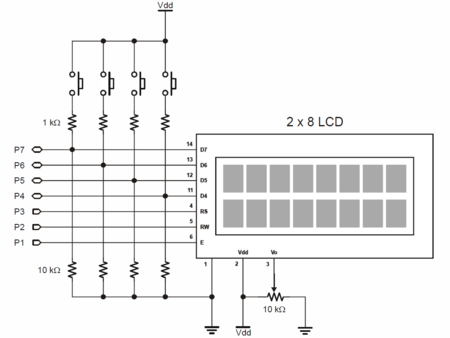
Tlačítka modulu LCD Terminal AppMod
Pre prístup k tlačítkam tohto modulu je v knižnici lcd.h k dispozícii funkcia
unsigned char ReadButtons();
Ak ju tam nemáte, tu je:
/* ------------------------------------------------------- */
/*  Read and debounce the LCD AppMod buttons               */
/*                                                         */
/*  Returns 0 if nothing  is pressed                       */
/*  Returns 1 if button A is pressed                       */
/*  Returns 2 if button B is pressed                       */
/*  Returns 4 if button C is pressed                       */
/*  Returns 8 if button D is pressed                       */
/*  Returns combination if more is pressed (e.g. 6 for B+C)*/
/*                                                         */
/* ------------------------------------------------------- */

unsigned char ReadButtons()
{
  DDRD  = 0b00001110;                // make LCD bus inputs
  unsigned char state = 0xFF;           // assume nothing pressed

  for(int scan = 1; scan<=10; scan++)
  {
   state = state & ((PIND&0xF0)>>4); // make sure button held
   _delay_ms(5);                     // debounce 10 x 5 ms
  }

  DDRD  = 0b11111110;				 // return bus to outputs

  return(state);
}
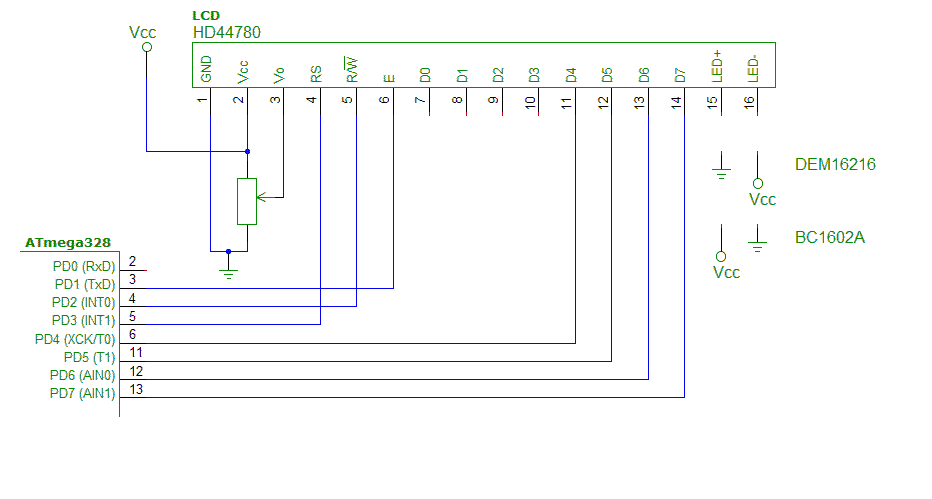
Prečo je takto napísaná a ako vlastne funguje lepšie zistíte, keď si preštudujete schému zapojenia:
Simulátor periférií
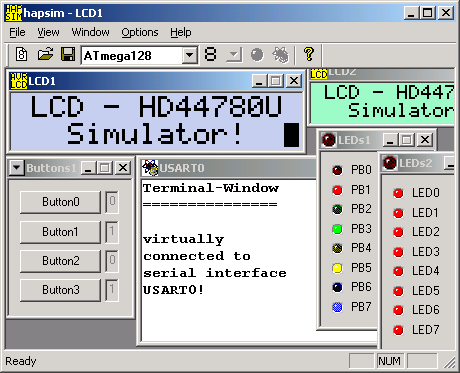
Stiahnite a nainštalujte si Hapsim - simulátor periférií pre AVR Studio:
