Generátor trojuholníkového signálu s R-2R prevodníkom: Rozdiel medzi revíziami
Zo stránky SensorWiki
| Riadok 21: | Riadok 21: | ||
== Analýza a opis riešenia == | == Analýza a opis riešenia == | ||
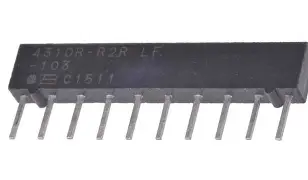
Na vyriešenie môjho problému som použil 4310R-2R LF 103 prevodnik, bude mať štyri vstupy a 1 výstup a 1 GND | Na vyriešenie môjho problému som použil 4310R-2R LF 103 prevodnik, bude mať štyri vstupy(PB0, PB1, PB2, PB3) a 1 výstup na A0 a 1 GND | ||
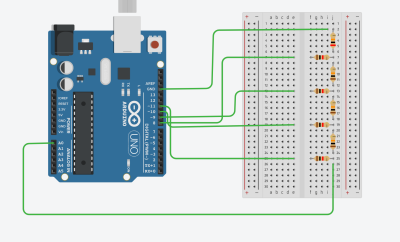
[[Súbor:ArduinoSchema11. | [[Súbor:ArduinoSchema11.png|400px|thumb|center|Celkový pohľad na zariadenie.]] | ||
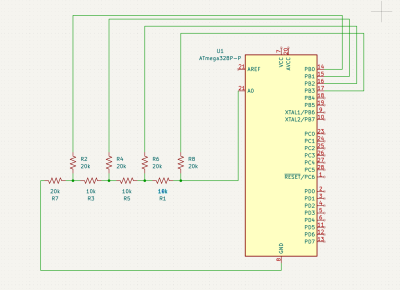
Tuto mame schemu zapojenia | |||
[[Súbor:Schema11.png|400px|thumb|center|Schéma zapojenia.]] | [[Súbor:Schema11.png|400px|thumb|center|Schéma zapojenia.]] | ||
| Riadok 40: | Riadok 40: | ||
#include <avr/io.h> | #include <avr/io.h> | ||
int main(void) | #include <util/delay.h> | ||
{ | #include <stdio.h> | ||
#include <avr/io.h> | |||
#include "uart.h" | |||
#define F_CPU 16000000UL | |||
#define D0 0 // PB0 (D8) | |||
#define D1 1 // PB1 (D9) | |||
#define D2 2 // PB2 (D10) | |||
#define D3 3 // PB3 (D11) | |||
#define DELAY_MS 5 | |||
int main(void) { | |||
DDRB |= (1 << D0) | (1 << D1) | (1 << D2) | (1 << D3); | |||
uart_init(); | |||
char buffer[4]; | |||
while (1) { | |||
for (uint8_t value = 0; value <= 15; value++) { | |||
PORTB = (PORTB & ~((1 << D0) | (1 << D1) | (1 << D2) | (1 << D3))) | | |||
((value & 0x01) << D0) | | |||
((value & 0x02) >> 1 << D1) | | |||
((value & 0x04) >> 2 << D2) | | |||
((value & 0x08) >> 3 << D3); | |||
sprintf(buffer, "%u", value); | |||
uart_puts(buffer); | |||
uart_puts("\r\n"); | |||
_delay_ms(DELAY_MS); | |||
} | |||
for (uint8_t value = 15; value > 0; value--) { | |||
PORTB = (PORTB & ~((1 << D0) | (1 << D1) | (1 << D2) | (1 << D3))) | | |||
((value & 0x01) << D0) | | |||
((value & 0x02) >> 1 << D1) | | |||
((value & 0x04) >> 2 << D2) | | |||
((value & 0x08) >> 3 << D3); | |||
sprintf(buffer, "%u", value); | |||
uart_puts(buffer); | |||
uart_puts("\r\n"); | |||
_delay_ms(DELAY_MS); | |||
} | |||
} | |||
return 0; | |||
} | } | ||
</syntaxhighlight ></tab> | |||
<tab name="uart.h"><syntaxhighlight lang="c++" style="background: LightYellow;"> | |||
#ifndef UART_H | |||
#define UART_H | |||
void uart_init(void); | |||
void uart_putc(char c); | |||
void uart_puts(const char *s); | |||
char uart_getc(void); | |||
#endif // UART_H | |||
</syntaxhighlight ></tab> | </syntaxhighlight ></tab> | ||
<tab name=" | <tab name="uart.c"><syntaxhighlight lang="c++" style="background: LightYellow;"> | ||
#include <avr/io.h> | #include <avr/io.h> | ||
#include <util/setbaud.h> | |||
#include "uart.h" | |||
void uart_init(void) | |||
{ | |||
UBRR0H = UBRRH_VALUE; | |||
UBRR0L = UBRRL_VALUE; | |||
#if USE_2X | |||
UCSR0A |= _BV(U2X0); | |||
#else | |||
UCSR0A &= ~(_BV(U2X0)); | |||
#endif | |||
UCSR0C = _BV(UCSZ01) | _BV(UCSZ00); /* 8-bit data */ | |||
UCSR0B = _BV(RXEN0) | _BV(TXEN0); /* Enable RX and TX */ | |||
} | |||
void uart_putc(char c) | |||
{ | |||
if (c == '\n') | |||
{ | |||
uart_putc('\r'); | |||
} | |||
loop_until_bit_is_set(UCSR0A, UDRE0); /* Wait until data register empty. */ | |||
UDR0 = c; | |||
} | |||
void | void uart_puts(const char *s) | ||
{ | |||
while (*s) { | |||
uart_putc(*s); | |||
s++; | |||
} | |||
} | |||
char uart_getc(void) | |||
{ | |||
loop_until_bit_is_set(UCSR0A, RXC0); /* Wait until data exists. */ | |||
return UDR0; | |||
} | |||
</syntaxhighlight ></tab> | </syntaxhighlight ></tab> | ||
</tabs> | </tabs> | ||
Verzia z 20:05, 15. jún 2025
Záverečný projekt predmetu MIPS / LS2025 - Meno Priezvisko
Zadanie
Generátor trojuholníkového signálu s R-2R prevodníkom 4310R-2R LF 103 https://eu.mouser.com/ProductDetail/Bourns/4310R-R2R-103
Úlohou bolo napísať program pomocou R-2R prevodníka na generovanie trojuholníkového signálu

Literatúra:
Analýza a opis riešenia
Na vyriešenie môjho problému som použil 4310R-2R LF 103 prevodnik, bude mať štyri vstupy(PB0, PB1, PB2, PB3) a 1 výstup na A0 a 1 GND

Tuto mame schemu zapojenia

Algoritmus a program
Algoritmus programu využíva toto a toto, základné funkcie sú takéto a voláma ich tuto... Výpis kódu je nižšie...
#include <avr/io.h>

#include <util/delay.h>
#include <stdio.h>
#include <avr/io.h>
#include "uart.h"


#define F_CPU 16000000UL
#define D0 0 // PB0 (D8)
#define D1 1 // PB1 (D9)
#define D2 2 // PB2 (D10)
#define D3 3 // PB3 (D11)


#define DELAY_MS 5


int main(void) {
    DDRB |= (1 << D0) | (1 << D1) | (1 << D2) | (1 << D3);


    uart_init();

    char buffer[4];

    while (1) {

        for (uint8_t value = 0; value <= 15; value++) {
            PORTB = (PORTB & ~((1 << D0) | (1 << D1) | (1 << D2) | (1 << D3))) |
                    ((value & 0x01) << D0) |
                    ((value & 0x02) >> 1 << D1) |
                    ((value & 0x04) >> 2 << D2) |
                    ((value & 0x08) >> 3 << D3);
            sprintf(buffer, "%u", value);
            uart_puts(buffer);
            uart_puts("\r\n");
            _delay_ms(DELAY_MS);
        }


        for (uint8_t value = 15; value > 0; value--) {
            PORTB = (PORTB & ~((1 << D0) | (1 << D1) | (1 << D2) | (1 << D3))) |
                    ((value & 0x01) << D0) |
                    ((value & 0x02) >> 1 << D1) |
                    ((value & 0x04) >> 2 << D2) |
                    ((value & 0x08) >> 3 << D3);
            sprintf(buffer, "%u", value);
            uart_puts(buffer);
            uart_puts("\r\n");
            _delay_ms(DELAY_MS);
        }
    }

    return 0;
}
#ifndef UART_H
#define UART_H

void uart_init(void);
void uart_putc(char c);
void uart_puts(const char *s);
char uart_getc(void);

#endif // UART_H
#include <avr/io.h>
#include <util/setbaud.h>
#include "uart.h"

void uart_init(void)
{
    UBRR0H = UBRRH_VALUE;
    UBRR0L = UBRRL_VALUE;

#if USE_2X
    UCSR0A |= _BV(U2X0);
#else
    UCSR0A &= ~(_BV(U2X0));
#endif

    UCSR0C = _BV(UCSZ01) | _BV(UCSZ00); /* 8-bit data */
    UCSR0B = _BV(RXEN0) | _BV(TXEN0);   /* Enable RX and TX */
}

void uart_putc(char c)
{
    if (c == '\n')
    {
        uart_putc('\r');
    }
    loop_until_bit_is_set(UCSR0A, UDRE0); /* Wait until data register empty. */
    UDR0 = c;
}

void uart_puts(const char *s)
{
    while (*s) {
        uart_putc(*s);
        s++;
    }
}

char uart_getc(void)
{
    loop_until_bit_is_set(UCSR0A, RXC0); /* Wait until data exists. */
    return UDR0;
}
Pridajte sem aj zbalený kompletný projekt, napríklad takto (použite jednoznačné pomenovanie, nemôžeme mať na serveri 10x zdrojaky.zip:
Zdrojový kód: zdrojaky.zip
Overenie
Ako ste overili funkciu, napríklad... Na používanie našej aplikácie stačia dve tlačítka a postup používania je opísaný v sekcii popis riešenia. Na konci uvádzame fotku hotového zariadenia.

Video:
Kľúčové slová 'Category', ktoré sú na konci stránky nemeňte.