Merací systém s Ardino Nano: Rozdiel medzi revíziami
Zo stránky SensorWiki
Bez shrnutí editace |
|||
| Riadok 85: | Riadok 85: | ||
** nemáte zapnuté Arduino | ** nemáte zapnuté Arduino | ||
=== Processing + Arduino === | |||
Napokon spojíme prostredníctvom komunikácie cez sériovú linku oba svety. | |||
<tabs> | |||
<tab name="Javascript"><source lang="java"> | |||
import processing.serial.*; | |||
import g4p_controls.*; | |||
// The serial port | |||
Serial myPort; | |||
GLabel lblOut; | |||
GButton buttonOn; | |||
GButton buttonOff; | |||
void setup() | |||
{ | |||
size(200, 200); | |||
createGUI(); | |||
printArray(Serial.list()); // List all the available serial ports | |||
myPort = new Serial(this, Serial.list()[2], 9600); | |||
} | |||
void draw() | |||
{ | |||
background(225); | |||
} | |||
/* | |||
void myBtnEvents(GButton button) { //_CODE_:button1:12356: | |||
// It is safe to enter your event code here | |||
} //_CODE_:button1:12356: | |||
*/ | |||
public void buttonOn_click(GButton source, GEvent event) { | |||
println("buttonOn - GButton >> GEvent." + event + " @ " + millis()); | |||
myPort.write('1'); | |||
} | |||
public void buttonOff_click(GButton source, GEvent event) { | |||
println("buttonOff - GButton >> GEvent." + event + " @ " + millis()); | |||
myPort.write('0'); | |||
} | |||
public void createGUI() // Create all the GUI controls. | |||
{ | |||
G4P.messagesEnabled(false); | |||
G4P.setGlobalColorScheme(GCScheme.BLUE_SCHEME); | |||
G4P.setMouseOverEnabled(true); | |||
G4P.setDisplayFont("Arial Black", G4P.PLAIN, 14); | |||
surface.setTitle("Demo"); | |||
buttonOn = new GButton(this, 60, 60, 80, 30); | |||
buttonOn.setText("LED On"); | |||
buttonOn.setLocalColorScheme(GCScheme.GREEN_SCHEME); | |||
buttonOn.addEventHandler(this, "buttonOn_click"); | |||
buttonOff = new GButton(this, 60, 110, 80, 30); | |||
buttonOff.setText("LED Off"); | |||
buttonOff.setLocalColorScheme(GCScheme.RED_SCHEME); | |||
buttonOff.addEventHandler(this, "buttonOff_click"); | |||
lblOut = new GLabel(this, 0, 10, 200, 20, ""); | |||
lblOut.setTextAlign(GAlign.CENTER, null); | |||
lblOut.setText("LED Control Demo"); | |||
} | |||
</source></tab> | |||
<tab name="Arduino C++"><syntaxhighlight lang=c style="background: Cornsilk"> | |||
char recData; // Data received from the serial port | |||
void setup() | |||
{ | |||
pinMode(LED_BUILTIN, OUTPUT); // Set pin as OUTPUT | |||
Serial.begin(9600); // Start serial communication at 9600 bps | |||
} | |||
void loop() | |||
{ | |||
if (Serial.available()) // If data is available to read, | |||
{ | |||
recData = Serial.read(); // read it and store it in val | |||
} | |||
if (recData == '1') // If 1 was received | |||
{ | |||
digitalWrite(LED_BUILTIN, HIGH); // turn the LED on | |||
} | |||
else | |||
{ | |||
digitalWrite(LED_BUILTIN, LOW); // otherwise turn it off | |||
} | |||
delay(10); // Wait 10 milliseconds for next reading | |||
} | |||
</syntaxhighlight></tab> | |||
</tabs> | |||
[[Category:ELSA]] | [[Category:ELSA]] | ||
Verzia z 09:57, 12. október 2020
Materiál
Software
- Vývojové prostredie Processing
- Vývojové prostredie Arduino (alebo aspoň Hex Loader)
- Špecifické programy pre dané meranie
Processing
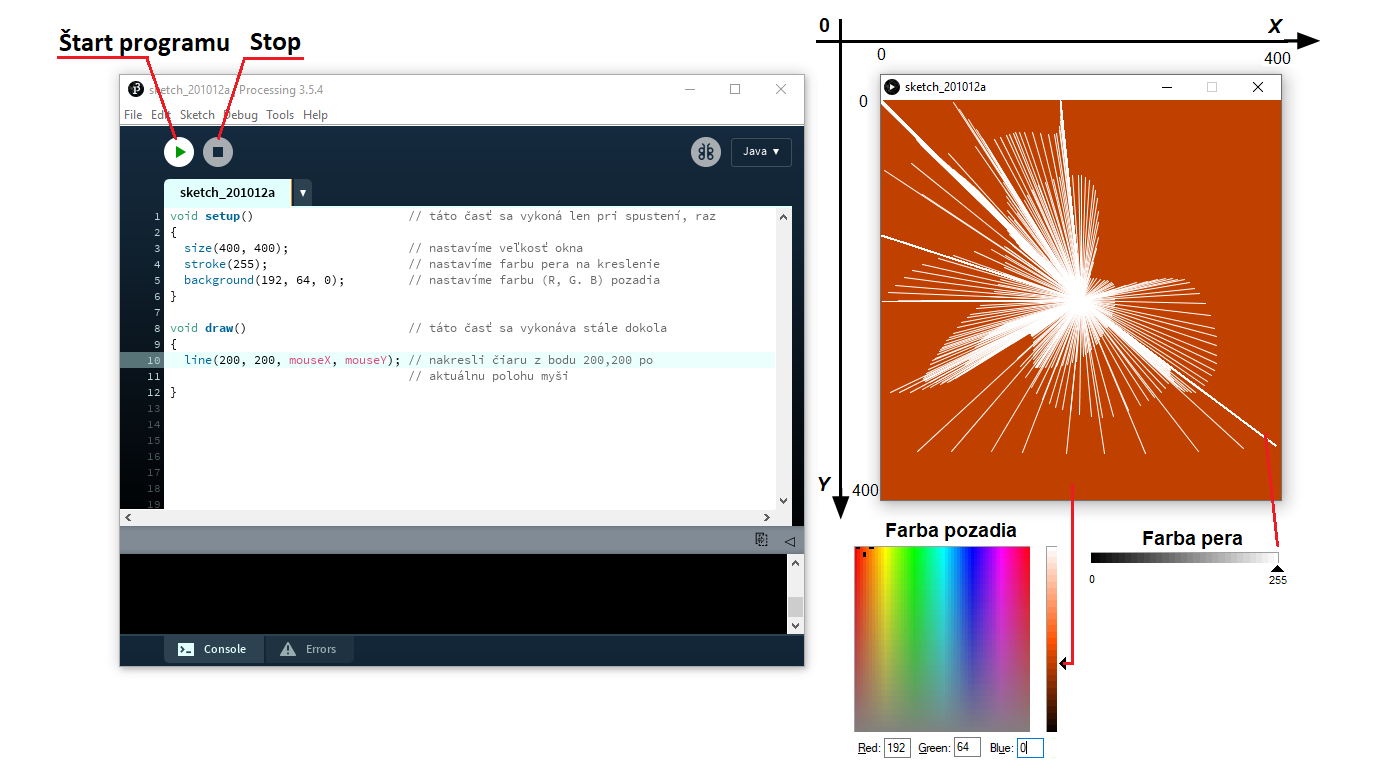
Je to veľmi jednoduché vývojové prostredie urené na rýchly náčrt programu (preto sa aj programy v Processingu nazývajú sketch) a orientuje sa predovšetkým na ich grafickú stránku. Na rozdiel od iných jazykov sa dá prakticky hneď začať kresliť jednoduchá grafika. Prostredie je k dispozícii bezplatne a pre rozličné operačné systémy. Základom prostredia je Java, ale nie je podmienkou vedieť programovať v Jave. Najnovšiu verziu si vždy stiahnite a nainštalujte z adresy http://processing.org/ Na tejto stránke nájdete aj príklady, referenčnú príručku a diskusné fórum.
- Inštalácia: https://processing.org/download/
- Prvý príklad:
void setup()                      // táto časť sa vykoná len pri spustení, raz
{
  size(400, 400);                 // nastavíme veľkosť okna
  stroke(255);                    // nastavíme farbu pera na kreslenie
  background(192, 64, 0);         // nastavíme farbu (R, G. B) pozadia
}

void draw()                       // táto časť sa vykonáva stále dokola
{
  line(200, 200, mouseX, mouseY); // nakresli čiaru z bodu 200,200 po
                                  // aktuálnu polohu myši
}
- Mnoho ďalších príkladov nájdete priamo v editore (File -> Examples) a oveľa viac potom tu https://processing.org/tutorials/
Arduino
Arduino je veľmi populárna platforma pre programovanie mikroopočítačov Atmel AVR, ktorá sa dnes už rozrástla pre mnoho ďalších mikroprocesorových systémov, vrátane ARM architektúry. Vývojové prostredie je veľmi podobné Processingu, a to aj vzhľadom. Programovacím jazykom je C++, pred použitím však musíme kompilátor nakonfigurovať pre daný procesor.
- Inštalácia: https://www.arduino.cc/en/Main/Software
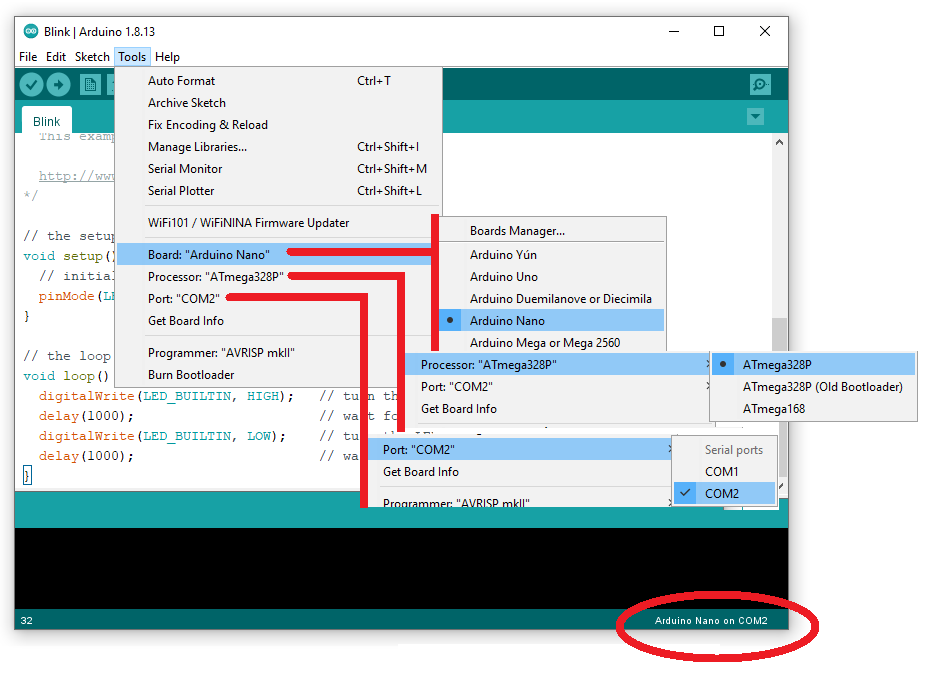
- Konfigurácia:
Pred naprogramovaním procesora musíme prostredie Arduino nastaviť pre nami používaný typ. Teda Arduino Nano s procesorom ATmega328P a treba tiež nastaviť, na ktorý sériový port ho máme pripojený.
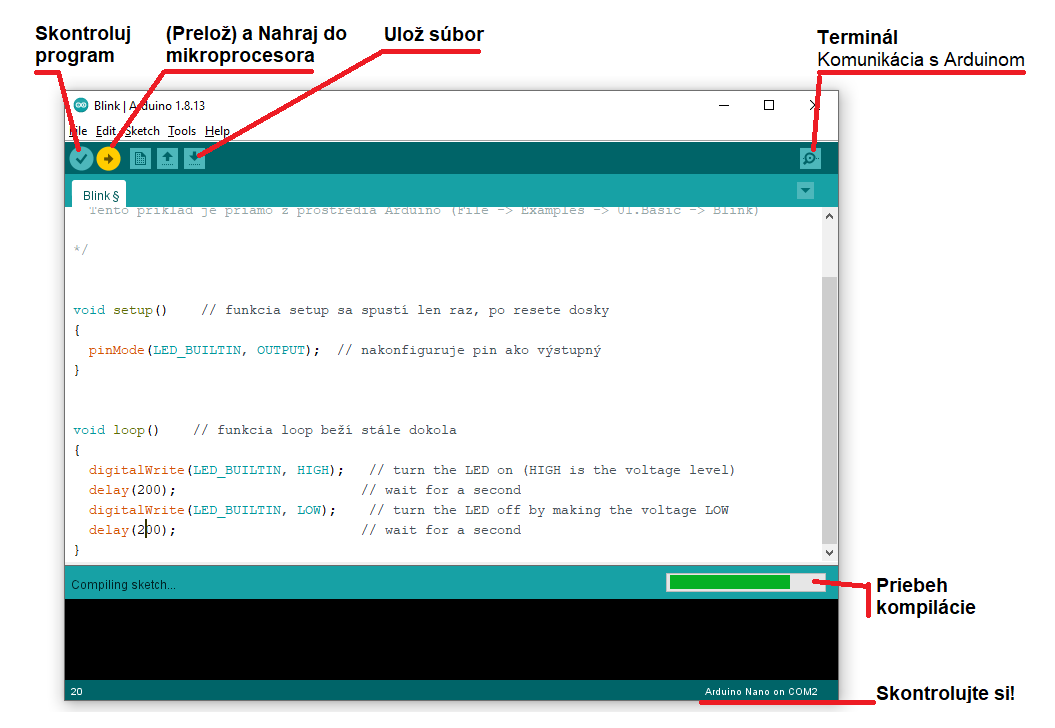
- Prvý príklad:
/*
  Blink

  Tento príklad je priamo z prostredia Arduino (File -> Examples -> 01.Basic -> Blink)

*/


void setup()    // funkcia setup sa spustí len raz, po resete dosky
{
  pinMode(LED_BUILTIN, OUTPUT);  // nakonfiguruje pin ako výstupný
}


void loop()    // funkcia loop beží stále dokola
{
  digitalWrite(LED_BUILTIN, HIGH);   // turn the LED on (HIGH is the voltage level)
  delay(1000);                       // wait for a second
  digitalWrite(LED_BUILTIN, LOW);    // turn the LED off by making the voltage LOW
  delay(1000);                       // wait for a second
}
- Čo všetko sa môže pokaziť:
- máte chybu v programe a ten sa ani neskompiluje
- máte nesprávny typ procesora
- máte vybraný nesprávny port, na ktorom nie je Arduino
- nemáte zapnuté Arduino
Processing + Arduino
Napokon spojíme prostredníctvom komunikácie cez sériovú linku oba svety.
import processing.serial.*;
import g4p_controls.*;

// The serial port
Serial myPort;

GLabel lblOut;
GButton buttonOn;
GButton buttonOff;

void setup()
{
  size(200, 200);
  createGUI();
  printArray(Serial.list());  // List all the available serial ports
  myPort = new Serial(this, Serial.list()[2], 9600);
}


void draw()
{
  background(225);
 }

/*
void myBtnEvents(GButton button) { //_CODE_:button1:12356:
     // It is safe to enter your event code here
 } //_CODE_:button1:12356:

*/


public void buttonOn_click(GButton source, GEvent event) {
  println("buttonOn - GButton >> GEvent." + event + " @ " + millis());
   myPort.write('1');
}

public void buttonOff_click(GButton source, GEvent event) {
  println("buttonOff - GButton >> GEvent." + event + " @ " + millis());
   myPort.write('0');
}


public void createGUI()      // Create all the GUI controls.
{

  G4P.messagesEnabled(false);
  G4P.setGlobalColorScheme(GCScheme.BLUE_SCHEME);
  G4P.setMouseOverEnabled(true);
  G4P.setDisplayFont("Arial Black", G4P.PLAIN, 14);

  surface.setTitle("Demo");

  buttonOn = new GButton(this, 60, 60, 80, 30);
  buttonOn.setText("LED On");
  buttonOn.setLocalColorScheme(GCScheme.GREEN_SCHEME);
  buttonOn.addEventHandler(this, "buttonOn_click");

  buttonOff = new GButton(this, 60, 110, 80, 30);
  buttonOff.setText("LED Off");
  buttonOff.setLocalColorScheme(GCScheme.RED_SCHEME);
  buttonOff.addEventHandler(this, "buttonOff_click");

  lblOut = new GLabel(this, 0, 10, 200, 20, "");
  lblOut.setTextAlign(GAlign.CENTER, null);
  lblOut.setText("LED Control Demo");

}
char recData;          // Data received from the serial port

void setup()
{
   pinMode(LED_BUILTIN, OUTPUT); // Set pin as OUTPUT
   Serial.begin(9600); // Start serial communication at 9600 bps
}

void loop()
{
   if (Serial.available())    // If data is available to read,
    {
     recData = Serial.read(); // read it and store it in val
    }

   if (recData == '1')        // If 1 was received
    {
     digitalWrite(LED_BUILTIN, HIGH);  // turn the LED on
    }
   else
    {
     digitalWrite(LED_BUILTIN, LOW);   // otherwise turn it off
    }

   delay(10); // Wait 10 milliseconds for next reading
}


