MEMS cvičenie 6: Rozdiel medzi revíziami
Z SensorWiki
d (→Schéma zapojenia) |
(→1. Schéma zapojenia) |
||
| Riadok 29: | Riadok 29: | ||
[[Súbor:i2c_breadboard.png|400px|center]] | [[Súbor:i2c_breadboard.png|400px|center]] | ||
| + | |||
| + | === 2. Device address === | ||
| + | |||
| + | [[Súbor:i2c_address.png|400px|center]] | ||
| + | |||
| + | === 3. Zápis === | ||
| + | |||
| + | [[Súbor:i2c_write.png|400px|center]] | ||
| + | |||
| + | === 2. Čítanie === | ||
| + | |||
| + | [[Súbor:i2c_read.png|400px|center]] | ||
=== Pomôcka k Serial Print === | === Pomôcka k Serial Print === | ||
Verzia zo dňa a času 10:02, 2. apríl 2016
Obsah
Oboznámenie so zbernicou i2c
Úlohy:
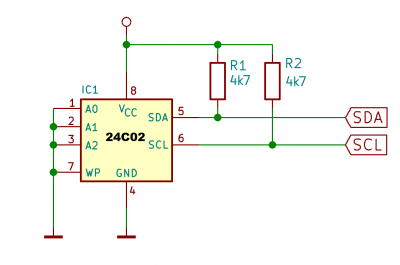
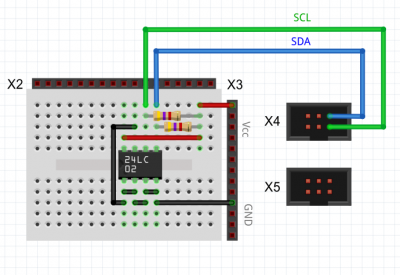
- Pripojte k procesoru pamäť podľa schémy zapojenia
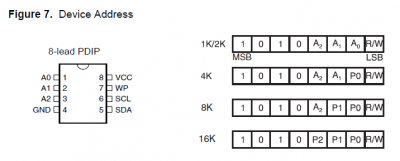
- Schému upravte tak, aby adresa zariadenia bola ??
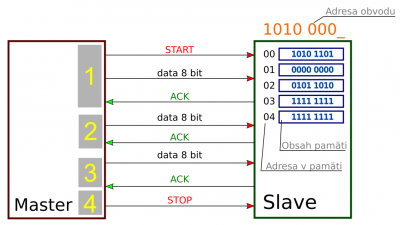
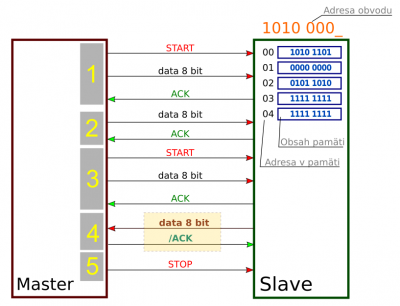
- Zapíšte na prvé pamäťové miesto (adresa 0x00) znak 'A'
- Prečítajte, či je znak správne zapísaný
- Prečítajte obsah celej pamäte a vypíšte ho na terminál.
Literatúra
- Official I2C Specification Version 6 http://www.nxp.com/documents/user_manual/UM10204.pdf
- Official List of assigned NXP / Philips I2C addresses http://www.diolan.com/downloads/i2c-address-allocation-table.pdf
- ---
- [ht-ps://www.arduino.cc/en/Reference/Wire Wire Library] Reference
- Serial Library - Print Reference
Datasheets
1. Schéma zapojenia
2. Device address
3. Zápis
2. Čítanie
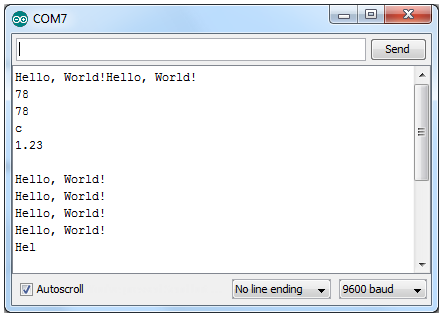
Pomôcka k Serial Print
void setup()
{
  byte c = 78;

  Serial.begin(9600);

  Serial.print("Hello, World!");
  Serial.println("Hello, World!");

  Serial.println(78);
  Serial.println(c);
  Serial.println('c');
  Serial.println(1.23456);
  Serial.println();
}

void loop()
{
  Serial.println("Hello, World!");
}
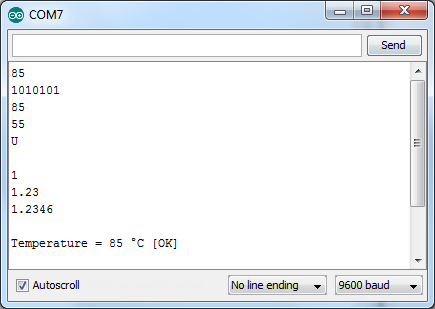
void setup()
{
  byte c = 85;      // c = 'U';

  Serial.begin(9600);

  Serial.println(c);
  Serial.println(c, BIN);
  Serial.println(c, DEC);
  Serial.println(c, HEX);
  Serial.println((char)c);

  Serial.println();

  Serial.println(1.23456, 0);
  Serial.println(1.23456, 2);
  Serial.println(1.23456, 4);

  Serial.println();

  Serial.print("Temperature = ");
  Serial.print(c);
  Serial.print(' ');
  Serial.write(176);
  Serial.println("C [OK]");
}

void setup()
{
}
