Acrob005: Rozdiel medzi revíziami
Z SensorWiki
(→Advanced example) |
(→Advanced example) |
||
| Riadok 41: | Riadok 41: | ||
<source lang="cpp"> | <source lang="cpp"> | ||
| − | |||
#define SPEAKER_Pin 4 | #define SPEAKER_Pin 4 | ||
| Riadok 49: | Riadok 48: | ||
int tempo = 300; | int tempo = 300; | ||
| − | void playTone(int tone, int duration) | + | void playTone(int tone, int duration) |
{ | { | ||
| − | for (long i = 0; i < duration * 1000L; i += tone * 2) | + | for (long i = 0; i < duration * 1000L; i += tone * 2) |
{ | { | ||
| − | digitalWrite( | + | digitalWrite(SPEAKER_Pin, HIGH); |
delayMicroseconds(tone); | delayMicroseconds(tone); | ||
| − | digitalWrite( | + | digitalWrite(SPEAKER_Pin, LOW); |
delayMicroseconds(tone); | delayMicroseconds(tone); | ||
} | } | ||
| Riadok 61: | Riadok 60: | ||
| − | void playNote(char note, int duration) | + | void playNote(char note, int duration) |
{ | { | ||
char names[] = { 'c', 'd', 'e', 'f', 'g', 'a', 'b', 'C' }; | char names[] = { 'c', 'd', 'e', 'f', 'g', 'a', 'b', 'C' }; | ||
| Riadok 76: | Riadok 75: | ||
| − | void setup() | + | void setup() |
{ | { | ||
| − | pinMode( | + | pinMode(SPEAKER_Pin, OUTPUT); |
} | } | ||
| − | void loop() | + | void loop() |
{ | { | ||
for (int i = 0; i < length; i++) { | for (int i = 0; i < length; i++) { | ||
| Riadok 92: | Riadok 91: | ||
// pause between notes | // pause between notes | ||
| − | delay(tempo / 2); | + | delay(tempo / 2); |
} | } | ||
} | } | ||
| + | |||
</source> | </source> | ||
[[Acrob004|< Previous]] | [[Acrob|Home]] | [[Acrob006|Next >]] | [[Acrob004|< Previous]] | [[Acrob|Home]] | [[Acrob006|Next >]] | ||
Verzia zo dňa a času 10:12, 12. jún 2010
Make Music
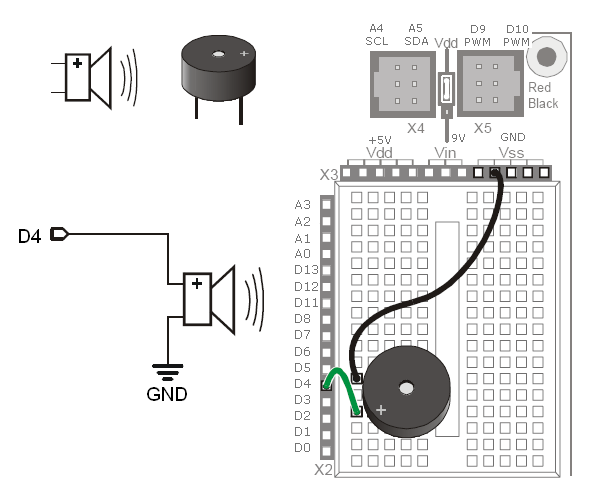
Speaker is a small electronic device which can make sounds if appropriate driven. Lets connect the speaker to the Arduino pin D4 (see schematic diagram and connection diagram below) and program it to make few tones.
#define SPEAKER 4  // Piezospeaker connected to pin 4

void setup()
{
// Example 1: tone of specified frequency and duration

  tone(SPEAKER, 4000, 1000);   // 4kHz, 1 sec.

  delay(500);     //small pause

  tone(SPEAKER, 3000);         // 2kHz, forever
  delay(1000);
  noTone(SPEAKER);             // turn off sound.
}

void loop()
{
  /* do nothing */
}
For more details about the tone command see the Reference
How it works
Why robot needs to play music?
Advanced example
Following example shows more sound effects. It comes from the http://www.arduino.cc/en/Tutorial/Melody with just one minor (but important) change: the pinnumber is 4, not 9.
#define SPEAKER_Pin 4

  int length = 15;                                              // the number of notes
char notes[] = "ccggaagffeeddc ";                               // a space represents a rest
 int beats[] = { 1, 1, 1, 1, 1, 1, 2, 1, 1, 1, 1, 1, 1, 2, 4 };
  int tempo = 300;

void playTone(int tone, int duration)
{
  for (long i = 0; i < duration * 1000L; i += tone * 2)
   {
     digitalWrite(SPEAKER_Pin, HIGH);
     delayMicroseconds(tone);
     digitalWrite(SPEAKER_Pin, LOW);
     delayMicroseconds(tone);
   }
}


void playNote(char note, int duration)
{
  char names[] = { 'c',  'd',  'e',  'f',  'g',  'a',  'b', 'C'  };
   int tones[] = { 1915, 1700, 1519, 1432, 1275, 1136, 1014, 956 };

  // play the tone corresponding to the note name
  for (int i = 0; i < 8; i++) {
    if (names[i] == note) {
      playTone(tones[i], duration);
    }
  }
}


void setup()
{
  pinMode(SPEAKER_Pin, OUTPUT);
}


void loop()
{
  for (int i = 0; i < length; i++) {
    if (notes[i] == ' ') {
      delay(beats[i] * tempo); // rest
    } else {
      playNote(notes[i], beats[i] * tempo);
    }

    // pause between notes
    delay(tempo / 2);
  }
}
< Previous | Home | Next >
