Acrob001: Rozdiel medzi revíziami
Zo stránky SensorWiki
Nová stránka: == 1. Úloha == Spustite vývojové prostredie kliknutím na ikonu Obrázok:ArduinoIcon.png. Najprv spravte základné nastavenia - t.j. typ riadiacej jednotky s ktorou budeme ... |
Bez shrnutí editace |
||
| (2 medziľahlé úpravy od rovnakého používateľa nie sú zobrazené.) | |||
| Riadok 1: | Riadok 1: | ||
== | ___NOTOC___ | ||
== '''Before You start''' == | |||
=== Download === | |||
Just download the latest version of the Arduino IDE from the http://arduino.cc | |||
=== Install === | |||
No install. Just unzip the installation package. | |||
Then, FTDI USB driver may be neccesary to install. Plug in Your hardware and when Windows ask for driver, go to the Arduino | |||
/drivers directory. For some hardware configurations it may be necessary to change default configuration according this | |||
manual: | |||
Go into the device manager (Windows 7) and highlight the FTDI device (a virtual COM port). | |||
Then went to Properties -> Port settings -> Advanced. | |||
Then check off the box "Set Rts on close". | |||
=== Setup === | |||
The Arduino integrated development environment (IDE) is run using the icon [[Obrázok:ArduinoIcon.png]] on Your desktop. | |||
First You have to perform the basic settings: the type of Your board and serial port to which is it connected. | |||
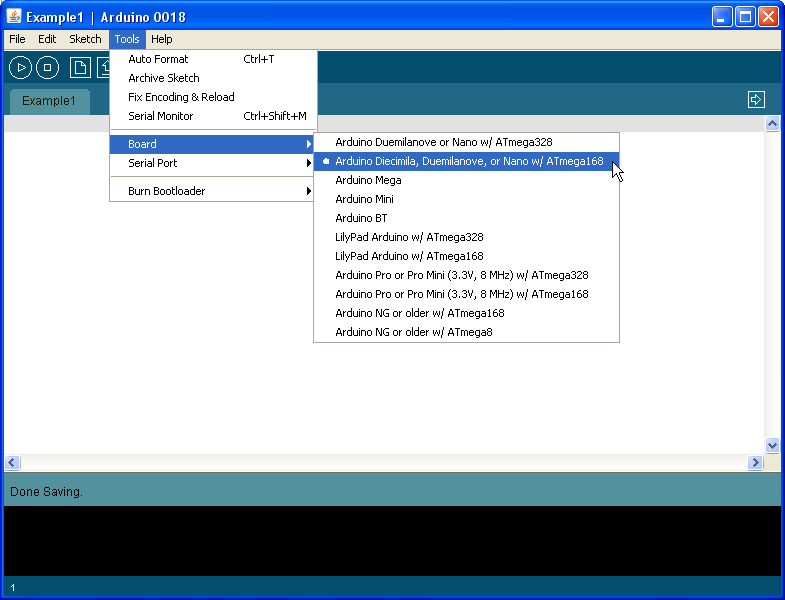
Go to the menu and select Tools -> Board -> Arduino Diecimila, Duemilanove or Nano w/ Atmega168. | |||
This is the type of the board we will use. | |||
[[Obrázok:ArduinoBoardSetting01.png|center]] | |||
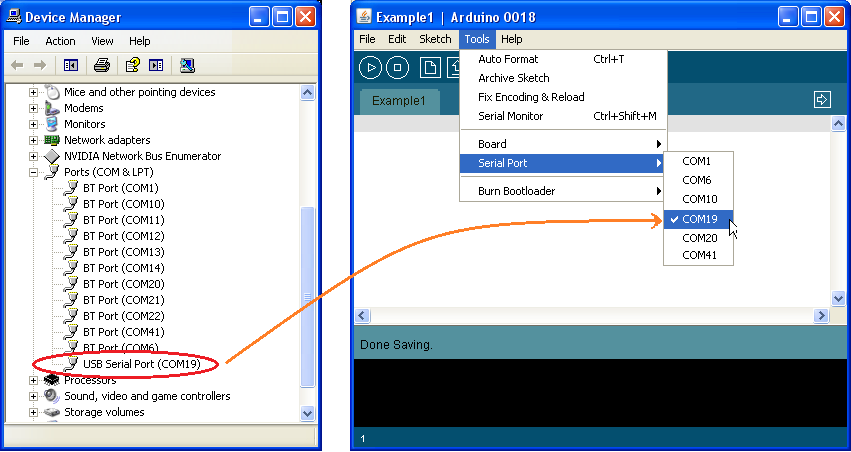
Then, again from the main menu select Tools -> Ports -> COMx where x is a number of Your serial port to which is the board connected. | |||
This port is used for communication, sending and receiving messages and also for program download using special firmware ''bootloader''. | |||
We use the USB/Serial converter, so it is necessary to know, which number is given by the operating system Windows | |||
[[Obrázok:ArduinoPortSetting01.png|center]] | |||
You are ready for Your first programm! | |||
[[Acrob| | [[Acrob|Home]] | [[Acrob002|Next >]] | ||
Aktuálna revízia z 08:40, 13. jún 2010
__
Before You start
Download
Just download the latest version of the Arduino IDE from the http://arduino.cc
Install
No install. Just unzip the installation package.
Then, FTDI USB driver may be neccesary to install. Plug in Your hardware and when Windows ask for driver, go to the Arduino /drivers directory. For some hardware configurations it may be necessary to change default configuration according this manual: Go into the device manager (Windows 7) and highlight the FTDI device (a virtual COM port). Then went to Properties -> Port settings -> Advanced. Then check off the box "Set Rts on close".
Setup
The Arduino integrated development environment (IDE) is run using the icon ![]() on Your desktop.
on Your desktop.
First You have to perform the basic settings: the type of Your board and serial port to which is it connected.
Go to the menu and select Tools -> Board -> Arduino Diecimila, Duemilanove or Nano w/ Atmega168.
This is the type of the board we will use.

Then, again from the main menu select Tools -> Ports -> COMx where x is a number of Your serial port to which is the board connected. This port is used for communication, sending and receiving messages and also for program download using special firmware bootloader. We use the USB/Serial converter, so it is necessary to know, which number is given by the operating system Windows

You are ready for Your first programm!